Sometimes, even on home computers, there is a need to solve the problem of how to add a user to Windows 10. This can be done using several basic options. Many people immediately have a question about why this is necessary. The answer is simple: you can create several accounts with limited rights for your family members so that they cannot change the system settings or harm it. And what can we say about office computers, which can employ two or more clerks?
How to add a user to Windows 10: method one
The main method is to use Windows settings (the second “Control Panel”). This section can be accessed through standard menu“Start”, but in a simplified version it is better to use the shortcut Win + I.
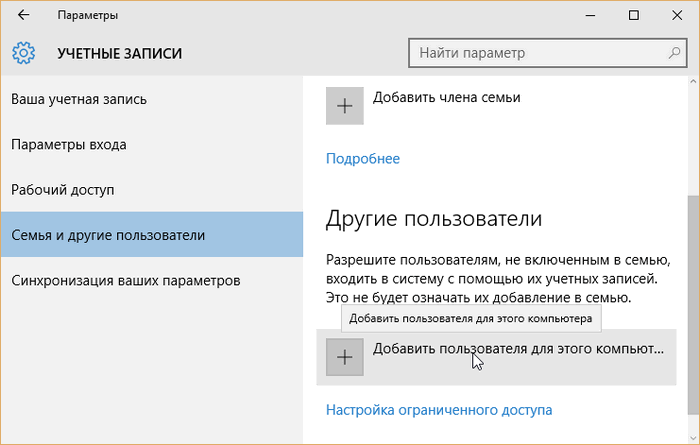
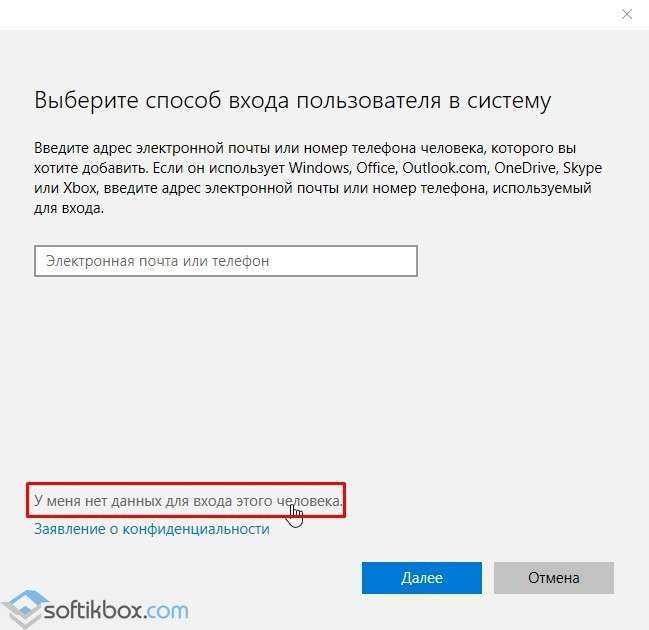
Here you select the accounts section, after which you go to the family and other users menu, located in the column on the left. On the right side of the window, you need to select the other users section and click the add new user button, indicated by a plus. Next you will be prompted to enter your address. Email or telephone. However, in Windows 10 you can add a local user without this. You just need to click on the link below (you don't have any data). This will be useful if you do not plan to create a Microsoft “account” at all.
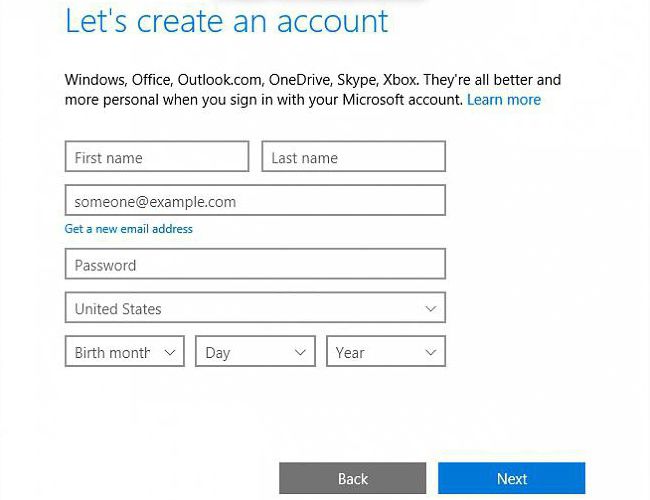
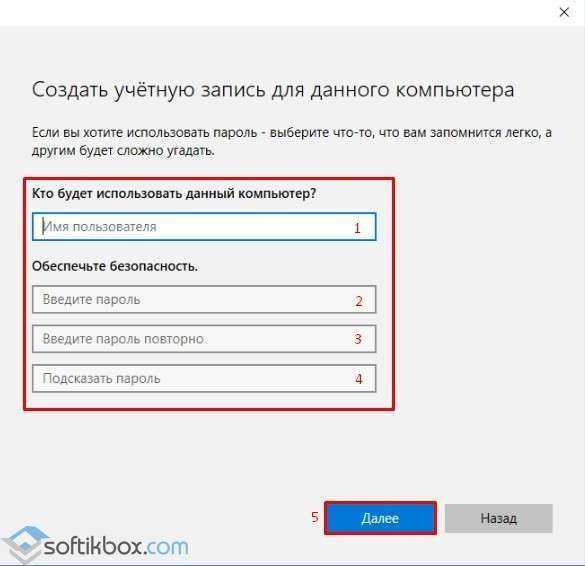
The next window will prompt you to create it. Again, in the question of how to add a user in Windows 10, the add line is used without such registration. Finally, all that remains is to indicate the name of the new user, create a password to ensure security and enter a hint for cases when it may be lost or forgotten. It’s worth noting right away that the new registration will correspond to the so-called regular user, that is, he will not have administrative rights to change system settings.
How to add a new user to Windows 10: method two
In principle, you can use the standard scheme that was used in earlier versions of Windows. This method is to first open the Control Panel (the easiest way is to enter control in the Run menu).

Here you need to go to the accounts section, select managing another account, and then simply click on the link to add a new user. After this, you will be redirected to the options menu, which was discussed above. So to perform such procedures, you can use both methods (whichever is more convenient).
Using the Command Line
The problem of how to add a user to Windows 10 can be solved by an equally effective method, which involves using command line. However, it must be launched as an administrator (either cmd in the “Run” console, or through the RMB menu for the “Start” button, or by opening the cmd.exe file through RMB in the System32 directory).

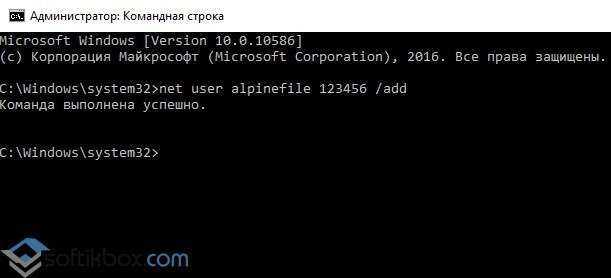
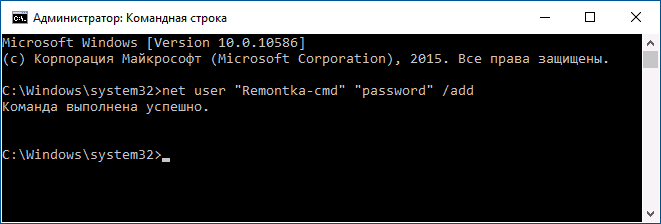
The command to add a user with a password looks something like this: net user NAME PASSWORD /add, where NAME is the name of the new user, and PASSWORD is the password (these values are set arbitrarily). After this, the enter key is pressed, and the new user will appear in the list of system users, but again without having administrator rights.
Adding a user to a group
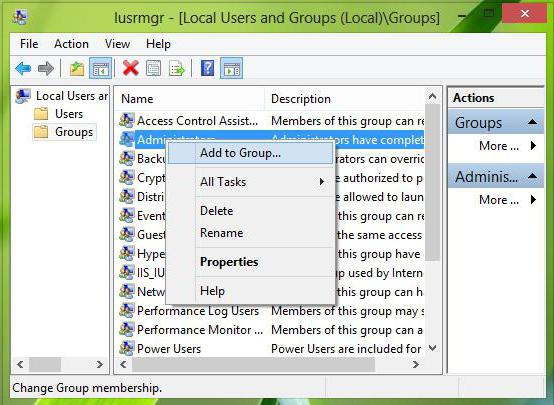
Now let's see how to add a user to a group (for example, administrator) in Windows 10. To do this, you first need to launch this system tool by entering the combination lusrmgr.msc in the Run console (Win + R). First, the user folder is selected, and the center field in the right-click menu uses the add new user line. Next, enter the required information and click the create button. After this, the group membership section is selected, the line for adding a registration record is selected via RMB and the desired group is indicated (for example, “Administrators”).
Assignment of rights
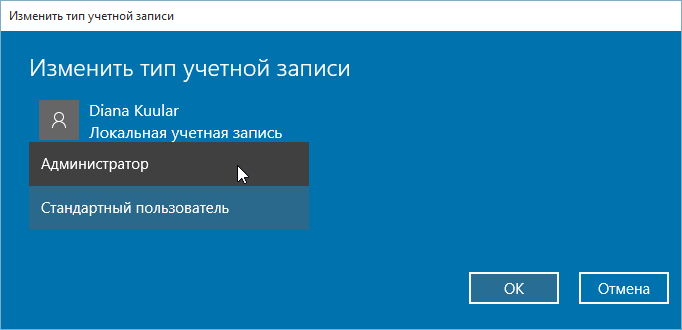
Since the new user, after registration, has, so to speak, bird rights, they can be expanded by changing the registration type to administrator. One method has already been discussed (group membership), but you can do it differently. After creating a user in the settings section, you just need to go to the other users menu and click on change type account. “Administrator” is selected from the list, after which the changes are saved. Again, access to changing these parameters can be done through the regular “Control Panel”.
When performing operations to add a new user from the command line, you can also assign such rights. To do this, use the command net localgroup Administrators NAME /add, where NAME is the name of the new user.
Conclusion
That, in fact, is all that concerns the creation new registration For Windows systems 10. It is difficult to say which of the above methods is better. Here everyone chooses what is more convenient for him to work with, although in terms of efficiency and the results obtained, they are all absolutely equivalent to each other. However, based on practical considerations, when you need to simultaneously add a user and give him administrative rights, the easiest way is to use command console. At least it will take much less time than traveling through various sections and menus.
Like almost all previous versions of Windows, it is a multi-user OS. This means that one Windows 10 PC can be used by multiple users, each user having their own desktop settings, user profiles, etc. Windows 10 also has three types of user accounts (Administrator, Standard, and Children), providing varying degrees of rights and control over the OS to users.
However, when it comes to adding new users to Windows 10 (especially compared to older versions of Windows like Vista and Win7, although the process is largely similar to Windows 8), things are a little different.
How to add a new user on Windows 10?
Adding a new user to Windows 10 is quite easy, you just need to dig a little into your PC settings. So:
Step 1: Run application N PC settings, select Users and accounts in the left panel.
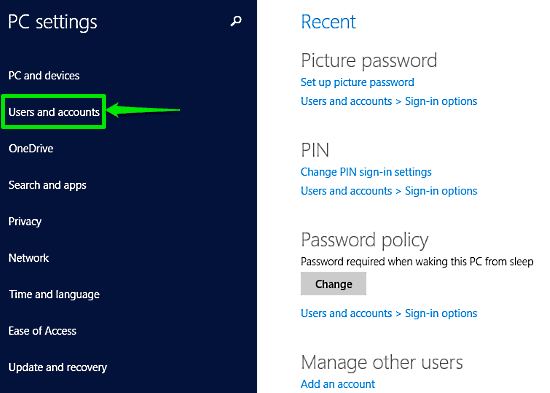
Step 2: Next select Other users in the left column. You will now see some user management options in the right box. D To get started press Add user.

Step 3: Now you are presented with the account creation screen. Here you can choose whether to link the new user's account to an existing Microsoft account (required to sync apps, settings, etc. in various systems), or create it as a local account. Click Further, how ahead of you Withby choice.

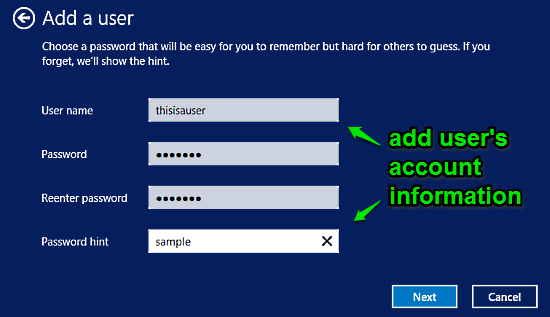
Step 4: The next step requires you to provide credentials (username, password, etc.) for the new user account. Enter information and click Further to complete the settings.
Step 5: All! You've just added a new user to Windows 10. As an administrator, you can always control and change important settings related to standard accounts and children. IN any time m You can change the account type (administrator, standard or child).
Conclusion
Windows 10 has a changed but much easier way to add new users. You can easily add and manage multiple user accounts, change account types, and more.
You create a new account during the installation process. But what if you want to add additional local accounts? Read on and we'll show you how to do it.
Why do this?
Millions of Windows users never create additional accounts on their computers, but use their primary accounts with administrative privileges. As practice shows, this is not safe, and users would need to get rid of this habit, or are too lazy to create new account, as you please.
Creating a secondary, non-administrator account for yourself and additional accounts for your children (to prevent dubious downloads from malicious sites from infecting your computer) is a great idea and one of the important things that will significantly increase the security of your machine.
You may prefer the online and synchronized features of an online account. Microsoft records, but we found a lot of benefits to having a local account without all the online bells and whistles and potential privacy issues. The standard local account is great for people who don't want to link their personal information to Microsoft, and it's also ideal for kids who don't need the extras (and may not even have an email address to associate with the account).
Let's take a look at the process of creating a secondary account in Windows 10.
How to create a new local user account in Windows 10
The first step is to access the Accounts menu. To do this, click on the search icon to the right of the Start menu and type “Accounts.”
Select "Add, change, or remove other users" from the search results. Clicking on it will open the Accounts menu as shown in the screenshot below. Alternatively, you can go to Start -> Settings -> Accounts, then select "Family and other users" to get to the same menu.
Select "Add a user for this computer." Microsoft has made it so that during the process of creating an account, you will be strongly pushed towards an online account instead of a local one. So, let's be careful.

Ignore the prompt to provide an email or phone number. Instead, click the link at the bottom of the window: “The user I want to add does not have an email address.”
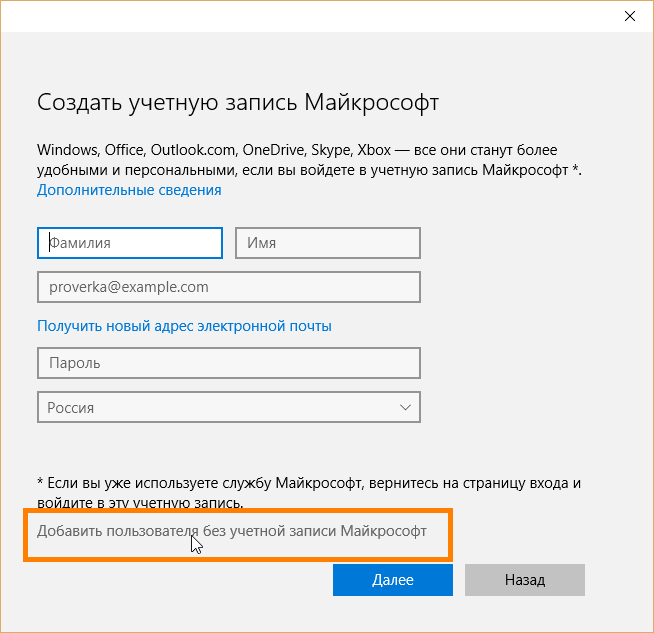
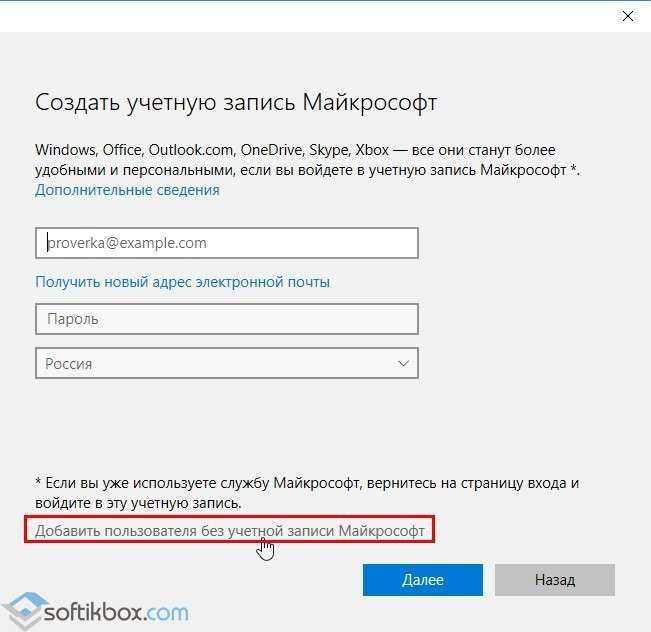
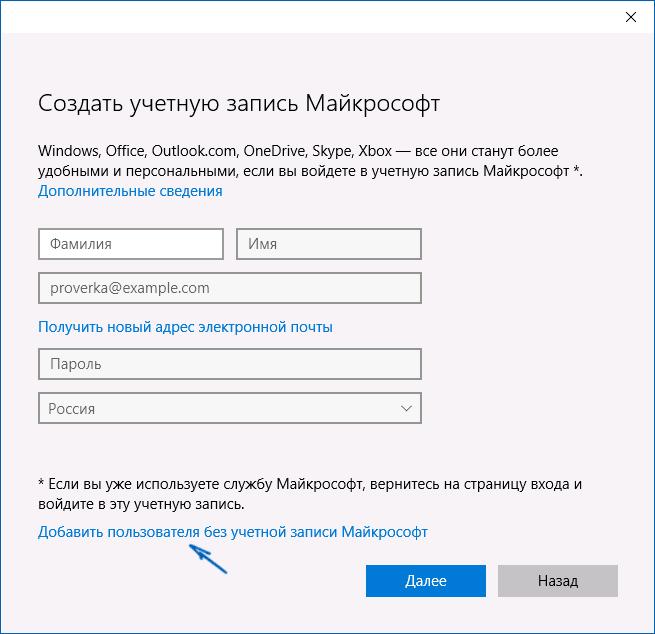
Since we don’t have an email address, Windows will prompt us to create an online account. Logical. But as we already said, Microsoft is quite insistent that we create an online account instead of a local one, and suggests creating a new email address through @outlook.com. But ignore this information and click on the link below “Add a user without a Microsoft account.”

If anyone remembers, in Windows, ten years ago, the account creation screen looked very simple: just a username and password and nothing extra. But now, as we see, everything is different... Enter your username and password and click the “Next” button.
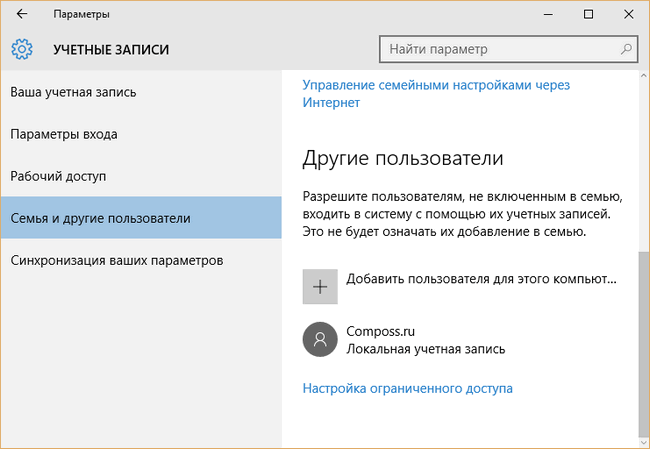
After clicking the Next button, you will be redirected back to the account settings screen, and now you can see your new account. By default, the local account is set to limited rights(no ability to install applications or make administrative changes to the machine).
If you have a compelling reason to change your account type to one with administrative privileges, click on the account, select Change Account Type, and set it to Administrator.
You can also select "Delete" to delete an account that is no longer needed. If you need to make more changes (for example, child accounts or parental control) be sure to check it out for a more detailed look.
Many PC users often share their gadget with other users. Because of this, conflicts arise. Someone accidentally deleted the file, installed unnecessary program or performed some action that led to a system failure. To avoid such problems, you should add a new user to your PC in Windows 10. Let’s look at all the existing methods on how to do this.
Creating a new user in Windows 10 through the Settings section
The easiest way to add a user to Windows 10 is to use the options in the Settings section. In order to add another account on Windows 10, you should do the following:
- Click “Start”, “Settings” and select the “Accounts” section.
- In the menu on the left, select the “Family and other people” section. Click “Add a user for this computer.”
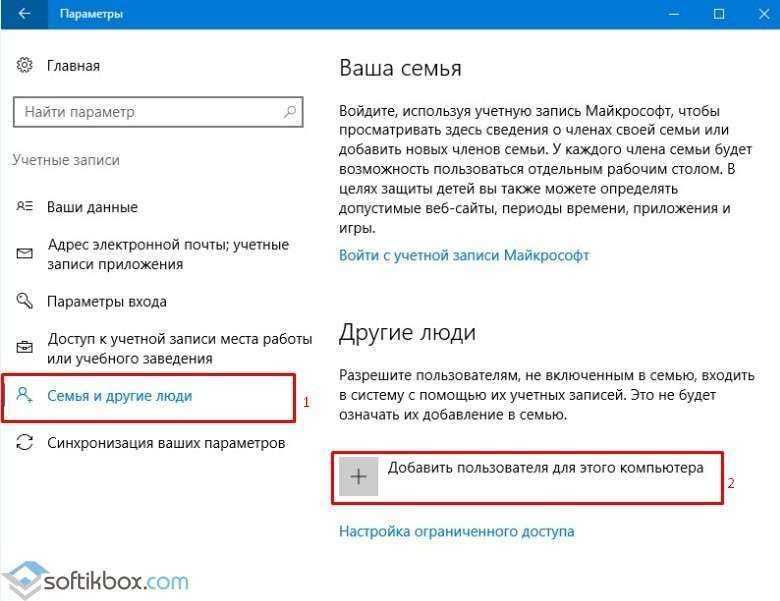
- A new window will appear. The system will ask you to enter the user's name or phone number. If you want to create a new user in Windows 10 without specifying that the account belongs to a specific person, you should click “I don’t have this person’s login information.”
- A new window will appear again. Click “Add a user without a Microsoft account.”
- Next, you need to come up with a new user name and enter a password and password hint.
The creation of the new local user account is complete.
Creating a new account via Command Line
The second way to create a new user in Windows 10 is to use the command line. To do this you need to do the following:
- Click right click mouse on the “Start” icon and select “Command Prompt (Admin)”.

- The console will launch. You need to enter the following command “net user Username Password /add”, where “Username” is the name of the new account, and the password is a combination of numbers. In an example it looks like this.
![]()
- Press “Enter” to add a new user.
- Now, when you log in, you can select a different user.
Using Local Group to Add a New User in Windows 10
You can create accounts for users of one PC not only using the above methods, but also using the “Local groups and users” section.
- Press “Win+R” and enter “lusrmgr.msc”.

- A new window will open. Select the “Users” section. Right-click on an empty space and select “New User”.

- A small window will appear. Enter the new username, password and confirm the password.

User added. You can log in with a new account in a standard way.
Adding a new user using the Run command
The last method for Windows 10 to get an account is to run the “control userpasswords2” command in the Run window.

The User Accounts section will appear. Click on the “Add” button.
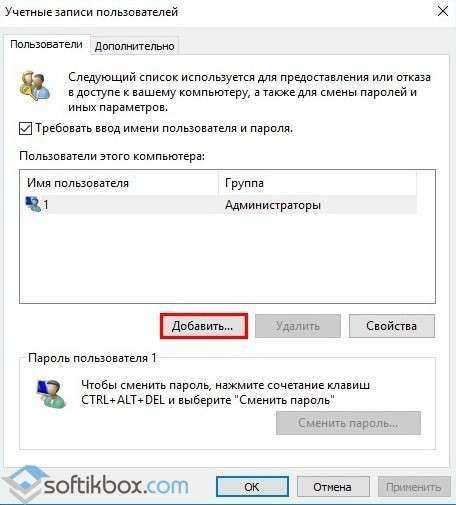
A window for creating a new account will open, the same as in the method above (Creation through the Settings section). Enter all the data and follow the instructions. New entry will be created.
To learn how to add a new user in Windows 10, watch the video:
This instruction for beginners shows how to create a new Windows 10 user in several ways, how to make him an administrator or vice versa, create a limited user account on a computer or laptop.
There are two types of accounts in Windows 10 - Microsoft accounts (which require an email address and sync settings online) and local user accounts, which are no different from the ones you may be familiar with in the early days. Windows versions. However, one account can always be “transformed” into another. This article will cover creating users with both types of accounts.
Creating a user in Windows 10 settings
The main way to create a new user in Windows 10 is to use the “Accounts” item in the new settings interface, available in “Start” - “Settings”.
In the specified settings item, open the “Family and other users” section.
Under Other Users, click Add a user for this computer. The next window will ask you to provide an email address or phone number.
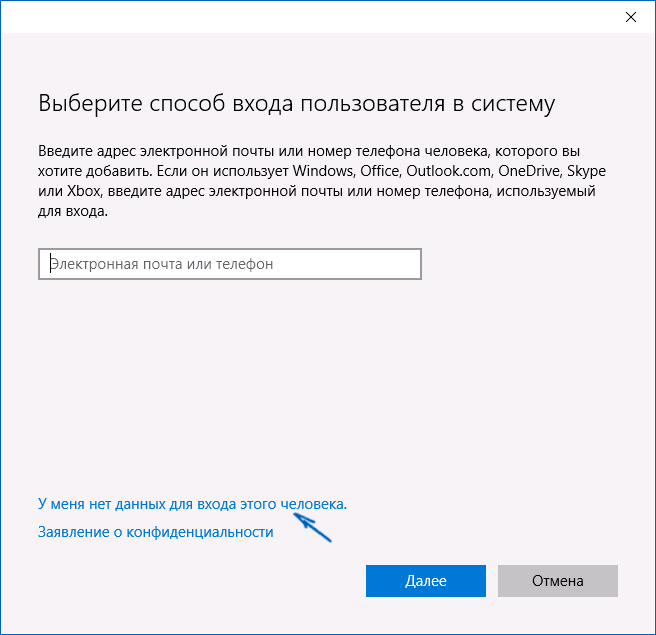
If you're planning to create a local account (or even a Microsoft account, but haven't registered an email for it yet), click "I don't have this person's sign-in information" at the bottom of the window.
The next window will ask you to create a Microsoft account. You can fill out all the fields to create a user with such an account, or click "Add a user without a Microsoft account" at the bottom.
In the next window, you will have to enter your username, password and password hint so that the new Windows user 10 appeared in the system and it was possible to log in using his account.

By default, the new user has the rights " regular user" If you need to make him a computer administrator, follow these steps (you must also be an administrator to do this):
You can sign in as a new user by clicking on the current user's name at the top of the start menu or from the lock screen after logging out of your current account.

How to create a new user on the command line
To create a user using the command line Windows strings 10, run it as an administrator (for example, through the right-click menu on the “Start” button), then enter the command (if the username or password contains spaces, use quotes):
net user username password /add
And press Enter.
After successful execution of the command, a new user will appear in the system. You can also make him an administrator using the following command (if the command didn't work and you don't have Windows license 10, try writing administrators instead of Administrators):
net localgroup Administrators username /add
The newly created user will have a local account on the computer.
Create a user in Local Users and Groups Windows 10
And one more way to create a local account using the Local Users and Groups control:
To make the created user an administrator, right-click on his name and select “Properties”.
Then, on the Group Membership tab, click the Add button, type Administrators, and click OK.
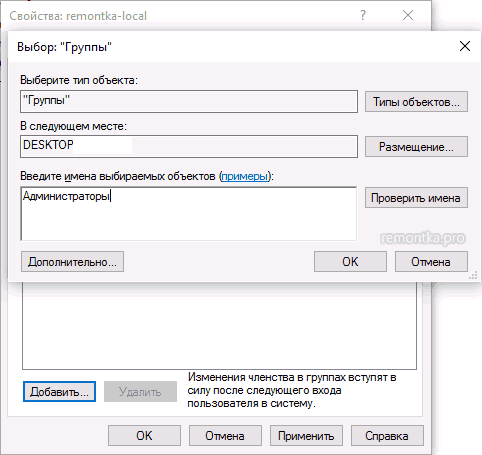
Done, now the selected Windows 10 user will have administrator rights.
If you have any questions or something doesn’t work out as simply as described in the instructions, write to me, I’ll try to help.