Before you download Windows 7 for free via torrent, you need to decide which version of Windows 7 is right for you. Regardless of whether the installation will be carried out on a computer or laptop, the main criteria for choosing a version are the number random access memory and processor characteristics. There are two types of operating systems among the seven, these are Windows 7 64 bit or and Windows 7 32 bit or. It is recommended to install the 64-bit version of Windows 7 on a device with RAM of 3 GB or more. For example, the 32-bit version of Windows 7 simply will not see more than 3 GB of RAM, although even if there is 8 GB, the x86 system will only show 3 gigs. It is not recommended to install the sixty-four-bit version of Windows on weak hardware, for example, less than 2 GB of RAM or a single-core processor, since the system will be loaded by default and will slow down or malfunction during operation.
Download free version Windows 7 torrent is available on our website for original images and clean assemblies. The bit depth is more or less clear, now let’s talk about the Windows 7 versions. Microsoft has released 4 versions of its line of operating systems (windows seven) that are worth talking about. Since our resource is designed for a Russian-speaking user, you most likely need Windows 7 download free Russian version, if necessary, everyone can change the interface language of their Windows, you just go to the update section and check the box for the desired language pack, then update and that’s it, you can English, German Windows 7 or even Chinese, you don’t need to reinstall the system for this.
Maximum version of Windows 7 64 free download- this version has everything possible, ideal for an advanced user who works in a team, for corporate purposes, with clouds of information and is sensitive to the security of his information.
Professional version download windows 7 for free in Russian- this is the choice of professionals who know what this version is for, an ideal balance of performance and capabilities, suitable for advanced gamers, support for multiple monitors, group activities and many interesting goodies.
Home extended version download windows 7 to your computer for free- this version is ideal for non-confused users, there is nothing superfluous and in functionality it is not much different from the maximum version and in some ways it has more than the professional version Windows version 7. An ideal option for those who like to stick to YouTube and go racing, so that it doesn’t slow down and errors don’t pop up about the conflict of some incomprehensible services.
Home basic version of Windows 7 in Russian free download- this version is considered the lightest of the windows7 series, most often it is installed on laptops or weak computer. Nothing superfluous, despite the fact that everything you need is there to the average user, watch videos, listen to music, work with text, surf the Internet, in general, here you can do everything within the needs of 98% of all PC users.
All versions of operating systems are original images of Windows 7 with updates 2017 SP1 from microsoft, all in Russian and with a built-in activator.
Below are the programs that you will need to ultimately download the torrent from the iso image and correctly install Windows 7 on your computer or laptop.
Windows 7 free download windows 7 64 torrent on your computer and laptop - bookmark this page and share with your friends, you and your friends will always have access to the original and latest versions of the seven and more.
Installation process for this operating system is not fundamentally different from the installation process of other Windows operating systems.
To install this operating system you will need an installation disk Microsoft Windows 7 Ultimate. You can either buy it or download a disk image from the Internet for free and burn it to a physical disk. Images can be found on torrent trackers. If you cannot find the image, leave a message on our page and we will help you.
ATTENTION! If file copying errors occur during installation, your disc is damaged or your CD drive cannot read it properly. Do not use scratched or stained discs. If you still don’t have another disk, try wiping it thoroughly with a cotton swab and alcohol and wiping it dry with a soft cloth - sometimes it helps.
1) First, as usual, you need to configure BIOS to boot from a CD drive. To do this, turn on the computer and as soon as white inscriptions on a black background begin to appear on the screen, press the button on the keyboard Delete (in some cases, for example on computers from ASUS, you need to press the F2 button instead of Delete). A blue (or gray) BIOS setup screen will appear on the monitor. Insert the Windows 7 installation disc into your CD drive. Further point by point.
1.1) First for those who have blue. (For those who have gray, read paragraph 1.2 below) Control is done from the keyboard using the up and down buttons.
We need the line “Advanced BIOS features”. Select it and press Enter. We see the following:

Find the line First Boot Device(Translated as First boot device). Opposite this line is usually either Floppy, or HDD(HDD-0). Our task is to establish there CDROM. To do this, use the arrows to highlight the line and click Enter. A list of boot devices will appear, from which you need to select the item using the down or up arrows CDROM and press Enter. It will look something like the picture above. In this way, we will tell the computer to boot from the CD drive rather than from the hard drive when the computer is turned on. Now press the key F10 from the keyboard, a confirmation window will appear. Press the letter igrek Y then Enter. The computer will restart.
1.2)
Now for those who have a gray BIOS. (Whoever has blue, skip this point and go to point 2).
After turning on the computer and clicking Delete You will see something like this screen:

You can move through the menu using the arrows right, left, down, up. Use the right arrow to select the item Boot upstairs. And use the down arrow to select the item Boot Device Priority. Press the button Enter and choose CD/DVD-ROM. Click F10 on the keyboard, then Enter. The computer will restart.
2) So, after setting up the BIOS, the computer starts to reboot. Now we don’t yawn and follow the white inscriptions on the screen. As soon as the inscriptions begin to appear on the screen, wait for the inscription “ PRESS ANY KEY TO BOOT FROM CD… "(Translation: press any key to boot from CD), it only appears for 3 seconds, so don't sleep. As soon as it appears, click Enter. The download will start from installation disk. If you overslept and did not have time to press Enter, turn off the computer and turn it on again, wait for the inscription, press Enter.
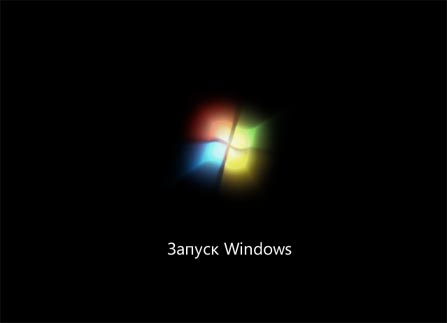
3) After pressing Enter, booting from disk begins Windows installations 7. First we will see the inscription "" on a black background and a scale. Then a beautiful interface will load, and for a few seconds we will see the inscription " Running the installer..."on a blue background.

We wait until we see the following:
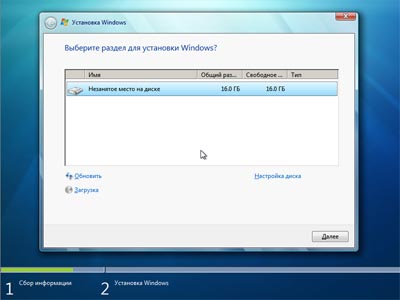
Will be shown here hard disks and other storage media on which you can install Windows. In our case, we have one 16 Gb hard drive. If you have several hard drives, select the one on which you want to install Windows 7.
Here you can also configure the disks before installation. You can format partitions (when formatting a partition, all information on the partition is erased), delete partitions, and create new ones. To do this, select the desired section from the list with the mouse and click on " Disk setup".
After selecting the desired section, click Further. The installation process will begin.
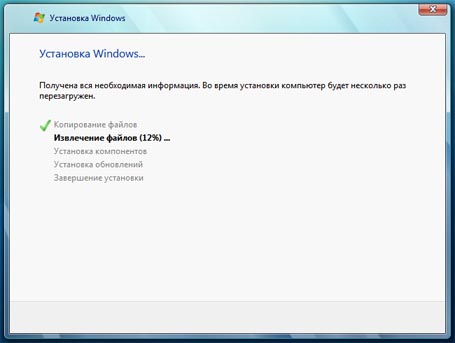
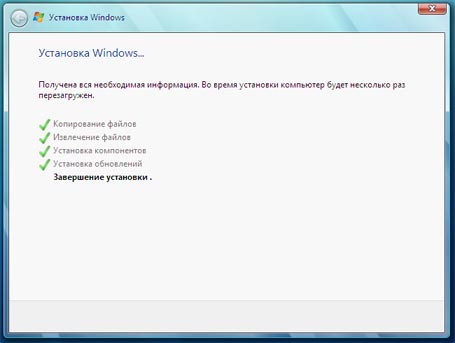
You can see the progress of the installation process on the screen. After completing these steps, the computer will restart. If everything went well, when you turn it on you will see the following screen:
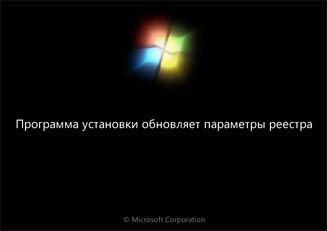
Then the final stage of installing Windows 7 will begin.
After which the computer will reboot again and the new operating system will start launching.
At the first launch, an automatic performance check and equipment configuration will be performed. And now Windows 7 Ultimate welcomes us.

Desktop showing:
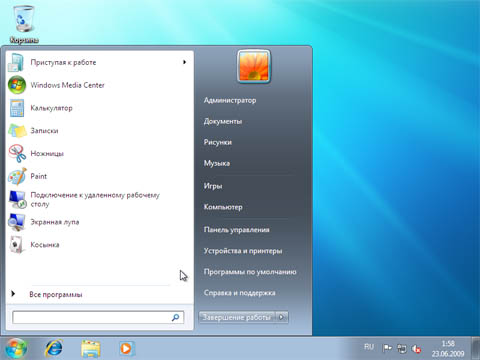
Congratulations! On this Microsoft installation Windows 7 Ultimate is finished. Master new system! ;)
Please leave only your feedback and suggestions in the comments. Please ask any questions you have on our website.
All content on the site is protected by copyright law.
When using any materials from our website, be sure to provide an active link to the source site.
All articles are advisory in nature and do not constitute an incentive to take any action. The author of the article and the site administration are not responsible for any damage caused to the equipment due to user actions based on the above materials. If you are not sure of your actions, seek help from specialists.
A few words about reinstalling Windows 7
Hello!
It is no secret that one of the main sources of income for computer services and “geeks” is the notorious system reinstallation. Now you can save a lot on this by simply doing everything the same way as in this article.
You can independently install or reinstall Windows 7 on your computer, laptop or netbook. I tried to explain each step as clearly as possible and provide several options for the development of events.
In fact, everything is quite simple, but for clarity, I divided the process into several steps, and not all steps are required for everyone. At the same time, the points can be completed in several ways, depending on what suits you best. The methods are in order of preference, from my point of view. That is, if the first method worked, then we don’t waste our time on the others.
In short, the whole process looks like this: first download Windows image 7 from the Internet (the image is a copy of the real Windows disk 7) and is written to your DVD or flash drive. You can take a ready-made disc, for example from a friend. Hereinafter in the text, a flash drive also means a memory card or external HDD.
Then the computer is set to boot from a DVD or from a flash drive and the installation process begins, which is similar to installing one large program. At the end, we still have to install device drivers (we'll check if it's required).
If you already have a Windows 7 installation disk, then go straight to .
If you bought a new HDD or SSD, then you can simply.
Search Windows 7 on the Internet
I must immediately warn you that use is not licensed Windows not legal, but, nevertheless, few people use the licensed version at home.
Watch the video on how to find a suitable Windows 7 image on the Internet for free
If you have 4GB of RAM or more, then download the x64 version of Windows 7, otherwise, take the x86 version. Read more in the article about that. From the editions, I advise you to choose “Ultimate”, but not lower than “Home Extended”. I also advise you to download only original images, and not various assemblies, although there are normal options among them.
Here are a couple of sites where you can find something good:
Some sites may offer to download Windows from file hosting services, for example, letitbit, depositfiles, vipfiles and others. This doesn't make sense, because... Without Gold access, it will take a very long time to download from file hosting services. Also, don’t be fooled by paid “high speed” downloads.
Burning an image to a DVD (if installing from a disk)
You cannot simply copy the downloaded file with the “.iso” extension onto a disk or flash drive; for this we will need a special program.
To burn the image to disc, you will need a blank DVD-R or a rewritable DVD-RW disc. CD-R/RW discs will not work because... there is not enough space for them.
Watch the video tutorial on how to burn an image to disk using free program Ashampoo Burning Studio 6 Free
See how to prepare a USB flash drive using the HP Format Tool
When using an external hard drive, instead of a flash drive, no special formatting required!
The second way to prepare a flash drive using the RMPrepUSB program
Booting the computer from the installation disk or flash drive
To boot from a newly made bootable DVD or flash drive, you need to “explain” to the computer that it needs to boot from him/her, and not from the hard drive.
Your computer may already boot from the recorded device, check this. Those. insert the disk or flash drive and restart the computer. If it starts loading from there, then go to .
For a better understanding, let me explain how a computer or laptop boots. In general, when the computer turns on, it looks at its settings in the so-called BIOS - a program that controls the inclusion and initial setup. The BIOS records which device it should boot from: hard drive, CD/DVD-ROM, flash drive, etc. So we need to set it so that the computer boots from installation DVD or from a flash drive.
There are many types of computers, but they all set it approximately the same. I made several videos for you from different computers. If you watched the entire video, but your situation is a little different, then still using the information received you can easily figure out how to enter the BIOS and set the desired boot device in your case.
There are three main types of BIOS interfaces: Award BIOS (Award-Phoenix BIOS), AMI BIOS and UEFI.
Award bioses mostly come with blue windows, AMIs with gray-blue ones, and UEFIs with beautiful graphical interface(and it’s not a BIOS at all, but out of inertia they call it that, but that doesn’t matter).
In order to enter the BIOS, you need to press one button when the computer starts. BUT WHAT BUTTON? Please note that as soon as the computer turns on, some information is displayed on a black background and at the bottom you are prompted to press one or more keys. One of them is entering the BIOS.
For Award BIOSes, this is usually the Delete (Del) key, and for AMIs it is the F2 or F10 key. At the bottom of the screen it will say something like this “Press Del to enter Setup”. Setup is the same as BIOS.
You must press quickly and several times (just in case), otherwise the computer will continue to boot. If you didn’t have time, just reboot it again using the “Reset” button on system unit or using the key combination “Ctrl+Alt+Del”.
If, when you turn on the computer, the screen saver fills the entire screen, but nothing is visible behind it, then try pressing the “ESC” key to hide the screen saver and read the information from the screen on how to enter the BIOS. Also, which button to press can be found in the manual for motherboard computer.
Watch the video on how to enter BIOS Award and set the boot device
An older version of BIOS Award
Watch the video about BIOS AMI
more about AMI
On Lenovo laptops
In all modern computers You can boot from the desired boot device without changing BIOS settings. To do this, you need to carefully look at which buttons are asked to press when the system starts. There you may be prompted to call up the boot menu. Then it will say “Press F9 for Boot Menu ", For example.
The boot menu button may vary. For Award BIOSes it is usually “F9”, and for AMIs it can be “F12”. Example for Bios Award I showed above in the corresponding videos.
See how to select a boot device on a Lenovo laptop
If you have a computer with UEFI, then when you get into the BIOS you will see the following picture:
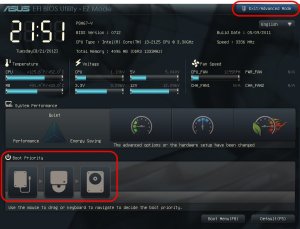
At the bottom of the screen there is a “Boot Priority” section, where you can use the mouse to set the desired boot order.
You can also click on the right top corner button “Exit/Advanced mode” and select “Advanced mode” in the window that appears. Next, go to the “Boot” tab and in the “Boot Option Priorities” section in the “Boot Option #1” field, set the default boot device to a flash drive, DVD-ROM, hard drive or other available device.
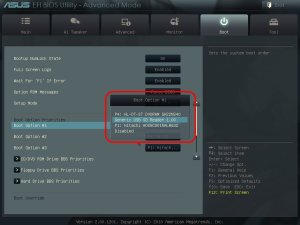
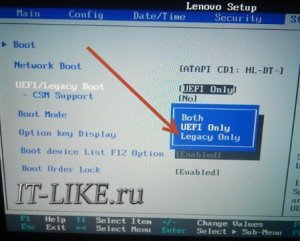
If your computer or laptop does not want to boot from your image, then on the “Startup” tab, set the “UEFI/Legacy Boot” value to the “Legacy Only” position
Owners of Hewlett-Packard computers will probably find the following picture in the BIOS:

Select the device you want, press Enter, then move it to the top and press Enter again. Save the settings in the “File -> Save and Exit” menu.
Installing Windows 7 on a computer
After booting from the installation disk or flash drive, the installation itself begins. Watch a video tutorial on how to install Windows 7 on a computer or laptop
Installation is almost no different from reinstallation. Only if Windows is installed on new computer, then during the process you need to create partitions on the hard drive in the “unallocated area”, and when reinstalling, simply format the existing one system partition, having previously copied important data from it to another location (if any).
Windows 7 activation
After installation, Windows must be activated, otherwise the system will only work for 30 days. Owners of the licensed version perform activation using the built-in wizard (via the Internet or by phone). Unlicensed Windows versions 7 are activated with special programs. I warn you that this is not legal, so for informational purposes only. I recommend purchasing it and not having problems with activation.
I show the most universal method activation using the RemoveWAT program. If possible, activate by following the instructions included on the image torrent download page. Also keep in mind that illegal activation does not guarantee stable operation of the system.
Watch the video on how to activate using the RemoveWAT program
The RemoveWAT program is searched and downloaded from the Internet independently (for example, from here new-rutor.org/torrent/225082/, if the link is working). At this moment current version RemoveWAT 2.2.6
Installing drivers
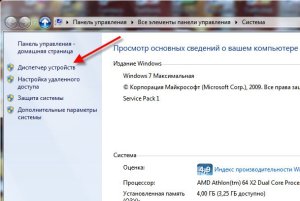
After the installation is complete, you need to install the drivers. Without them, the computer will not work at full capacity. To check if you need drivers, open Device Manager. To do this, press the “Win + Pause” buttons and select “Device Manager” in the window that opens on the left.
There should be no exclamation marks in the device manager, i.e. there should be a picture like this
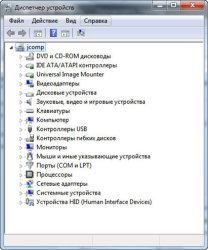
If there are exclamation or question marks, then you will have to install the drivers

It's good if you have the driver disks that came with your computer. Then insert them one by one and install the drivers from the autorun menu of each disk. If there are no disks, then simply use one of the special programs.
Watch the video tutorial on how to automatically install drivers using the Drivers Installer Assistant program from the SamDrivers package
This method does not require an Internet connection, but the downloaded file is an image. Therefore, in order to use it, you need to burn it to a DVD or flash drive using any of the methods described above. Or just extract the files from ISO image, as from a regular archive and run the program.
The third method, using the Slim Drivers program
This method requires an Internet connection, so to use it you must already have the Internet configured.
The fourth method, using DriverPack programs Solution Lite
This method is similar to the previous one and also requires an Internet connection.
One more note: if after Windows reinstallation 7 you have all the drivers installed (according to Device Manager), I still recommend downloading and installing drivers for your video card separately, especially if you are a gamer.
Conclusion
After reinstalling Windows 7, you can begin installing your usual programs. I advise beginners to read the article.
If something is not clear, then ask in the comments - I will answer.
Also write in the comments feedback, your opinion is very important to me!
(127 votes, average: 4.7 out of 5)Alexey Vinogradov, 2016-09-13 Edited: 2016-09-13
Similar articles:
Alexey Vinogradov
7 months agoAnswer
Stepan
7 months agoAnswer
Stepan
7 months agoAnswer
Stepan
7 months agoAnswer
Alexey Vinogradov
7 months agoAnswer
Alexey Vinogradov
8 months agoAnswer
Alexey Vinogradov
9 months agoAnswer
Valery
9 months agoAnswer
Alexey Vinogradov
9 months agoAnswer
Alexey Vinogradov
10 months agoAnswer
Alexey Vinogradov
12 months agoAnswer
Alexey Vinogradov
1 year agoAnswer
Alexey Vinogradov
2 years agoAnswer
Alexey Vinogradov
2 years agoAnswer
Alexey Vinogradov
2 years agoAnswer
Alexey Vinogradov
2 years agoAnswer
Alexey Vinogradov
2 years agoAnswer
Alexey Vinogradov
2 years agoAnswer
Alexey Vinogradov
3 years agoAnswer
Alexey Vinogradov
3 years agoAnswer
Alexey Vinogradov
3 years agoAnswer
Alexey Vinogradov
3 years agoAnswer
Eugene
3 years agoAnswer
Alexey Vinogradov
3 years agoAnswer
Alexey Vinogradov
3 years ago
Stepan
7 months ago
Answer
Alexander
8 months ago
Answer
Valery
9 months ago
Answer
Prro
10 months ago
Answer
Gennady
12 months ago
Answer
back
1 year ago
Answer
Mirriada
1 year ago
Answer
Ivan
2 years ago
Answer
Murat
2 years ago
Answer
Murat
2 years ago
Answer
Oleg
2 years ago
Answer
Vladimir
2 years ago
Answer
Anton
2 years ago
Answer
Irina
2 years ago
Answer
Alexei
2 years ago
Answer
Oleg
2 years ago
Answer
greff
3 years ago
Answer
Sergey
3 years ago
Answer
Leonid
3 years ago
Answer
Leonid
3 years ago
Answer
Paul
3 years ago
Answer
Eugene
3 years ago
Answer
Stanislav
3 years ago
Answer
Anastasia
3 years ago
Answer
Kirill
3 years ago
Answer