The development of technology, the emergence of new generations of components that work much faster and are more economical, makes it possible to extend the life of computers and delay the need to purchase a new, more productive model. One option for such an upgrade would be to replace a traditional hard drive with its solid-state counterpart.
Considering the excellent speed characteristics of such drives, using them as system drives is a The best decision. ABOUT possible problems We will tell you about problems that may arise when transferring a system partition from a classic hard drive to an SSD. We will talk about the Windows 8 system installed on a Lenovo laptop, and similar issues of modernization, repair, and computer setup Apple We'll leave it for another time.
Wim image binding
Windows 8 has a factory reset mode when problems occur that cannot be fixed by any other means. This will result in the loss of everyone installed programs, settings, personal data, etc., but all the shortcomings in the work will disappear, and the system will return to its original form.
When replacing a disk and after the accompanying procedure of transferring the system from an old disk to a new one, it happens that the binding to the Windows 8 system recovery environment of the OS wim image with factory settings is broken. It is contained in the hidden Recovery partition. The result of violating this binding is the impossibility of rolling back the system to factory settings.
Next, we will describe the process of how to restore the wim image binding. For example, we used a Lenovo laptop with a UEFI BIOS. The algorithm of action will be similar for devices from other manufacturers. The difference may lie in the names of menu items and some other little things.

If you don’t have confidence in your abilities, and what is described below looks too complicated, then it would be best to go to the launch.rf workshop computer repair in Otradnoye and find out when they can help you with this problem.
You need to go to the Disk Management utility. There we will see that all partitions, including the hidden Recovery, are on system disk intact.

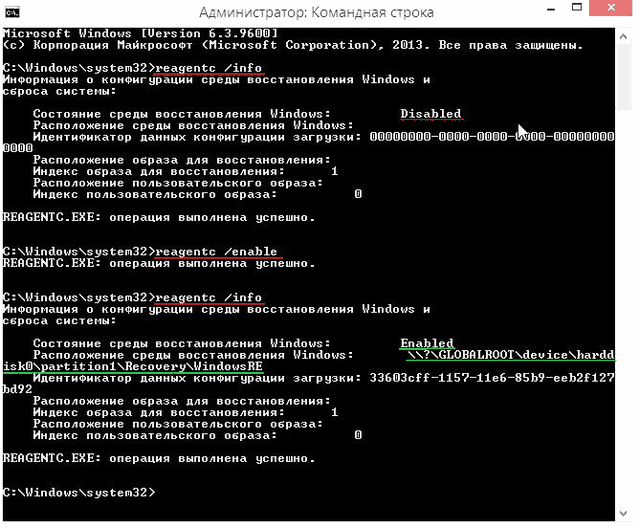
First of all, make sure that the recovery environment is enabled by entering “reagentc /info” in the command line.
In response, we will receive a message that the recovery environment is disabled. This happened after migrating the system from an old hard drive to an SSD. You need to turn it on. The command “reagentc /Enable” is intended for this.
The REAgentC program will report that the recovery environment (Winre.wim file) is enabled, and its standard location is in the hidden first partition of the disk - \\?\GLOBALROOT\device\harddisk0\partition1\Recovery\WindowsRE. The problem is that the location of the recovery image is unknown. This means that if you use the one-button recovery mode (Push-Button Reset Overview), then the image will be used installation DVD Windows.
Previously, we established that we have all the necessary partitions, including the hidden Recovery with the wim image, and the problem is the missing connection between this image and system environment recovery. Let's start restoring the connection. You will need a command line where you need to enter several commands in sequence:
- "Diskpart".
- “lis vol” – a list of all disk partitions is displayed.
- “sel vol 4” – select the partition containing the desired recovery image.
- “assign letter M” – assign the letter “M” to section 4.
- “exit” – exits the Diskpart utility.

Now you should open “Explorer”, in which the “M” drive will appear. To control, you can check that the “install.wim” file containing the factory image of the system is located on this drive.

Let's return to the command line and continue working. “M:” – with this command we go to the “M” drive.
The next directive is “attrib /s /d”. With its help, the full paths of files located in the directory and subdirectories on this disk and their attributes. We see that the “Factory” subdirectory we are interested in has attributes S “system”, H “hidden”, R “read only”, which we do not need and need to be cleared.

To do this, enter the commands:
- “cd OKRBackup\Factory” – change the current directory to L:\OKRBackup\Factory.
- “attrib -s -h -r /s” – remove the listed attributes from all files in this directory.
- “attrib /s /d” – control that attributes have been removed.

“C:” – goes to the system drive.
Now we bind the wim image with the command “reagentc /setosimage /path M:\OKRBackup\Factory /index 1”. If everything went well, then when you roll back to the original settings, information from the desired disk partition (from the wim image) will be used. To verify this, you can run the command "reagentc /INFO".

Push-Button Reset Overview (one-button system reset)
Just in case, we will briefly describe the procedure for returning to factory settings. You need to go to “Options”.


Click the “Start” button in the “Remove all data and reinstall Windows” item.

A warning window will appear telling you what action will be taken. You need to click the “Next” button.

The system rollback procedure to factory settings will begin.
If the OS does not start
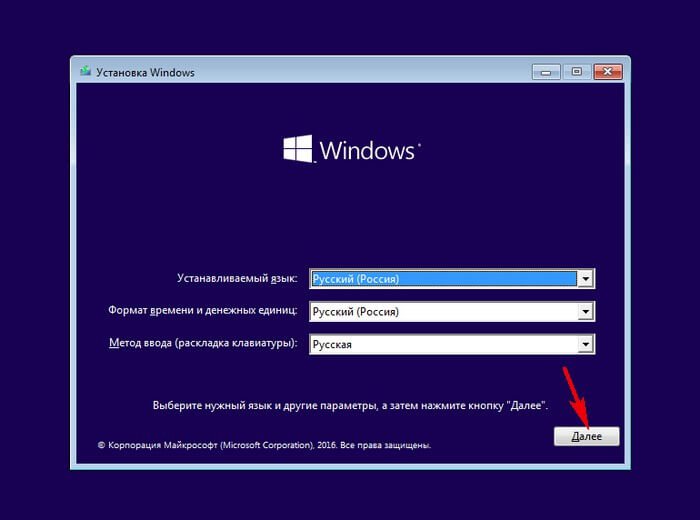
You need to boot from the installation Windows media 8, click “Next”.
Click "System Restore".

In the “Select action” window that opens, click “Diagnostics”.

Select the “Return the computer to its original state” mode.


Then select “Windows 8.1”.

The last window will open, in which you can click the “Return to original state” button.

The process of restoring the system to factory settings will begin.

It’s probably great when the opportunity to organize your work on a personal laptop becomes available to any user of such a laptop, without third-party interference from “all sorts of thousands of programmers and systems specialists.” And even in the saddest case, it is possible to press a couple of keys and make your computer Factory Reset- returning to the original Windows state, thereby solving your pressing problems.
However, in those cases when you yourself work on such a laptop, or even worse - you are preparing such a laptop in order to give it to your colleagues for use - then the “luggage of programs” that come with the pre-installed system are so terrible and useless that they are taken away immediately about 30% of the resources of your brand new laptop. What to do? Remove such programs step by step, manually. Or.... ?
There are several situations when you need to think about this:
- you really these programs interfere, take away “ALL THE POWER” of your laptop
- you don't know which programs to remove
- you have already removed such programs somehow, but you did Windows recovery and now, they are all in front of you again
- you want to get rid of the Recovery partition, which eats up about 15-25Gb of your hard drive
- and finally, you have replaced your HDD with a new one and you simply have nowhere to restore Windows
And even if there is such a disk, there is no guarantee to restore the system. After all, each such set of disks is aimed at specific model. For example, recovery disks for the T430 model are no longer suitable for the T430U model and vice versa.
Again, having restored the system from such a disk, we again get a bunch of unnecessary software that is an eyesore for us and our hard drive.
Therefore, the main task is to install clean Windows without losing your license.
The main headache for the Windows that came with the laptop is that Windows version is OEM version. And in a nutshell - a copy linked to a specific laptop. Those. Logically, re-activation of such a product is impossible. With the exception of Microsoft's condescension and by calling technical support, you will most likely be activated by your copy over the phone.
However, it is not possible to obtain the OEM distribution itself. At the time of writing this article, it was no longer possible to officially download the Windows 7 distribution from the Microsoft website. This fact was confirmed to me when I called Microsoft technical support. But for Windows 8.1 there is a wonderful utility.
So, to avoid even more "unnecessary" controversy, I'll just write a solution for these systems.
 If on your Windows laptop 7:
- Find the serial number sticker on your laptop. Perhaps it is hiding under the installed battery.
- find a clean image of Windows 7. Not activated, not customized, but a clean image that matches your edition. In my case, it was the Windows 7 Pro x64 distribution. And I downloaded it on the VLSC website https://www.microsoft.com/licensing/servicecenter/ If you download from third-party resources and doubt the authenticity of the distributions or suffer from paranoia, I recommend looking for hash sums for the distribution you are interested in and comparing it with the downloaded images.
- Install the system using your serial number(which you found on your laptop)
- Activate the system by automatic activation via the Internet. As it turned out, it is completely painless.
- Install only necessary drivers, without unnecessary software, downloading them from the manufacturer’s website.
- All. Your legal copy of Windows 7 is ready to use!

If your laptop has Windows 8:
- Follow the link: http://go.microsoft.com/fwlink/p/?LinkId=510815 to download a utility that will help you create a bootable distribution image for Windows installations 8.1
- After launching the utility, choose the most convenient option for yourself: a) create a bootable USB flash drive (at least 4Gb) or b) create an iso image, which can later be burned to a DVD disc
- Set cos this image using special test keys (which Microsoft itself provides):
- Pro Version: 27NXJ-JH9WY-KYF3K-J8DPP-9P9HP
- Single Language Version: PRN2R-9J3M9-VHVKK-YVTJ7-PWD3X
- According to the employee technical support Microsoft: "after installing 8.1 with test keys, the system will pick up the activation using your SLIC table.
- In my case, I got a legal one copy of Windows 8.1 without unnecessary junk from Lenovo.
Summary.
I didn't go into detail" why\how\why\or maybe" and just took advantage of similar solutions. Because I know for sure: if I have a laptop with a pre-installed, legal copy, then I have the right to use it and reinstall it as much as I want :) Well, if this is not the case - write, maybe someone will be interested in your rationale :)On Lenovo laptops, as indeed on laptops from other manufacturers, there are a lot of pre-installed junk programs (bloodware). But among all the rubbish there is quite useful program One Key Recovery from CyberLink. If you do not know how to use other system recovery tools, you can use this program. She only knows how to restore Windows system, but it may still be useful to someone... In this article we will figure out how to restore the functionality of this program.
This program consists of two components. The first is a regular Windows program that can create backup copy everything that is on your C drive. The second is an EFI application (like a mini operating system), which restores from a backup copy.
It is understood that the user can get into the recovery utility in the following ways: 1) From a running Windows: run the OneKey Recovery program, select System Recovery and the computer should reboot into the recovery utility; 2) From the off state: press the Novo button with a paperclip, select System Recovery and the recovery utility should load.
You wonder Why does Windows 10 boot again instead of the recovery utility? But I’m no longer there. I know how to fix this because I did the research. And don’t believe Lenovo official representatives who say that “Recovery tools are built into the OS” of win8, so there will be no support for OneKey Recovery in win10. They also say that if you roll back to win8, your OKR will work. This is wrong. Let's figure it all out.
Generally speaking, there is a way to download the one key recovery utility without any tools at hand. But for this, the Windows must still be in working order. Hold down the Shift key and select reboot. You will see a menu where you need to follow the following points: diagnostics, Extra options, load other devices, show more devices and select the Lenovo Recovery System item that appears (if you have a menu in English, then either guess or change the bcd locale from under Windows).
If Windows has already been demolished, then you can use either already installed Linux or a bootable USB flash drive with Linux. A flash drive with ArchLinux is suitable since it does not contain anything unnecessary, takes up little space and will ultimately save us time. Boot, run the command efibootmgr -v. This is how we find out the number of the Lenovo Recovery System boot variable. We need the four digits of the BootXXXX variable. Next, you need to set the efi variable BootNext; to do this, run efibootmgr --bootnext indicating the entry number. We reboot and rejoice - the recovery utility is loading.
But this procedure will have to be done anew each time, since the BootNext variable is applied once and is overwritten. What to do if you want everything to work as expected?
Before installing Linux, I looked at how the partitioning scheme from the manufacturer (OEM assembler) works:
List of sections with explanations
- Sda1 ntfs 1000 MiB WINRE_DRV is the boot partition windows recovery. Used when you boot into the WinRE environment.
- Sda2 fat32 260 MiB SYSTEM_DRV is an EFI System Partition (esp, that is, the main boot partition for UEFI). It all starts with him. It stores efi applications (windows bootloader, Linux bootloader and other applications).
- Sda3 fat32 1000 MiB LRS_ESP is the original equipment manufacturer (oem) section, namely Lenovo Recovery System. This partition simulates a real esp (you can only create one real esp on your hard drive). The efi one key recovery application is stored on it.
- Sda4 without FS 128 MiB Microsoft Reserved Partition is a partition that Microsoft reserves on gpt disks. Used by Windows when you move or change partitions using disk manager.
- Sda5 ntfs 892.15 GiB Windows8_OS is the main partition of Windows (drive C). There is the OS itself, the swap file and all your files.
- Sda6 ntfs 25.00 GiB LENOVO - this is the partition on which Lenovo installed drivers for your computer and installers of some spam software, displayed as disk D. It was assumed that you could backup to this partition. But look at its size and everything will become clear.
- Sda7 ntfs 12.03 GiB PBR_DRV is a partition that contains the very, very initial recovery image that you can select in OneKey Recovery.
When installing Linux, if for some reason you need pre-installed Windows, I advise you to simply compress system partition to what is needed, and in the free space create an LVM partition and smear all the internals of Linux in it (you will forget about the problems of moving and resizing partitions). I checked that the OKR system will not destroy this section when restoring from the image.
If Windows 8 was pre-installed on your Lenovo computer and you decided to upgrade to Windows 10, then you The functionality of the One Key Recovery program will be lost. You can run OKR in windows and create a backup, but you will not be able to launch the recovery utility either by selecting Reboot recovery in the program or from Novo Button Menu - System Recovery. It will just start Windows. How to boot into the recovery utility, and why did this problem arise?
The thing is that when Windows is installed, it replaces the file in the standard path $esp/EFI/Boot/bootx64.efi with its own, and in Windows 8 it was simply replaced manually by OEM.
Where do we even need to go? We need to load the efi application from the LRS_ESP section. There we have the following efi files, which I checked and found out what we need:
LRS_ESP:/EFI/Boot/bootx64.efi - loads what we need, the OKR utility
LRS_ESP:/EFI/Microsoft/Boot/bootmgr.efi - does not support booting
LRS_ESP:/EFI/Microsoft/Boot/LrsBootmgr.efi - loads what we need, the OKR utility
LRS_ESP:/EFI/Microsoft/Boot/memtest.efi - does not support booting
LRS_ESP:/bootmgr.efi - does not support booting
My laptop has UEFI firmware from Phoenix. It is made in such a way that when you select System Recovery in the Novo button menu, the following boot order occurs: 1) If there is a file $esp:/EFI/Boot/bootx64.efi, then it is loaded; 2) If there is a file $esp:/EFI/Microsoft/Boot/bootmgrfw.efi, then it is loaded, that is, the usual loading windows; 3) If there are no files from points 1 and 2, then LRS_ESP:/EFI/Boot/bootx64.efi is loaded (exactly like that, not boot entry lrs) 4) If it is not there, then (regardless of the existence of other boot entries) an entry with lenovo recovery system is added to the bootorder and a normal startup occurs, which will lead to our OKR utility, because the Lenovo Recovery System entry contains the necessary path LRS_ESP: /EFI/Microsoft/Boot/lrsBootmgr.efi.
When you press the power button, the order of downloading the firmware is as follows: 1) if you hold down the esc, f2, f12 key, then load the right application from ROM; 2) if the bootnext variable is set, then load the boot record with the number from this variable; 3) normal boot using boot order.
And when you press the Novo button, a new menu is loaded. And generally speaking, you can safely do without the novo button, since all the items that are in its menu can be called up separately, and last point- this is nothing more than loading a record from hard drive. This entry is displayed when you hold f12 and for me it starts with WD. Please note that WD is not a boot record of the Lenovo Recovery System, but rather a record from the hard drive, which behaves according to the boot sequence described above, that is, in step 3 it will load LRS_ESP:/EFI/Boot/bootx64.efi, and not the Lenovo boot record Recovery System. OKRs are also loaded along this path, but I specifically pay attention to this subtle point. Because of this boot sequence, by the way, we did not get into the recovery utility, despite the working entry of Lenovo Recovery System.
That is, the firmware itself was made quite cleverly, it deleted the system boot variable - it was restored with all other variables cleared, if there is absolutely nothing to load during normal sturtup - it will add the number of the lrs entry to the boot order, which in turn will be recreated automatically; in a sad situation, the firmware tries to do everything possible. A the culprit of all dances with a tambourine is Micosoft, which obligingly does nasty things to you, for example, overwrites other bootloaders when it is not asked to do so. Using the standard path, you can put, for example, a fallback kernel for Linux and boot into it, if necessary, with the novo button or make a boot selection menu.
As you can see, with Windows running, even deleting the $esp:/EFI/Boot/bootx64.efi file, which when windows update was overwritten by a Microsoft one that loads Windows, although there should be a file that contains instructions to either load the application from the LRS_ESP partition, or install bootnext in the entry with the lenovo recovery system and reboot. Now it’s clear why you were loading windows normally using the novo button?
I could write these instructions myself, but I haven't done EFI application programming yet. So for now, the only option is to either pull out a similar file from a Lenovo computer that has not yet been updated to Windows 10, or you can install rEFInd there, which already has built-in functionality for downloading OKRs from Lenovo laptops. If it doesn't appear, just press ESC. An orange life jacket with a Windows icon will appear in the menu.
Hello admin! Judging by the articles on this site, you can tell me a way out of this situation. Three years ago I bought a laptop with Windows 8 Single Language pre-installed and immediately reinstalled it on Windows 7. Now I want to sell this laptop, but the buyer asks that Windows 8 be installed on the laptop. How can this be done if the partitions with factory settings are deleted, and HDD converted to MBR?
ISO image I couldn’t find Windows 8 Single Language on the Internet, but I also have a laptop, albeit from a different manufacturer, and it has Windows 8.1 installed, to which it was updated from Windows 8. Could this help me somehow? What happens if I copy a factory image of Windows 8 from a hidden partition on a laptop from another manufacturer and deploy this image to my laptop?
Hi all! IN in this case the simplest solution is to download in Internet Windows 8 Single Language and install it on your laptop, before installing, enable the UEFI option in the BIOS and Secure Boot, accordingly, Windows 8 will be installed on a GPT disk; after installation, the system will pick up the key from the BIOS and activate automatically after the first access to the Internet.
Unfortunately, we cannot post an ISO image on our website licensed Windows 8 and it’s a shame that Microsoft will not post this image on its official resources, as is done with Windows 8.1, 10 Single Language.
What happens if you copy a factory image of Windows 8 from a hidden partition of a laptop from another manufacturer and deploy this image to your laptop?
Friends, this is what will happen - a factory image of Windows 8 taken from another laptop will perfectly deploy to your laptop, but along with the operating system, everything branded will also be installed on your laptop software from another manufacturer, which would be best removed, since it is unclear whether it will work correctly. And yet, since the factory image is not native, you will have to install drivers on most of the devices on your laptop after deploying Windows 8. One positive thing is in the process of deployment factory image of Windows 8, native license key will be picked up from the BIOS of your laptop and Win 8 will be activated immediately after the first access to the Internet. All!
So, everything else that is written below is for lovers of experiments and computer enthusiasts.
If you have another laptop at hand (even from a different manufacturer), on which Windows 8 was installed from the store and hidden partitions with factory settings were saved on this laptop, then from these partitions you can copy the factory image in WIM format and deploy it to on your laptop. Let me note again - it doesn’t matter what operating system is installed on this laptop. this moment, even Windows 10, the main thing is that hidden section with the factory image of Windows was intact.
What it looks like in reality. For example, I have an HP laptop and Windows 8 Single Language was installed on it from the store, then I installed everything on it, as a result it ended up with Windows XP, then I needed Windows 8 again, but the hidden partitions on the laptop were deleted , and I don’t have a Single Language ISO image, but I have a second Toshiba laptop on which Windows 8 was installed, then upgraded to Windows 8.1 and in the end it ended up with Windows 10, the hidden partitions on the laptop were preserved.
Copying a factory WIM image from a Toshiba laptop to a portable hard drive USB
So, we take the laptop - “donor” Toshiba and go to disk management. Usually, the very last hidden partition without a letter has a volume of 15-25 GB, this is the partition with factory settings. From this section we need to copy the factory WIM image of Windows 8 to a portable hard drive USB New volume (F:). Then we will connect external drive USB to a second HP laptop and deploy a factory image of Windows 8 onto it, during system deployment and Win 8 is activated immediately after the first access to the Internet. All!
Let's enter the hidden factory partition using the command "
Launch the command line as administrator and enter the commands:
diskpart
lis vol (displays a list of hard disk partitions)
sel vol 4 (select hidden partition without a letter, with a factory Windows image, capacity 20 GB)
assign( this command assigns a letter to the hidden partition)

Open the “Computer” window and go to the section with factory settings (E:).

Left-click on View and check the box “Hidden elements”, with this action we are in key display hidden files and folders, otherwise we will not see the factory WIM image with Windows 8, since it has the “Hidden” attribute.

Now we look in the folders for the factory WIM image. On my laptop it is located in the “Backup” folder and is not one install.wim file, as usual, but several files with the .swm extension.

Select all the factory image files with the .swm extension, right-click on them and select:
Send-->New Volume (F:).

The process of copying an image.

The factory image files are copied to the (F:) drive of the portable hard drive.

We no longer need the Toshiba laptop.
Create a bootable Live CD AOMEI PE Builder flash drive with ImageX utility
Now we need to create a bootable Live CD AOMEI PE Builder flash drive with ImageX utility and boot the HP laptop from it.
In the main WinSetupFromUSB window, select the name of our flash drive.
Put a tick on the item Auto format it with FBinst and check the FAT32 box,
Check the box Vista/7/8/Server 2008/2012 based ISO and click on the button that opens the Explorer window.

Explorer opens, find the ISO image of the Live CD AOMEI PE Builder on the computer and select it with the left mouse, click "Open".

Click “GO”.


"Yes"

Creation begins bootable flash drive Live CD AOMEI PE Builder.

The bootable USB flash drive is ready.

"OK"

We boot the laptop from the bootable USB flash drive Live CD AOMEI PE Builder. Our flash drive is universal; from it you can boot a laptop with a UEFI interface, as well as a regular BIOS.

Press “Enter” on the keyboard.

The Live CD AOMEI PE Builder desktop loads, which is a regular Live CD on Windows based 8.1.

Connecting external USB disk to an HP laptop and deploy a factory image of Windows 8 onto it using the ImageX utility
Click double click mouse on Windows shortcut Disk Management and the Disk Management window opens.

In Disk Management, we need to completely delete all partitions of the laptop’s hard drive; if there are hidden partitions on the disk, then this can only be done in the command line.

Launch the command line.

Enter the commands:
diskpart
lis dis (list all hard drives connected to the computer)
sel dis 0 (select laptop hard drive)
clean (with this command we delete all partitions on the laptop’s hard drive)
convert gpt (with this command we initialize the disk in GPT style)
create par efi size=100 (create an encrypted (EFI) system partition of 100 MB).
format fs=fat32 (format it in file system FAT32).
creat par msr size=128 (create a 128 MB MSR partition required in the EFI system)
Closing the window command line.

Return to the Disk Management window and create a disk (C:) from unallocated space.
Right-click on the unallocated space and select “Create simple volume”.


Disk (C:) has been created.
Now all we have to do is deploy the factory image of Windows 8 to disk (C:) using the command line.
The factory image files are located on the (G:) partition of the portable hard drive USB, but you may not see them,

since they have the "Hidden" attribute. Left-click on View and check the “Hidden” items box.

Open the command line and enter the command:
Since any install.wim or install.swm file must have an image index, we must specify it in the next command. To determine the image index of the install.swm file, open the command line and enter the command:
DISM /Get-WimInfo /WimFile:H:\install.swm

where H: is the drive letter of the install.swm file.
As you can see, the image index is 1.
Enter the following command:
imagex /apply /check /ref G:\install*.swm G:\install.swm 1 C:\
where (G:), the partition with the .swm files of the Windows 8 factory image, and 1 is the index.
Windows 8 image files are deployed to the C: drive of the laptop.
Progress 100% - Windows 8 is deployed to disk (C:) and all we have to do is restore Windows boot loader 8, enter the commands:
diskpart
lis vol (we list all partitions of all drives connected to the laptop)
exit (exit diskpart)
Creating download files for Windows 8.
Since the letter with deployed Windows 8 is (C:) (in your case it may be different), then to create a bootloader operating system enter the command:
bcdboot C:\Windows

We exit the command line and reboot the laptop and immediately enter the final phase of installing Windows 8.
We do not change the regional settings, click “Next”.

We accept the license terms.

Enter the computer name.

"Use standard settings".

Enter your username.


Windows 8 is loading.

Branded Toshiba laptop screensaver on an HP laptop.


Disk management.

As I warned, drivers will need to be installed.

It is better to remove the pre-installed software from Toshiba on an HP laptop, although many programs work.

Article on this topic: .