Nowadays, the Internet has become so integrated into the lives of ordinary people that the first thing that arises when moving to a new home is the question of running an Internet cable there. But if previously most people had only one computer in their apartment, now each family member has a separate personal gadget with Internet access, and they are all connected not via a cable, but via a Wi-Fi interface, so the problem of purchasing equipment arises. which can satisfy these needs. When you come to the store, you will see a huge amount various types devices (routers, access points, repeaters) that are similar in functionality, and how can you buy exactly what you really need from everything presented?
Network equipment, although it performs similar tasks, differs in its functionality and capabilities
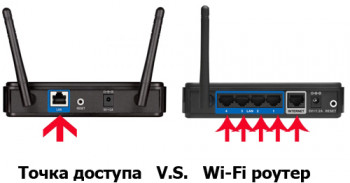
When choosing wireless communication equipment for their home, many users do not see the difference between Acess Point and Router and often buy the wrong thing. It would seem that both equipment distributes a Wi-Fi signal, but the difference between them is colossal.
What is an access point?
An access point is a regular splitter wireless interface, allowing you to cover a certain area of your apartment with a radio signal, most often the device is used to:
- Receive Internet traffic and broadcast it to other gadgets via Wi-Fi. That is, we connect our AP to existing network equipment (to a router that does not have a wireless interface or to a computer) and it, in turn, transmits a signal via radio frequencies to your gadgets.

- Receive radio signals from your gadgets and transmit them further via cable (feedback).
- Acess Point is also used in repeater (repeater) mode to increase the coverage area of an existing Wi-Fi. That is, if you already have a Router and you need to transmit the signal further to client machines, then installing an AP will help solve this problem.

What is a router?
Routers, or routers as they are also called, are a much more complex device. Among other things, they differ in that with their help you can organize new network, and the TD is already built in there. Router features:
- Distribution of Internet data packages between devices.

Wireless networks have enveloped our homes and apartments. It’s hard to imagine a modern apartment, office, or even a cafe without wireless network Wi-Fi access. Wi-Fi networks provide fast and convenient connection to the network with a minimum of labor costs. But wireless networks cannot appear on their own; special network devices are needed to create them. One such device is a Wi-Fi hotspot. I will tell you what it is and how to choose it in this article.
First, you need to define the terminology.
Wireless access point is a base station designed to provide access to already existing network(wireless or wired) or creating a new wireless network.
The access point cannot independently distribute network settings IP, it does not have functions like a firewall, traffic routing, etc.
The access point receives the Internet from the router/modem and distributes it via Wi-Fi. Of course, there are more advanced models that are equipped with DHCP, Firewall, and network segmentation functions, but these are often quite expensive models, and it’s not at all a fact that you need them. It is also important to remember that the access point has only one network connector with all the ensuing consequences.
Router(router, router (from English router) or router) - specialized network device, which has two or more network interfaces and forwards data packets between different network segments. A router is a device into which a cable from your Internet provider (WAN port) is connected, and then distributes the Internet to all devices of your home network.
It would seem, what do access points and routers have to do with it? Everything is very simple - most modern routers already have built-in functions for creating wireless networks, which means that to create your home wireless network, a router that will take on all the necessary functions will be enough.
However, it is not always possible to get by with just one wireless router. Very often situations arise when it is necessary to create an additional wireless network based on an existing wired network, or your router cannot cover the entire required amount of space, and often it is simply necessary to transfer the functions of creating a wireless network to a separate device to reduce the load on the main router. In addition, using access points, you can connect two segments of a wired network - “bridge” mode. There are many uses for a wireless access point.
Specifications
External designBased on their external design, access points can be divided into those intended for external placement (outside premises) and for indoor placement. Placing an access point outdoors imposes certain specifics on the external design - a stronger and more protected case, standard wall mounts, etc.
Installation
Also, the type of placement of the access point may depend on the external design. In this case, in addition to the standard wall or tabletop options, the option of installation in a socket is added. The last option is perfect for repeaters. It allows you to place the access point compactly and without unnecessary wires by simply plugging it into an outlet.


Operating frequency
Transmitter operating frequency – the frequency at which the access point operates. There are two options - 2.4 GHz and 5 GHz. There are also access points capable of operating at both 2.5 GHz and 5 GHz.
Wi-Fi standards
Wi-Fi standards allow you to evaluate maximum speed wireless network operation and, in most cases, the frequency range used (but actual speed performance depends on many factors, so the supported standard can only give an approximate idea of speed performance).
· 802.11 - original 1 Mbit/s and 2 Mbit/s, 2.4 GHz and IR standard (1997).
· 802.11a - 54 Mbit/s, 5 GHz standard (1999).
· 802.11b - improvements to 802.11 to support 5.5 and 11 Mbit/s (1999).
· 802.11g - 54 Mbit/s, 2.4 GHz standard (backwards compatible with b) (2003).
· 802.11n - increased data transfer speed (600 Mbit/s). 2.4-2.5 or 5 GHz. backward compatibility from 802.11a/b/g (September 2009).
· 802.11ac - new standard IEEE. Data transfer speed is up to 6.77 Gbps for devices with 8 antennas. Approved in January 2014.
· 802.11ad - a new standard with an additional 60 GHz band (frequency does not require licensing). Data transfer speed - up to 7 Gbit/s.
Transmitter power
The output power of the transmitter affects the strength and distance of the signal. The higher the power, the theoretically the greater the distance the signal travels, including the better ability to overcome the walls of rooms. But you can’t just go out and buy the most powerful access point. The thing is that in Russia the law limits the transmitter power to 100 mW (20 dBm). Anything more powerful must be registered and permission to use the frequency obtained. For this reason, almost all access points have a transmitter whose power is exactly 20dBm. More powerful models are usually professional equipment.
Maximum speed wireless connection
The access point's support for any Wi-Fi standard allows us to draw only approximate conclusions about the possible network speed. For example, 802.11n promises us up to 600 Mbit/s, only this is with the simultaneous use of 4 antennas (MIMO technology), so to predict possible data transfer rates, it is best to pay attention to the declared speed characteristics of the access point.
Number of antennas
A parameter inextricably linked with the previous discussion point. The more antennas the access point has, the higher the maximum speed of the wireless network, but remember that on the side of the client device (for example, your laptop) there must also be the same number of antennas, otherwise some of them will simply not be used.
In addition, antennas operate in different frequency ranges. For example, if an access point has 6 antennas, then most likely 4 of them are used in the 2.5 GHz range, and 2 in 5 GHz range.

Antenna type
Antennas can be internal or external. External ones, in turn, can be either removable or non-removable. A removable antenna or its absence will allow you to later install an antenna that is more suitable for your characteristics. For example, with a high gain or the radiation pattern you need, which will improve the signal quality in your area.
Ethernet port speed
Through the Ethernet port, the access point is connected to a wired network, and accordingly this parameter can become a bottleneck if selected incorrectly. If active interaction with a wired network is expected, creating backup copies, working in “bridge” mode, transferring “heavy” files, etc., it is recommended to choose an access point with a high speed Ethernet port, for example 1000 Mbit/s. If you are using a wireless network just to access the Internet, and your provider cannot provide you with a speed of more than 100 Mbit/s, then a 100 Mbit/s port will be enough for an access point. This parameter is also important when it is intended to work in the “reverse” mode, when Internet access is provided via a Wi-Fi network, and it must be distributed via a wired network.

PoE support
PoE (Power over Ethernet) is a technology that allows you to transmit to a remote device electrical energy along with data, via standard twisted pair on an Ethernet network. Allows you to power the access point from the router/switch to which it is connected. This technology It will be useful if the access point is located far from electrical outlets, and running a separate cable for power is problematic. But PoE support increases the cost of the device, and, as a rule, is found in professional solutions.
Operating modes
Access point
The simplest and most understandable mode of operation is to simply create a wireless network to which your devices connect. Creating a network based on the existing wired network to expand its capabilities. 
Bridge Mode
This mode serves to connect two wired networks independent from each other. So to speak, a “wireless Ethernet extender” for combining two network segments. 
Repeater Mode
Repeater mode (also known as repeater) is a simple signal repeater designed to increase the range of a wireless network. 
WISP
An operating mode in which the access point receives the Internet not via a wire, but via a wireless channel, and then distributes it both via a wired interface and via a wireless network.
Router
The mode of operation of the access point as a router allows you not only to create a wireless network based on the existing wired network infrastructure, but also to independently route networks, including distributing network settings (DHCP), filtering traffic (firewall), etc.
Signal amplifier
In essence, this is the repeater operating mode, but in some cases such devices work exclusively to amplify the existing signal, and are not capable of operating in bridge mode. Also, some models may not have ethernet port.
If you need to expand your existing wireless network, or in the far corners of your apartment there is a signal level, but it is too weak and unstable, then you should pay attention to signal repeaters (amplifiers). Moreover, in the simplest version it will be a fairly compact device that simply plugs into an outlet.
After determining the type of access point, you need to select speed indicators.
There are many Wi-Fi standards that differ not only in speed, but also in the frequency at which the wireless network operates. When selecting an access point this moment also needs to be taken into account. The most common is the 2.4 GHz band. Most client devices support these frequencies and will be able to work with such access points without problems. Creating a Wi-Fi network at 5 GHz has both its pros and cons. This frequency range is less congested (at the moment), and therefore is able to provide you with better speed performance. One access point can support both the 2.4 GHz and 5 GHz bands, but there are also devices designed exclusively for the 5 GHz band. You also need to check whether your devices support given range. Support for a second frequency range increases the cost of the device, but also provides more capabilities. You can create several wireless networks in different frequency ranges and use them depending on the workload.
As for the supported Wi-Fi standards, the situation is somewhat similar to ranges - all devices on your wireless network must support the same standards. So, for example, if your laptop only supports 802.11b/g/n, then you just need to buy an access point that supports only these standards. Naturally, no one forbids you to buy a more advanced access point, so to speak for the future, for example with support for 802.11a/ac/b/g/n. But you can feel the effect of increased speed when using more advanced standards only after replacing your laptop with a more advanced one that supports these wireless communication standards. The same is true for mobile electronics (smartphones, tablets).
Don't forget about the maximum data transfer speed. In most cases for Internet surfing, including viewing streaming video, 150 Mbit/s will be enough, and for more demanding customers, for example, for Reserve copy or transferring large files over the network - from 600 Mbit/s. A high speed wireless network is also needed when the access point is operating in repeater mode, and if active interaction between devices in the wireless network itself is expected.
For residents of high-rise buildings, I would advise using access points capable of operating in the 5 GHz range (don’t forget that your devices should also be able to do this) simply because it is less loaded and you can get higher speeds.
There are also non-standard situations, for example, you need to connect a remote segment of a wired network, and the distance is so great that two access points in bridge mode simply cannot see each other. Then one solution could be to install a signal amplifier in the middle of the circuit, resulting in a mixed bridge-repeater-bridge circuit. 
Results
When choosing a Wi-Fi access point, you need to clearly determine in what mode it will operate (access point, repeater, bridge), understand which devices you are going to connect to the wireless network, and which Wi-Fi standards they support (to create a bridge connection, it is advisable to select identical devices or at least one manufacturer). And based on this data, select a specific device.In addition to all of the above, it is worth adding a few words about the transmitter power. In general, the higher the power, the longer the distance it will travel. Wi-Fi signal(although in fact a lot depends on the presence of obstacles and the radiation pattern of the antenna, but this is a topic for another discussion). Accordingly, if you think that you may encounter insufficient signal strength, then it is better to immediately pay attention to more powerful access points, or access points with removable antennas. Then, if necessary, it will be possible to install an antenna with a higher gain. But you shouldn’t immediately buy an access point with the highest transmitter power and high antenna gain, firstly, the more powerful the access point, the more expensive it is, and, secondly, powerful access points create strong interference to others, which means someone of your neighbors will experience problems with their wireless network.
07:43:45 - 13.12.2017
Continuing the series of articles about self-configuration For Wi-Fi routers, we would like to dwell on the issue of setting up a Wi-Fi access point. On the pages of our website a lot has already been said about networks Wi-Fi at home and in the office, so in this article we will not bore users with unnecessary information, but will focus only on the key points when setting up a wireless point WiFi access.
What is the difference between a Wi-Fi router and an access point?
Basics Wi-Fi difference access point from a router lies in the absence of a NAT server at the access point, which for a home Internet user means the impossibility of connecting several computers to the Internet with using WiFi access point. Unfortunately, the vast majority of Internet providers provide their subscribers with only one IP address per contract, while each wireless device on your home network behind the access point will need its own IP address. This circumstance forces users to buy a Wi-Fi router, and not an access point, in cases where they need to connect several home computers to the Internet. A Wi-Fi router is capable of connecting several computers to one provider’s IP address at once, since, thanks to the built-in NAT server, it creates its own subnet of addresses in the home network. Wi-Fi access point, at its core, only deals with converting the network signal from “cable” to “wireless”, i.e. works like a regular network switch. Although the access point is often equipped with a DHCP server and has its own MAC address, the provider does not see this MAC address, because the access point “gives” to the provider physical adress(MAC address) of the wireless client connected to it. In addition, when WiFi connection router You enter the settings for working in the provider’s network into your router, and when installing a wireless access point to access the provider’s network, the TCP/IP parameters of the wireless client are configured. We have already discussed in some detail Wi-Fi selection router for home and small office, so below we will formulate a number of recommendations regarding the optimal choice of Wi-Fi access point.
Selecting a WiFi access point for your home
It just so happens that the cost of wireless Wi-Fi access points differs slightly from the cost of routers with support wireless technology communications. If now you only need to connect one computer to the Internet and you are going to buy a WiFi access point, then think about possibly increasing your fleet of wireless devices in the future! In the century modern technologies, when access to the Internet is needed not only by a laptop, but also by a communicator, iPhone, game console or even a TV, it would be quite useful to have a reserve in the number of possible wireless connections. In this case, purchase Wi-Fi router will be much more useful, because the router will simultaneously connect all listed devices to the Internet.
We will give the following recommendations about choosing a Wi-Fi access point for your home: the wireless device should not be very expensive, but it should work stably and have a nice design that matches the interior of the room or premises. It is advisable that Wi-Fi hotspot home access supported 802.11n - the current wireless communication standard. If you do not require a wireless network data transfer speed higher than 2 MB/s, then an 802.11g access point will do. For a typical apartment of 2 or 3 rooms, one access point will be enough. In rooms larger than 100 m2, you will most likely need to build a wireless network consisting of several WiFi access points. In this guide to setting up a WiFi access point, we will focus on the D-link DAP-1360 model, which has an optimal price-quality ratio.
Setting up Wi-Fi access point D-link DAP-1360
As noted above, the DAP-1360 access point supports the 802.11n wireless standard with MIMO technology, which significantly improves the data transfer speed of the wireless network and improves the quality of radio coverage. In this manual for setting up a Wi-Fi access point, we will look at all the main points that affect the data transfer speed and the security of working on a wireless network.
Connecting the access point to a computer to install and configure it
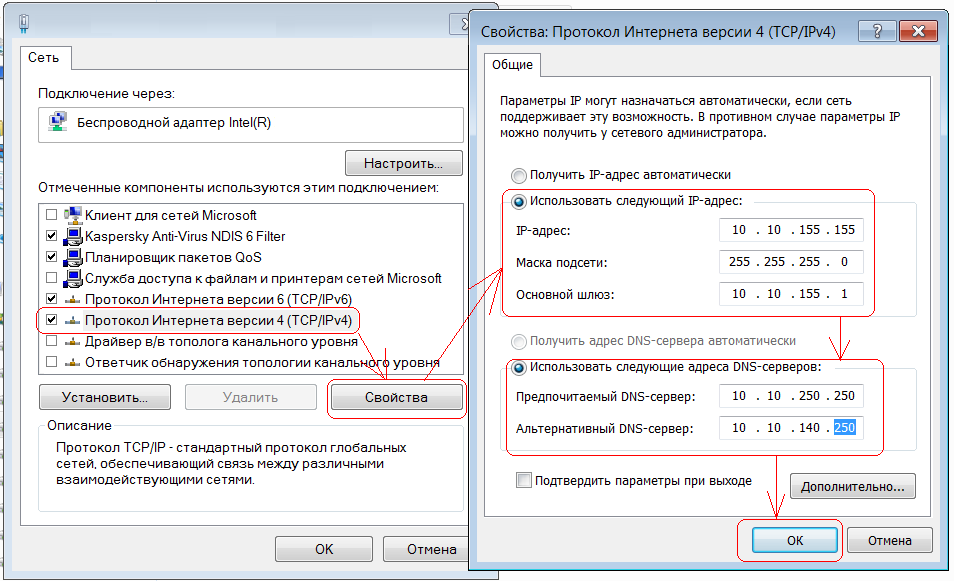
We will configure the D-Link access point via the VEB interface Wi-Fi devices, where you can get if you connect your computer to the point via a wired interface. Almost all Wi-Fi access points have an Ethernet interface for connecting network cable. It is into this connector that you connect one end of the blue cable from the kit, and with the other end you connect the DAP-1360 access point to the network card of your computer. After that, you will need to plug the DAP-1360 power adapter into an electrical outlet and you can begin setting up. To enter the setup menu for the D-link DAP-1360 access point, you will need to change the TCP/IP parameters network card in the following way:
- IP: 192.168.0.51
- Subnet mask: 255.255.255.0
- Gateway: 192.168.0.50
In the pictures below we will look in detail at how to change the network adapter settings in the case of Windows XP and Windows Seven:
So, let's look at how to connect a Wi-Fi access point to a computer using Windows XP as an example (see Fig. 1):

To connect a WiFi access point in Windows XP, you follow the following path: Start – Settings – Control Panel – Network Connections – Connection via local network– Properties – Internet Protocol TCP/IP
In the case of Windows 7 (Windows Seven), the process of connecting a Wi-Fi access point is as follows (see Fig. 2):

To connect a WiFi access point in Windows Seven (Windows 7), do the following: Start - type in the search bar View network - select the View option at the top of the search results network connections- Local Area Connection - Properties - Internet Protocol Version 4 – Properties
Installing and configuring WiFi in D-Link DAP-1360
We will configure the D-Link DAP-1360 access point via the VEB interface. For inexperienced users, let us explain that the VEB interface represents the “internal site” of your access point, where you can set certain settings. So, after connecting the access point to your computer, you launch your browser ( internet explorer, Mozilla, opera, chrome) and go to http://192.168.0.50
After this, the D-link DAP-1360 Wi-Fi access point will prompt you to enter your username and password to enter the administrator interface. By default, the login and password for logging into the Wi-Fi access point DAP-1360: login – admin, password – empty field (see Fig. 3):

Enter the User Name and click on Log In to enter the web interface of the D-link access point. A DAP-1360 message will appear in front of you, in which the device offers to use the wizard quick setup. We, as true professionals, will refuse such an invitation and do everything manually. To do this, select in the left top menu n. Wireless Setup (see Fig. 4)

Then a window will open for you to configure the wireless network settings (see Fig. 5). Let's consider the capabilities of the Wireless Network Settings item from top to bottom:

P. Enable Wireless activates or deactivates the wireless module in the D-link access point. To turn off Wi-Fi in the DAP-1360, you just need to uncheck the Enable Wireless box. But you and I understand that this is an access point, to provide Wi-Fi, so we will not turn off the wireless connection, but will use the option to set the operating time of Wi-Fi at the access point by day of the week. Limiting the operating time of Wi-Fi at an access point can be useful in apartments or offices with fixed working hours. You don’t need extra electromagnetic radiation at night, when all family members are sleeping safely, do you? Therefore, when installing a D-Link access point at your home, it will be very useful to set the operating time using the Add New button. If you do not want to limit the operating time of your Access point D-Link, then go directly here.
So, when you click on the Add New button, you will be taken to the menu shown in Fig. 6:

Here your D-Link access point offers to set its operating hours on certain days of the week.
In the Name field you should specify a name for your schedule (come up with a name to your liking).
In paragraph Day(s) you can specify the days of the week on which you plan to use the D-Link access point. We move the switch to Select day(s) and mark the planned days of the week with checkmarks, while we do not check the boxes for Sat. and Sunday (Sat and Sun respectively). For those who do not know English, let us explain. Here the days of the week are in the following order: Sunday (Sun)-Monday (Mon)-Tuesday (Tue)....Saturday (Sat).
The All Day – 24 hrs option implies round-the-clock operation of our D-Link access point on selected days. This is not our case, so we will not activate this item.
In the Start Time field below we will indicate the start time of Wi-Fi in our DAP-1360 access point. AM means time before noon, PM means time after noon. In the End Time field, you should specify the end time of the Wi-Fi module. In Figure 6, we made the D-link access point work from 9 am to 9 pm.
When all time restrictions are set, all that remains is to click on the Add button to add the rule to the memory of the D-Link access point (see Fig. 7):

Then we will return to the Setup – Wireless Setup menu of our D-Link access point (see Fig. 8). Here we will confirm Wi-Fi work module in the D-Link access point according to a given schedule:

In Enable Wireless, select the name of the newly created rule and move on to the next item in the settings of our D-link access point (see Fig. 9):

In item Wireless Mode, the operating mode of our access point is set. In this guide, we will look at setting up the DAP-1360 as an Access Point, so we leave this option. In addition, the D-Link Wi-Fi access point can operate in several more modes: Wireless client mode, Bridge mode, Bridge with AP mode, Repeater mode, router mode WISP (WISP Client Router), repeater mode WISP (WISP Repeater).
In the Wireless Network Name section, we indicate the name of our wireless network (SSID). Use any option as you wish! Under this name, the wireless WiFi network from D-link DAP-1360 will be visible to network clients.
P. Enable Auto Channel Scan enables automatic wireless channel assignment. To assign a channel manually, uncheck this box!
P. Wireless channel specifies the wireless channel number Wi-Fi connection, which will be used on your network. We recommend choosing channel number 1 or 11, because... By default, most Wi-Fi equipment operates on channel number 6. Few home users change the default channel, so our choice will reduce the likelihood of interference with neighbors' wireless networks.
The 802.11mode item allows you to choose which Wi-Fi protocols your D-Link DAP-1360 access point will be compatible with. Here we recommend doing the following: it is unlikely that your network will use equipment of the outdated 802.11b standard, so you can leave the Mixed 802.11g and 802.11n option - it will ensure compatibility with current protocols and will not allow the network speed to “sag” when connecting outdated equipment . But keep in mind the following: if your wireless clients operate using the 802.11n protocol, and an 802.11g client appears on the network, then the overall speed WiFi networks will drop to the 802.11g level. The actual data transfer speed in an 802.11g Wi-Fi network reaches 27 Mbit/s, while in an 802.11n network speeds of 100 Mbit/s can be achieved, i.e. get over-the-air speeds very close to those of a cable connection.
The Channel Width item determines the bandwidth for the wireless communication channel. We recommend setting the Auto 20/40MHz option here. Not all 802.11n wireless WiFi clients are capable of operating at 40 MHz. In this case, all incompatible wireless Wi-Fi clients will simply work with the D-Link DAP-1360 at 20 MHz.
In the Transmission Rate item, you can force the maximum data transfer rate on the wireless network. We recommend leaving it in the Auto position.
Enable Hidden Wireless hides your wireless network (namely, SSID broadcast) from uninvited guests. Using this option, you can further secure your wireless network from novice hackers. The fact is that computers with operating system Windows does not “see” Wi-Fi networks with a hidden SSID. At the same time, using special utilities, finding such networks is not a particular problem. Therefore, you will only be able to protect yourself from your neighbors;) If you disable SSID broadcasting on your D-Link DAP-1360 access point, then you will have to manually create a connection profile on your PC (you will need to know the SSID and password to connect to the wireless network - about the password, see below).
In the Wireless Security Mode area, you configure the encryption of your wireless network. This will protect your Wi-Fi network from unwanted intrusions from intruders and fans of free Internet access. We recommend dealing exclusively with WPA/WPA2 encryption. All other Wi-Fi encryption protocols are currently susceptible to hacking. Therefore, in the Security Mode section, select the Enable WPA2-Auto Wireless Security (enhansed) option. It should be noted that not all wireless clients are capable of working smoothly with WPA2 encryption, so if you have problems connecting your wireless client to WiFi hotspot access D-link DAP-1360, we recommend using simpler encryption (for example, regular WPA version 1).
Then in the WPA2-Auto area you will need to specify the following:
Cipher Type - encryption algorithm in your wireless WiFi networks. We recommend leaving the Auto option, which allows the use of TKIP and AES algorithms. Note that AES is a much more secure option than TKIP. Unfortunately, when working with AES, sometimes you have to encounter problems with wireless clients - connection breaks, inability to connect, etc. Therefore, “to make it work the first time,” we leave the Auto option.
The PSK / EAP item determines the operating mode of the access point: without or using a Radius server. The Radius server is used in enterprise-scale networks, which clearly does not fall within our configuration scenario. Therefore, we select the Personal option and move on to the next point.
In the Passphrase item, you need to specify a password to access your wireless network. This password must be created and entered below. Recommended password length for a Wi-Fi network: 8-12 characters. Use uppercase and lowercase passwords capital letters, numbers and Special symbols to eliminate the possibility of selection by intruders!
The Confirmed Passphrase item is just a password confirmation. Duplicate your WiFi password again to eliminate the possibility of a mistake!
In the WIFI PROTECTED SETUP field, we will uncheck the Enable item, because all necessary settings We will perform wireless clients manually. Auto-tuning will only interfere with understanding the essence of what is happening.
Configuring the basic WiFi parameters on the D-Link DAP-1360 access point is complete. To save the settings, click on the Save Settings button at the top. Whenever settings are saved, the D-link access point displays the following window (see Fig. 10):

In it, the DLink access point reports that it is saving its settings, and asks you to wait for a while. We will no longer pay attention to this message in the future.
Let's move on to the next stage of setting up the wireless WiFi connections on a DLink access point. Let's now consider how you can optimize the operation of an access point for IPTV and reduce the level of electromagnetic radiation. These settings can be accessed in Advanced – Advanced Wireless (see Fig. 11):

Here, in the Advanced Wireless Settings field, the Transmit Power item is responsible for the emission power of the radio part of our access point. The default value is 100%, but you can make it smaller. This may be useful when you do not need to cover wireless communication several rooms. If you experimentally find the minimum required signal level, then the wireless network will not “stick out” much from the windows of the apartment, which will significantly reduce the likelihood of an attack by intruders, and will additionally save your health. And although Wi-Fi networks have been recognized as safe for health, there is always reason to doubt this.
The Enable Multicast Streams item in the Enable position activates IPTV support ( digital television) in your D-link access point. After enabling this option, the access point begins to broadcast multicast traffic to wireless Wi-Fi clients. We also recommend setting Multicast Rate Control to 36 Mbit, this will reduce the impact of IPTV on other useful network traffic. Otherwise, connection drops may occur on other wireless clients when watching IPTV over Wi-Fi. The Enable Multicast to Unicast item will send IPTV traffic to only one network address on the wireless network. You can also activate it if you plan to watch IPTV on only one wireless device.
To complete the setup, all we have to do is set the access point to the correct time so that the rule for turning off the radio part on a schedule will work. This can be done in paragraph Maitenance – Time (see Fig. 12):
Here you only need to select the time zone in Time Zone. For Moscow you need to set GMT+3:00. And at the very bottom there is a wonderful Copy Your Computer’s Time Settings button, with which you can easily copy the system time from your computer. Next, click on Save Settings to save the settings of your DLink access point.
Setting up wireless WiFi network security
Now I would like to consider how we can improve the security of our wireless WiFi network. In principle, just setting up WPA2 encryption is enough, but “paranoids” can follow the recommendations below to get a very peaceful sleep: P
Let's start with the fact that you can change the IP address of the access point, which it has by default. This can be done in Setup – Lan Setup (see Fig. 13):
![]()
Here in the IP Address field you can change the IP address of the access point. But keep in mind that after changing the IP address you will have to access the access point using it! To save the settings, all you have to do is click on Save Settings.
Here in the New Password field you need to specify the password values to log into your D-link access point. In the Confirm Password field, you should duplicate the password to confirm that it was entered correctly. Then simply click on Save Settings to save the DAP-1360 settings.
You can then restrict the connection to the DLink access point through the MAC address filter for wireless clients. This can be done in Advanced – Access Control (see Fig. 15):

IN this menu You can manually set those MAC addresses of Wi-Fi clients that you want to allow or deny access to your D-link access point. To create a white list, in the Access Control field, set the switch to the Accept position (allow), and below in the MAC Address field you need to enter the value of the physical address wireless Wi-Fi client. You can find out the physical address of a wireless Wi-Fi client on a PC using the getmac command (start - run - type and execute cmd - type and execute getmac), but before that, disable all others network adapters, except wireless. Then click on the Save Settings button to save the settings. To create another whitelist rule, proceed in the same way!
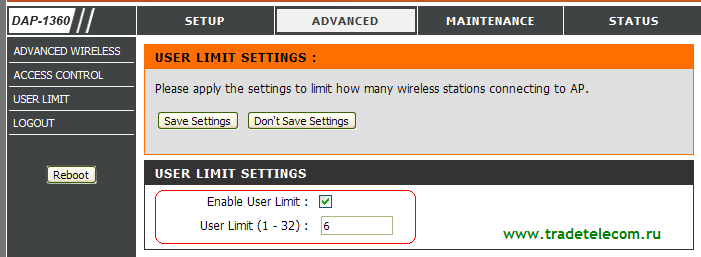
You can also limit the total number of wireless clients that can connect to the D-link access point. This can be done in the Advanced - User limit section (see Fig. 16):

To limit the total number of connections to the access point, you need to activate the Enable User Limit item, and in the User Limit (1-32) field specify the number of allowed Wi-Fi connections clients. Then click on the Save Settings button to save the settings.
At this point, setting up the basic parameters can be considered complete. If you have read this manual on setting up a D-link access point to the end, then you can accept our congratulations! Using an access point, you can optionally create wireless system video surveillance via IP cameras. If you need to organize remote video surveillance, then you can contact our managers for help! For example, wireless video surveillance in kindergarten using a Wi-Fi access point is more than possible.
Connecting computers via Wi-Fi to an access point
All you have to do is enter the provider settings into the TCP/IP wireless parameters Wi-Fi adapter on your computer (see Fig. 17) and connect to the access point.
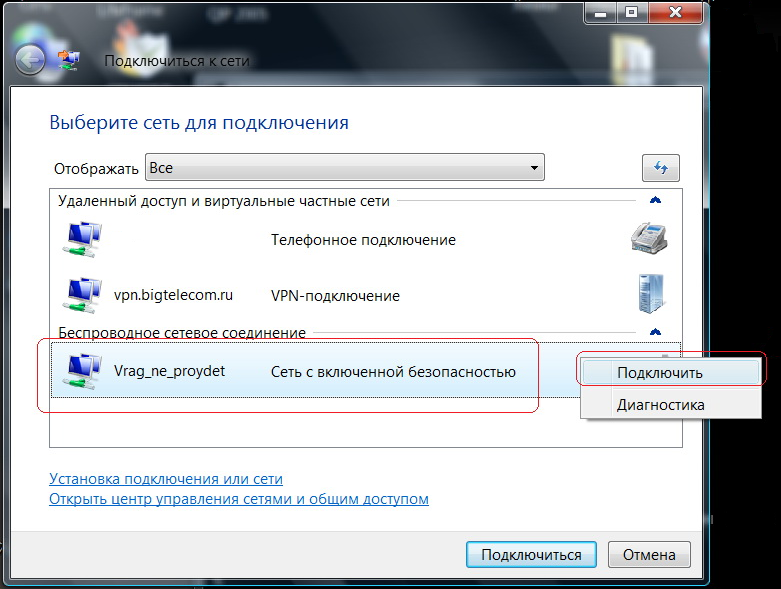
Turn on the wireless adapter on your computer (if it is suddenly disabled) and in the list of available wireless connections, select your wireless network from the DLink access point (see Fig. 18). Let's say our wireless network is called Vrag_ne_proydet:
When you connect to a wireless network for the first time, the computer will ask you to enter your Wi-Fi password, after which the PC will save the password in its permanent memory (see Figure 19):

If before installing the WiFi access point, your computer was connected to the Internet provider via cable, then do not forget to change the registration by MAC address with the technical support of your provider! Now you will be “visible” to the provider by MAC address wireless adapter on the PC (but not the MAC address of the access point).
If you liked our instructions for setting up a D-Link DAP-series access point, then the best gratitude would be if you post a link to this material on your blog or on the forum of a local provider. This will improve the position of this page in search results after the link is taken into account search engine Yandex or Google. You can also click on the "Like" button from your social network, which you will find at the very beginning of this manual (to the right of the title).
In addition, on our website you can find other detailed guides on setting up Wi-Fi routers and wireless points access:
- Network and multimedia capabilities of alternative firmware for Asus routers from Padavan (with built-in DLNA and Transmission)
- Connecting a YOTA modem to a Mikrotik router Selecting, installing and Wi-Fi setup(Wi-Fi) access points using the example of D-link DAP-1360