Using Word automation tools allows you to properly organize work on documents and automate a number of procedures for creating, formatting and editing documents.
Any Office application can have multiple documents open at the same time. Each open document will appear in its own window. For example, a user might see the following Word documents open throughout the day on the screen:
- report that needs to be corrected today;
- the document whose contents need to be copied into the report is also open;
- a new document created for composing a letter. When you finish composing the letter, it is saved and closed.
Sequence of actions, user
- Making amendments to the report.
- Creating a new document for composing a letter. The letter is saved, printed and left for amendments and approval.
- Continued amendments to the report. Fragments selected in other documents are copied into the reporting document.
- Making amendments to the letter (it is saved, printed and closed).
- Copying from the second document ends and it closes.
- Completing the report.
Work is carried out with several documents simultaneously. The list of open documents can be viewed in the menu Window.
Opening multiple documents
Working with several open documents at once allows the user to:
- navigate between documents and work with them;
- save or close all open documents with one command;
- copy and move text, graphics and objects between open documents;
- Place document windows next to each other to make dragging and copying easier.
- Select File, Open (File, Open). The Open dialog box appears.
- Find the files you want to open.
- Select the first file to open and hold Ctrl, Click on each of the remaining files to open.
To open a sequential group of files, select the first file and hold Shift, click on last file which should be open.
Arrangement of document windows on the screen
Windows of open documents can be positioned so that they are all visible at the same time.
On the menu Window Select Arrange All (Window, Arrange All).
Windows of open documents will appear on the screen, which you can move and resize.
Closing all open documents
In Word and Excel, you can close multiple documents at once. Holding Shift, select team Close all in the File menu (File, Close All).
All open documents will close. If changes to one of the documents have not been saved first, the user will be prompted to do so before closing the document.
Some people argue that for productive work Two applications running side by side are enough, and it’s better to minimize all the rest. In principle, we can agree with this statement. As an option for maximizing desktop window performance, this option is quite good.
If you suddenly notice that your desktop is simply “cluttered” open windows and you find it difficult to concentrate on anything, eat fast and easy way minimize all open windows on the desktop at once. Click the empty space in the right corner of the taskbar, to the right of the clock. There's a hidden button that automatically minimizes all windows on your desktop.
Hidden button in the right corner of the taskbar.
Advice. Most The best way find this hidden button, press the keyboard shortcut " Win+M» on the keyboard, but the same can be done by clicking on the right side of the taskbar.
Clicking this button again restores all windows to their original locations. This feature is sometimes called boss mode because it gives you the ability to hide your outside windows from a passing boss in a couple of seconds.
Note. Some laptops come with a feature that allows you to swipe your fingers down on the trackpad (usually four fingers) to automatically minimize all windows.
Minimizing and restoring windows using Shake.
Another way to minimize and restore all windows on the screen is to shake the mouse. One shake minimizes everything; the other restores. This feature is useful for many, but for people with fine motor problems, it can be annoying. You can enable or disable it in the accessibility section.
Fixing two windows side by side.
One of the most useful functions Windows – fix windows. It allows you to work in two windows located next to each other on the desktop at once, with each window occupying exactly 50 percent of the screen. This is done quite simply. Grab the desired window and drag it to the left or right side screen, at some point the selected window will be fixed to half the screen. The second option is to press the " Windows + left or right cursor key".
This feature is useful for many scenarios, including moving or copying files from one location to another, comparing two documents side by side, or working with two browser windows.
Fixing in Windows 8.1.
View thumbnails of closed windows.
Another extremely useful way to arrange windows on your desktop is to use their taskbar thumbnails.
When you move the mouse over a button open program A miniature of this program appears in the taskbar.
There are several things you can do here:
- Holding the mouse over the thumbnail for approximately 1 second will display the application window, even if it is minimized. Only this program is shown, all others are temporarily hidden.
- By clicking on the thumbnail, you can select a window and bring it to the front.
- You can close the window by clicking the " Close" in the upper right corner of the thumbnail.
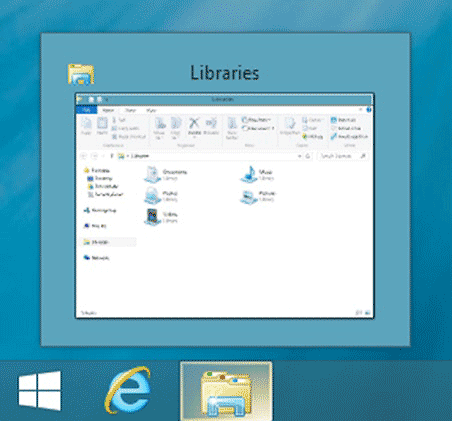
Miniatures running programs on the taskbar.
Pin programs to the taskbar.
Pinning a program to the taskbar in Windows 8.1 is not difficult. Click right click by its tile on the Start screen or in the " All applications" and select the option " Pin to taskbar».

Pin a program to the taskbar.
Clue. You can select several programs at once and pin them all together to the taskbar, which will undoubtedly save your time.
You can drag programs pinned to the taskbar into the order you want. The smartest thing to do is to pin constantly used programs to the taskbar.
Less commonly used utilities can be accessed as needed in the " All applications", "cluttering" the taskbar with rarely used applications makes no sense.
Increase productivity with Jump Lists.
Jump Lists are in a great way organizing files you work with on a regular basis or for an ongoing project. Jump Lists can be opened from the taskbar in one of two ways:
- Touch and zoom with your mouse or finger.
- Right click.
Jump lists show the files or locations that were last opened in the program. By default, this is the ten most recently opened documents.
You can attach as many documents as you want to “Jump Lists” manually by simply clicking on the button that appears when you hover the mouse next to the document name. Attach" Pinning a document to Jump Lists will ensure it appears at the top of the list. Access to commonly used files is very fast and easy.
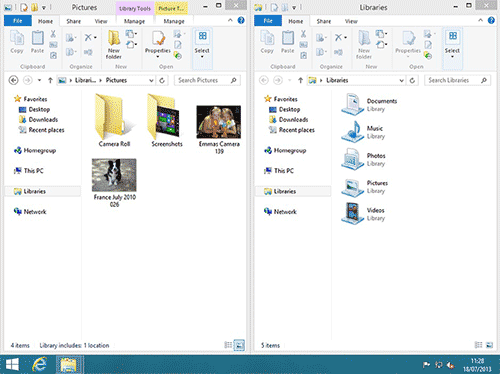
Sometimes while working in Microsoft Word there is a need to simultaneously access two documents. Of course, nothing prevents you from simply opening a couple of files and switching between them by clicking on the icon in the status bar and then selecting the desired document. But this is not always convenient, especially if the documents are large and need to be constantly flipped through and compared.
As an option, you can always place windows side by side on the screen - from left to right or from top to bottom, whichever is more convenient for you. But this function is convenient to use only on large monitors, and it is implemented more or less well only in Windows 10. It is quite possible that this will be enough for many users. But what if we told you that there is a much more convenient and efficient method that allows you to work with two documents at the same time?
Word allows you to open two documents (or one document twice) not only on one screen, but also in one working environment, providing the opportunity to fully work with them. Moreover, there are several ways to open two documents simultaneously in MS Word, and we will talk about each of them below.
Location of windows nearby
So, no matter which method of arranging two documents on the screen you choose, first you need to open these same two documents. Next, in one of them, do the following:
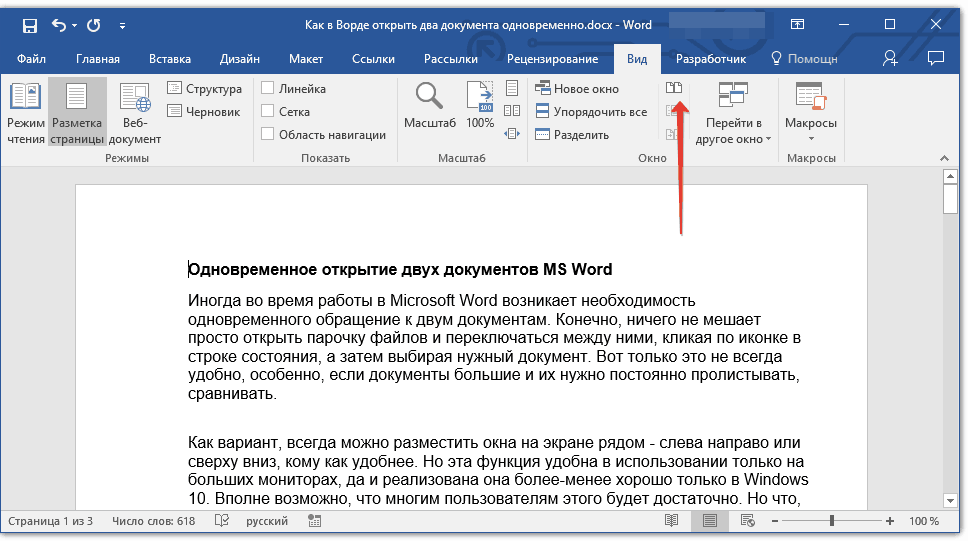
Go to the Quick Access Toolbar tab "View" and in the group "Window" click the button "Near".
Note: If in this moment If you have more than two documents open, Word will prompt you to indicate which one should be placed next to each other.

By default, both documents will scroll simultaneously. If you want to remove synchronous scrolling, everything is in the same tab "View" in Group "Window" click the button to disable the option "Synchronized Scrolling".
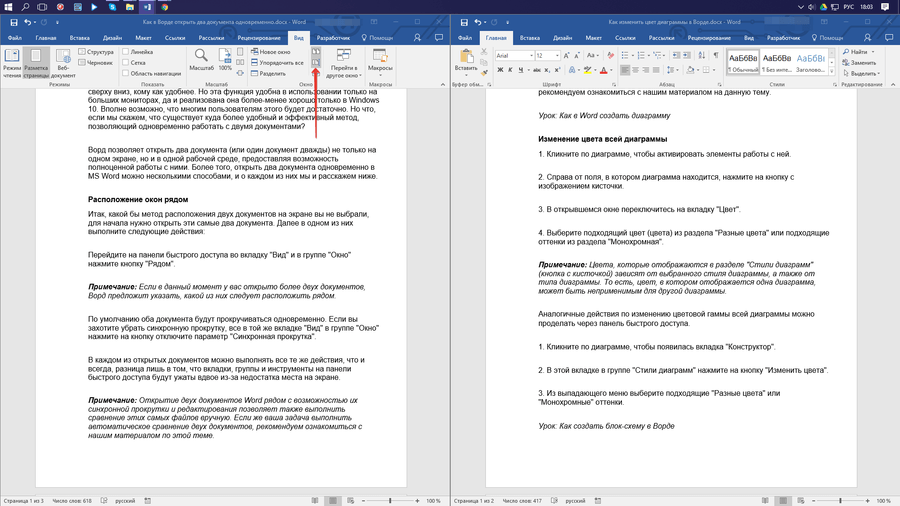
In each of the open documents, you can perform all the same actions as always, the only difference is that the tabs, groups and tools on the Quick Access Toolbar will be halved due to lack of screen space.
Note: Opening two Word documents Along with the ability to synchronously scroll and edit them, it also allows you to compare these same files manually. If your task is to perform an automatic comparison of two documents, we recommend that you familiarize yourself with our material on this topic.
Arranging windows
In addition to arranging a pair of documents from left to right, MS Word also allows you to arrange two or more documents one above the other. To do this, in the tab "View" in Group "Window" you should select a team "Arrange everything".
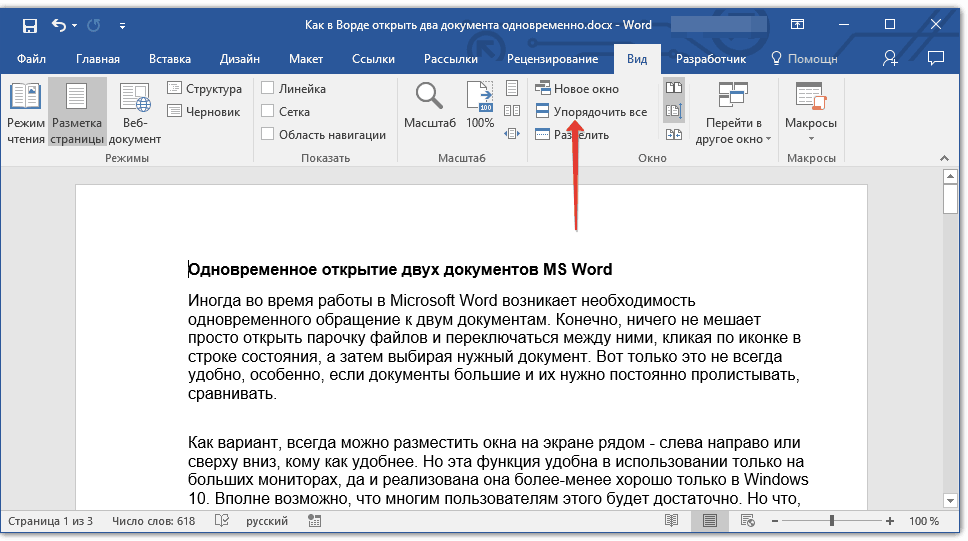
After organizing, each document will be opened in its own tab, but they will be located on the screen in such a way that one window will not overlap another. The Quick Access Toolbar, as well as some of the content of each document, will always remain visible.

A similar arrangement of documents can be done manually by moving windows and adjusting their size.
Splitting windows
Sometimes when working with two or more documents at the same time, you need to make sure that part of one document is constantly displayed on the screen. Working with the rest of the contents of the document, as with all other documents, should proceed as usual.
So, for example, at the top of one document there may be a table header, some instructions or recommendations for work. It is this part that needs to be fixed on the screen, prohibiting scrolling for it. The rest of the document will scroll and be editable. To do this, follow these steps:
1. In a document that needs to be divided into two areas, go to the tab "View" and press the button "Divide" located in the group "Window".
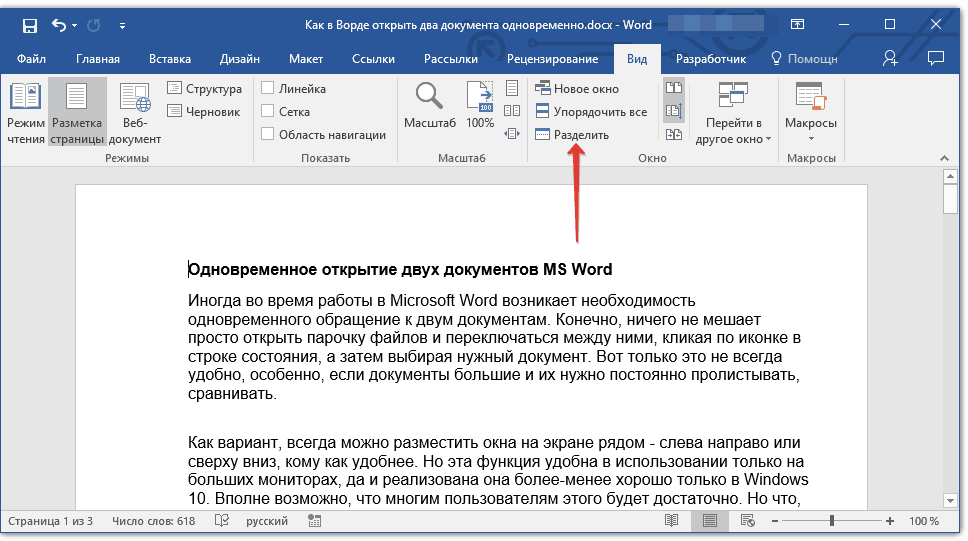
2. A dividing line will appear on the screen, left-click on it and place it in in the right place screen, designating a static area ( top part) and the one that will scroll.