Go to the admin section "WooCommerce -> Settings"
The first step is to change the country in which you are and plan to sell goods. In the drop-down menu "Location", select the country of location, for example: Russia. From the "Outlet(s)" list, select "Sell only in certain countries" and check the countries in which you plan to sell and arrange delivery of the purchased goods.
In the "Currency" drop-down list, select the type of currency with which you plan to work, as well as the price design (separators, currency positions ...)
Tax
In the "Tax" tab, indicate whether you will charge a tax on products. If tax accounting is enabled, then specify whether taxes are included in the product price. Edit the rest of the settings to your liking.
Payment
In the "Payment" tab, you can set up payment methods in the store. To do this, click on the "Settings" button next to the desired payment method.


You can also change the functional pages of the online store there, but I do not recommend touching them.
Delivery
In the shipping tab, you can set the shipping method, destination address, and cost.
Setting up permalinks for WooCommerce
First, if you haven't already, install the . It serves for transliteration of Cyrillic characters of Permalinks of articles, news, pages into Latin.
Then go to the WP admin menu section “Settings -> Permalinks”. In the settings of permalinks, I recommend to register: 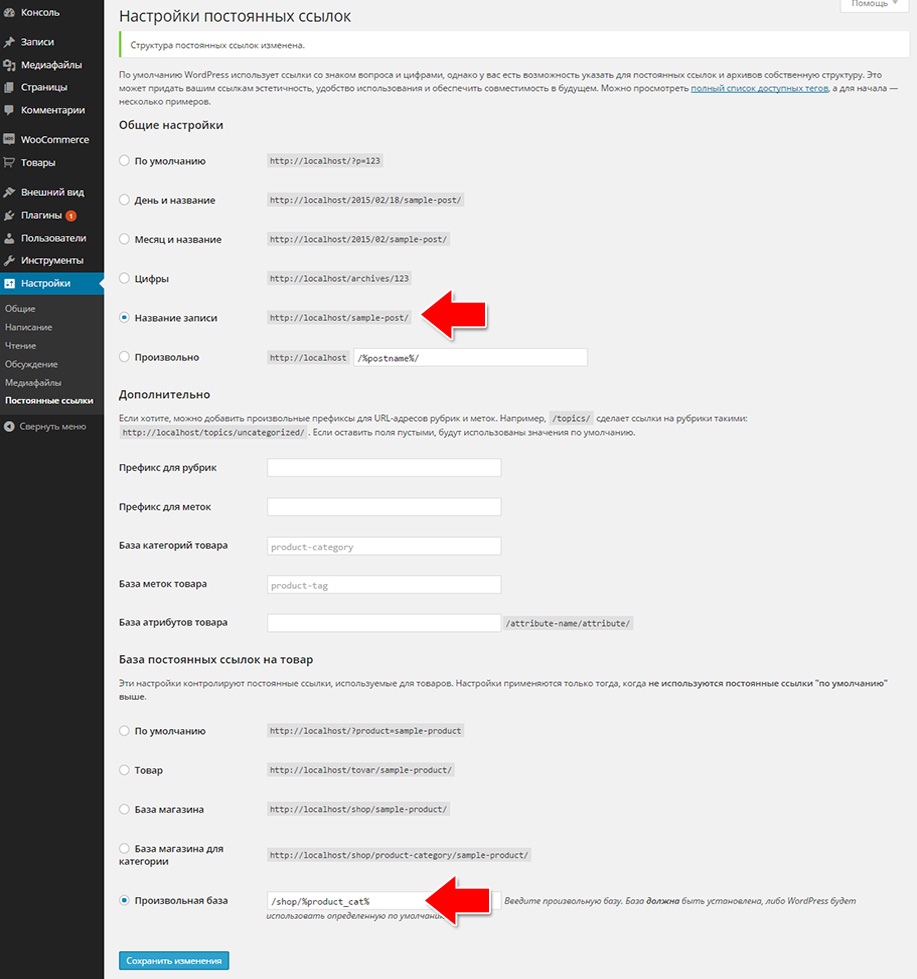
Post name: /%postname%/
And below
Custom base: /shop/%product_cat%
Possible problems with WooCommerce and their solutions:
How do I display products from a specific category on a page?
Suppose we have big online store and for convenience we want that when passing to specific page we displayed products of the same category, for this we will do the following:
1) Create new page, let's call it, for example, Fans
2) We create a category in the Products, if we haven’t created it yet, and in the properties of the products “Fans”, we assign this category to the products by ticking. Suppose the category is called "ventilyator"
2) Insert a shortcode with the name of the category in quotes.
Array("per_page" => "12", "columns" => "4", "orderby" => "title", "order" => "asc", "category" => "")
To change the shortcode values, you need to write a plugin or edit the code in the wp-content\plugins\woocommerce\includes\shortcodes file and in \woocommerce\includes\class-wc-shortcodes.php.
Custom Values:
per_page- the number of products on each page.
columns number of columns
How will the customer of the online store pay for the purchase?
To be able to pay for purchases, we can connect any payment gateway we need. By default, it already has a Paypal payment gateway, which gives the buyer the opportunity to pay for purchases using Visa and Master Card plastic cards. AT this case we need to register a wallet in the PayPal system on entity where money for purchases will be transferred. In the WooCommerce settings –> Settings –> Payment gateways –> Paypal enter the name of your mail.
You can choose to pay Cash, for example, we have an online furniture store that is focused on local buyers and they will pick up the goods from the store and pay there.
We can set up an online store so that the buyer can choose several ways to purchase, as well as connect convenient payment gateways such as WebMoney, Yandex money, etc.
How to fix blurry product images?
Sometimes after loading the product image is blurred and becomes inaccurate. To fix this, go to the tab –> Settings –> Catalog and enter your product thumbnail values, change the product sizes. Be sure to install the plugin. Then go to the "Tools" control panel, there will appear new tab Regen Thumbnails, go to it and start image regeneration. The plugin will re-update all thumbnails and images in the system. After that, you should not have problems with images.
When adding a review to a product, a redirect occurs and the page stops loading
The problem mainly arises due to the fact that the name of the product is in Cyrillic, for this we go to Settings - Permalinks and in the section Base of the product permalink we make the name arbitrary and add /product, as shown in the screenshot:
It turns out:
http://my site/catalog/category/product/ – works
http://my site/page/ - NOT working!!!
And if you change:
Product permalink base -> Custom base -> /catalog
or Product permalink base -> Custom base -> /catalog/%product_cat%
http://my site/catalog/ - works
http://my site/catalog/category/ - works
http://my site/catalog/category/product/ - DOES NOT work!!!
http://my site/page/ - works
Like it or not, everything does not work out and look at the goods and articles ... What's the problem?

WordPress is considered to be a blogging CMS. But in fact, on CMS WordPress you can build sites of almost any complexity. To prove it, we will show you how you can create an online store in WordPress using the WooCommerce plugin.
This is only the first part of the tutorial, after which we recommend reading "E-shop on WordPress with the WooCommerce Plugin - Part 2".
First you need to continue working with her. To place a site on a hosting, we recommend. To create an online store on WordPress, you need to have basic knowledge of working with WordPress. To do this, read the "" section. If you know how to work with WordPress, read on.
Download the WooCommerce plugin

To create an online store on WordPress, you need the WooCommerce plugin<- перейдите по ссылке и скачайте плагин. Если плагин скачали, то можете сразу , а затем активировать его. После активации плагина, в админке WordPress вы увидите новый тип записи Products и новую вкладку для настройки плагина WooCommerce.
Setting up WooCommerce
Setting up WooCommerce is perhaps the most important step in creating an online store on WordPress.
WooThemes - templates for your online store
For starters, we recommend download for free or buy special template for WooCommerce. Then install this template. This will allow you to get rid of the need to create a template yourself or order one.
Russification of WooCommerce
To make it more convenient for you to work with your online store, we recommend Russifying the WooCommerce plugin. To do this, you need to install the Saphali Woocommerce Russian plugin. After that, the entire plugin interface will be translated into Russian and Russian currencies will be added. Also you can with code.
Setting up the pages of the online store
After installing the WooCommerce plugin, you will be prompted to set up your web store pages. This must be done first. To go to the page settings you can click on the "Install WooCommerce Pages" button or go to the WooCommerce tab -> Settings -> Pages.
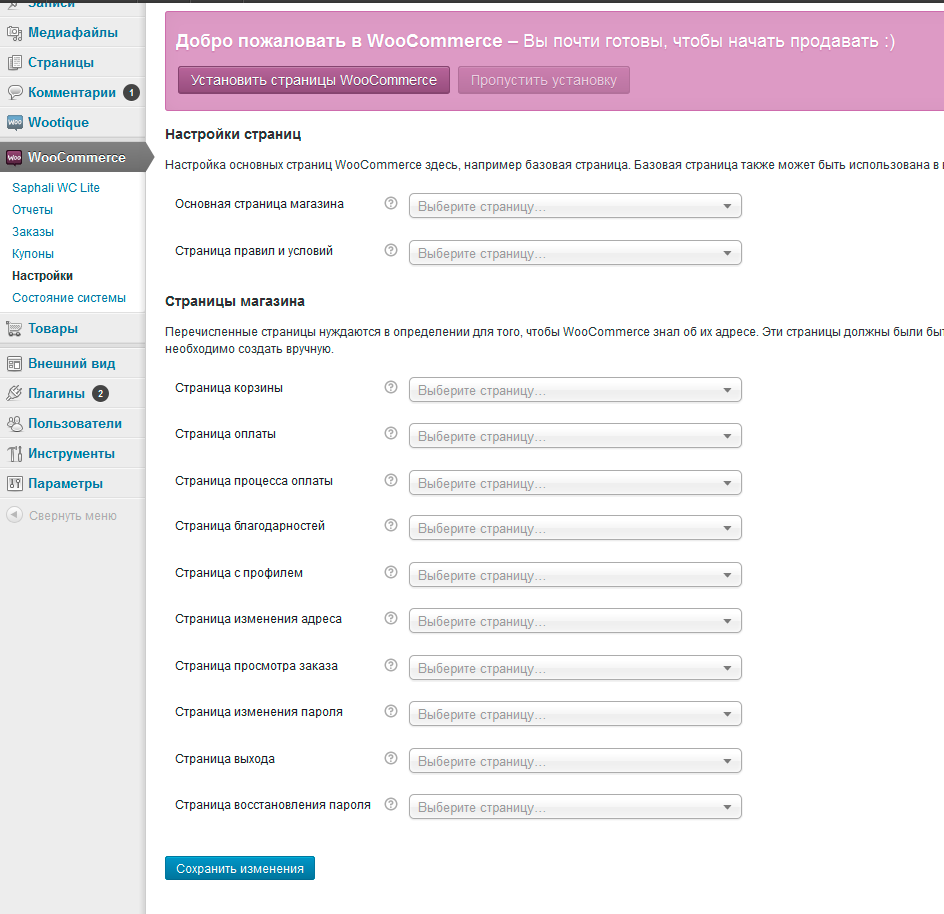
When installing the WooCommerce plugin, the pages should be created automatically, but if it doesn't, you'll have to create desired pages on one's own. Below you will find instructions on how to do this. On the settings page, you need to define these pages like the one shown in the picture below.

Creating Special Pages for WooCommerce
If for some reason the pages were not created automatically, do it manually, as follows. Create a WordPress page with a name like "Cart". To activate the cart on this page, add a shortcode to the page content:
This can be done using a button in the visual editor, as shown in the image below.

Similarly, you need to create other pages.
shortcode for WooCommerce
Just in case, below we will publish all the necessary shortcodes for WooCommerce.
Change my address
Change password
View order
Pay
New goods
This completes the main work, like the first part. Continue reading "WordPress Online Store with WooCommerce Plugin - Part 2".
Tell your friends

Like the blog? - Read VKontakte
Subscribe and receive useful articles by mail!
The Regenerate Thumbnails plugin will appeal to those who already have a store, and all images are adjusted to the previous theme. This plugin will resize all of your WordPress Media Library images to fit the new theme. You can choose not to do this with dummy data, or skip this plugin altogether (but we still recommend using its services, then all media files will be the correct size for testing).
Plugins like Envato Toolkit, however, are very important for themes purchased from ThemeForest, ensuring that you are notified of theme updates.

If you're using a theme from ThemeForest, like our Savoy example, don't forget to enter your Marketplace Username and Secret API Key in the Envato WordPress Toolkit to keep track of theme updates.
Setting
This part of the setup is very interesting, now you are starting to imagine the design of the future site.
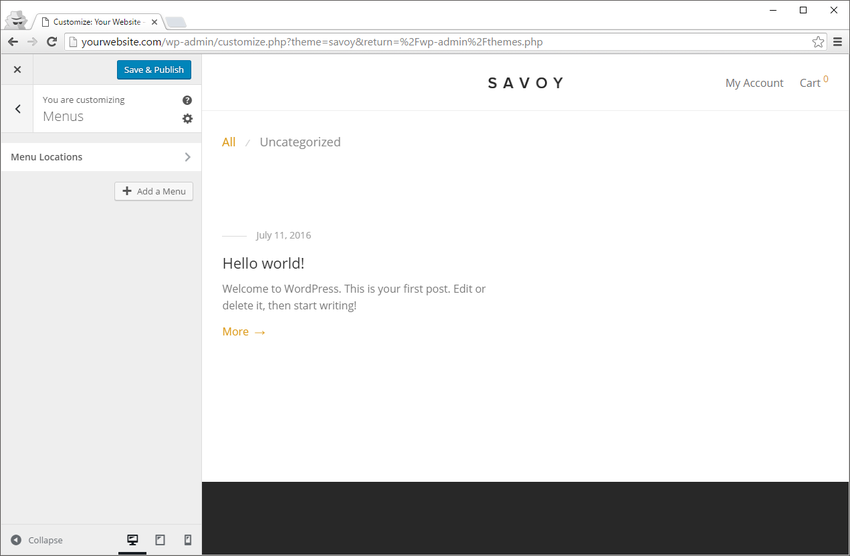
You have access to the WordPress Customizer from the menu Appearance→ Customize.

Welcome to WordPress Customizer:

Here we will change a couple of things, and then move on to deeper settings.
The first thing you will see will be the Site Identity . Here you can change the name and advertising slogan of the site.

Sometimes here you can add an image in the header of the site or a site icon (depending on the theme).
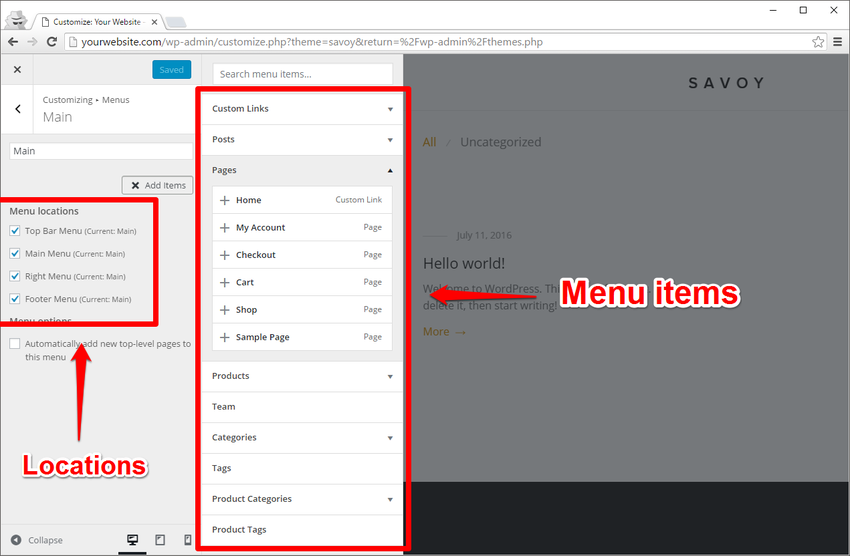
If you have not created pages yet, then there is almost nothing to configure. But WooCommerce automatically adds a few new pages that you'll want to add to the menu.
You can easily add and create a new menu:

Once you add a menu (one or more), you can choose where it and its sections (such as links, posts, pages, products) should be placed.
You have the freedom to customize the functionality of your site. Don't be afraid to experiment.
Before we're done with the WordPress Customizer, you'll want to create home page your site:
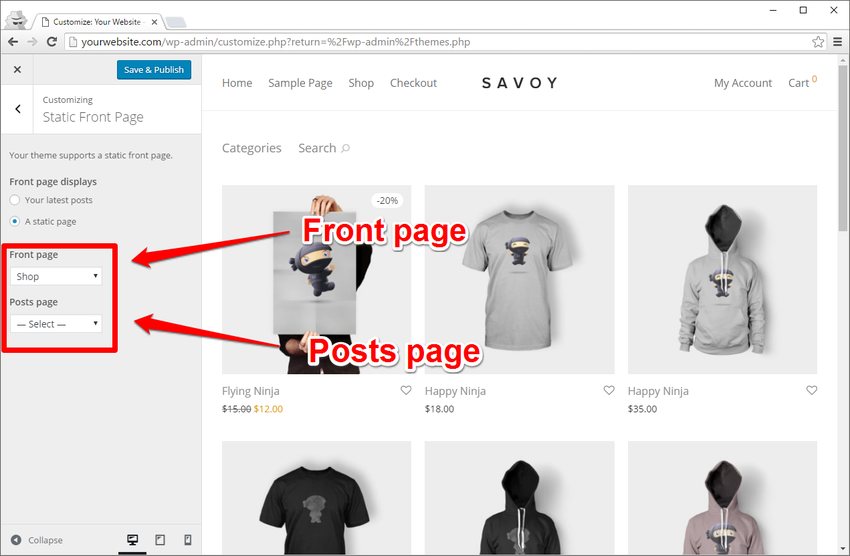
Mark Front page displays as A static page and select Front page - Shop from the drop down menu. The Shop page was created automatically when you installed the WooCommerce plugin.
As for the posts page, it all depends on whether you want to blog on your WooCommerce site. If so, you will need to create a blog page and select it in the WordPress Customizer or in Settings → Reading.
results
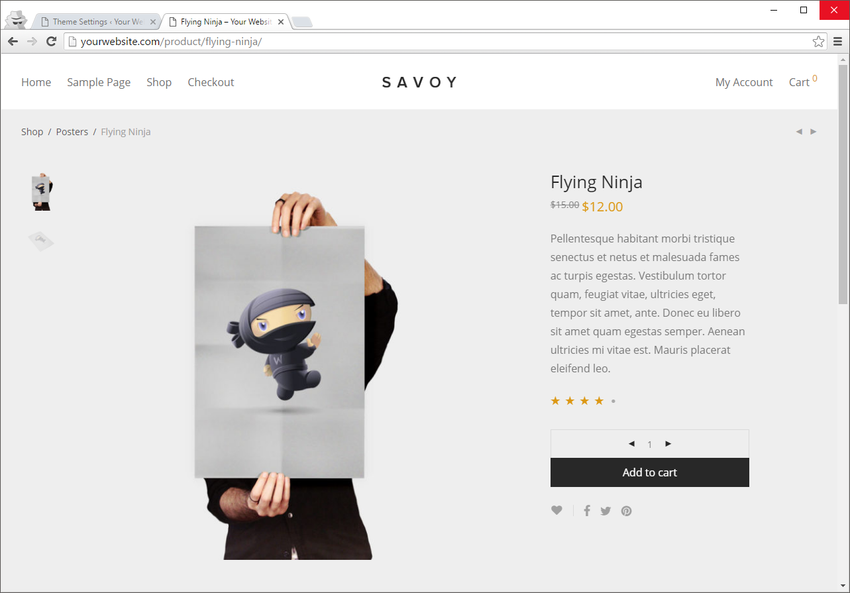
After basic settings you'll see how great your online store can look using the WooCommerce theme.

The product pages look amazing:
There is even a block with Similar products:

Savoy allows you to customize many elements of your site, and not just the ones we've covered (read your theme's documentation carefully to find out its specifics). We have only shown you the customizations that can be done with the WordPress Customizer and are the same for all themes.
Results
See how easy it is to take those first steps in setting up a new WooCommerce theme, and how beautiful the themes are made specifically for WooCommerce? But that's not all!
You can find as well for your store.
We are sure that you will find a cool WooCommerce theme that is perfect for your online store.
Did you like the material?
Initially, I planned to write about the implementation of one hack on the WooCommerce cart page, but later I decided to talk about several tricks for modifying it at once. I want to note that this blog has a special section about, because. This question has many nuances. Today the article will be devoted more to the appearance and display of information on the site. Let's start with the settings of the module itself, then consider the issue of deleting the delivery and at the same time changing the cart template. I think the post will be useful not only for beginners.
At one of the initial steps on WooCommerce, the system creates several key pages (including the shopping cart). If you look at its contents in the editor, you will see the shortcode .

Here you can also change the title and add some of your text to the page. You also set the META description tag and title with .
In the module settings, there are different options for managing the cart. You will find some of them in the tab "Delivery" - "Delivery options".

In the Calculations option, you can:
- include a shipping calculator in the shopping cart;
- hide the display of its cost if the address is not yet filled.
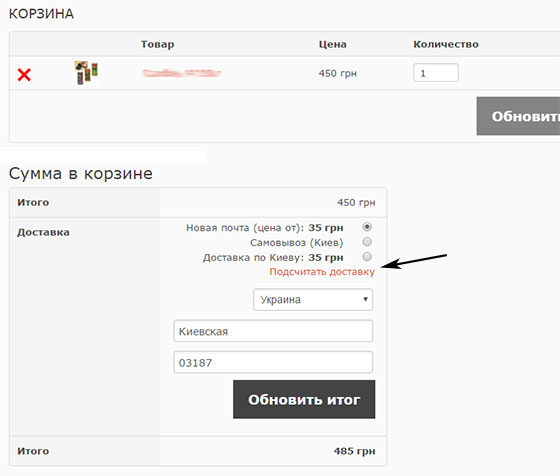
When shipping calculation is enabled, a corresponding link will appear on the WooCommerce cart page. When you click on it, the user will see fields for entering the address.
How to remove shipping from cart page
Actually, our next task is to remove everything superfluous at the stage of order formation, which does not concern the choice of goods and their quantity. By default, as you can see, this is not provided in the plugin settings, but this makes some sense. The fewer different distractions and confusing the user in your online store, the more likely that the buyer will be able to complete.
To solve the problem, we need your theme (custom-function.php or function.php) the following hack:
| function delshipping_calc_in_cart( $show_shipping ) ( if ( is_cart() ) ( return false ; ) return $show_shipping ; ) add_filter( "woocommerce_cart_ready_to_calc_shipping", "delshipping_calc_in_cart" , 99 ) ; |
function delshipping_calc_in_cart($show_shipping) ( if(is_cart()) ( return false; ) return $show_shipping; ) add_filter("woocommerce_cart_ready_to_calc_shipping", "delshipping_calc_in_cart", 99);
WooCommerce Cart Template
All the main template files for the WooCommerce cart page are located in the cart folder. I remind you what you need after you copy the templates folder to your child theme. By default, the directory contains several files:
- cart-totals.php
- cross-sells.php
- cart-empty.php
- cart-item-data.php
- cart-shipping.php
- mini-cart.php
- proceed-to-checkout-button.php
- shipping-calculator.php
Each of them is responsible for certain functions, for example, in the cross-sells.php file, cross sales are displayed, in cart-empty.php, an empty cart is processed, etc. You can change the output of all page elements to suit your needs. Although it is customary to do some edits through hacks / snippets, such as in a post about .
Let's look at one example in order to clarify the logic of work a little. After implementing the hack from the previous WooCommerce cart setup step, we got rid of the shipping, but the page still looks a bit odd.

If you carefully study the cart template files, you will see that the line is responsible for displaying the block under the products:
add_action("woocommerce_cart_collaterals", "woocommerce_cross_sell_display"); add_action("woocommerce_cart_collaterals", "woocommerce_cart_totals", 10);
Now, in essence, you have 3 options to hide it all:
- comment out the do_action line in cart.php;
- use the remove_action function in custom-function.php (or function.php);
- tweak the cross-sells.php and cart-totals.php files that are directly called by these functions.
After the implementation of any of these methods, not only the final price block will be hidden, but also the link to pay for the order. Therefore, you need to return the corresponding button to the WooCommerce cart page. Add it to cart.php after the form:

This is just one example of working with a template, I hope you get the point. In principle, there are 2 options for modifying it - in files directly (easier and more visual), or working through hooks and remove_action / add_action functions (it seems to be considered more correct and more flexible). Whichever option you choose, keep in mind that edits must be made to a copy of the store layout in a child theme.
If there are any other questions / additions on setting up a WooCommerce cart and modifying the corresponding page on the site, write in the comments.
Consider fine-tuning the WooCommerce online store component without making changes to the core. The modifications described here safe and valid. When updating WordPress and WooCommerce, no modifications will be lost.
Adding currency "Russian ruble" to the store on WooCommerce.
This mod will add a dollar to your WooCommerce store. You can install the Saphali Lite plugin and the ruble will be added automatically with the plugin.
Open file theme features(for your active WordPress theme). To do this, in the admin. panel go to menu "Appearance" --> "Editor" --> "Theme functions" - functions.php file. Add the above code to the end of the file and save:
Add_filter("woocommerce_currencies", "add_my_currency"); function add_my_currency($currencies) ( $currencies["ABC"] = __("Russian ruble", "woocommerce"); return $currencies; ) add_filter("woocommerce_currency_symbol", "add_my_currency_symbol", 10, 2); function add_my_currency_symbol($currency_symbol, $currency) ( switch($currency) ( case "ABC": $currency_symbol = "rub"; break; ) return $currency_symbol; )
Changing the number of products on one page of the WooCommerce store.
I recommend using the WooCommerce Customizer plugin - it will allow you to set the number of products per page, the number of columns with products on the store page.
If you want to work without a plugin, you can set an arbitrary number of products displayed by default on your store page. The number 30 in the code below specifies the number of items. Change it to what you need. Add code to functions.php file:
Add_filter("loop_shop_per_page", create_function("$cols", "return 30;"));
The quantity of goods in the column of your store.
You can change it to the value you need (number 35 in the code). We add the code as usual to functions.php:
Add_filter("loop_shop_columns", "loop_columns"); if (!function_exists("loop_columns")) ( function loop_columns() ( return 35; ) )
Changes the number of up-sells products.
Up-sells are products or products that you recommend instead of the ones you are browsing. customer goods Example: more profitable and inexpensive or better and more functional, but expensive options.
The numbers in the code mean the number of columns and the number of goods in the columns. Add code in theme functions as usual:
Remove_action("woocommerce_after_single_product", "woocommerce_upsell_display"); add_action("woocommerce_after_single_product", "woocommerce_output_upsells", 20); if (!function_exists("woocommerce_output_upsells")) ( function woocommerce_output_upsells() ( woocommerce_upsell_display(4,4); // Show 4 products in 4 columns ) )
We change the number of related products.
Related products are displayed in the product card at the bottom of the page under the main product. By default, 2 related products are displayed. Let's change the number of related products. The numbers set the number of products and the number of columns. We add the code to the functions.php file:
Function woocommerce_output_related_products() ( woocommerce_related_products(4,4); // Display 4 products and 4 columns )
Changing checkout fields in WooCommerce.
I recommend changing the set of checkout fields using the Saphali Lite plugin. But this can be done by editing theme functions. Below is an example of code that will remove the specified fields:
Add_filter("woocommerce_checkout_fields" , "custom_override_checkout_fields"); function custom_override_checkout_fields($fields) ( /*Removed unnecessary fields*/ unset($fields["billing"]["billing_company"]); unset($fields["billing"]["billing_country"]); unset($fields ["billing"]["billing_address_2"]); unset($fields["billing"]["billing_state"]); return $fields; ) add_filter("woocommerce_billing_fields", "custom_woocommerce_billing_fields"); function custom_woocommerce_billing_fields($fields) ( $fields["billing_address_1"]["class"] = array("form-row-wide"); /*Address field is wider*/ return $fields; )
Hide the display of the number of products in the category.
In the functions.php of the theme, you need to add the following code:
Add_filter("woocommerce_subcategory_count_html", "jk_hide_category_count"); function jk_hide_category_count() ( )
We change wrappers (wrapper) for our template on the pages of the online store.
In principle, this is not required for WooCommerce-compatible templates. If you want to experiment, the code is this:
Remove_action("woocommerce_before_main_content", "woocommerce_output_content_wrapper", 10); // Removed remove_action("woocommerce_after_main_content", "woocommerce_output_content_wrapper_end", 10); add_action("woocommerce_before_main_content", create_function("", "echo "
We remove the "Add to Cart" button on the main storefront.
We add the code as usual in the theme functions:
Remove_action("woocommerce_after_shop_loop_item", "woocommerce_template_loop_add_to_cart", 10);
We swap the short description of the product and the price.
If you want to swap short description and price, add this code to functions.php:
Remove_action("woocommerce_single_product_summary", "woocommerce_template_single_price", 10); remove_action("woocommerce_single_product_summary", "woocommerce_template_single_excerpt", 20); add_action("woocommerce_single_product_summary", "woocommerce_template_single_price", 20); add_action("woocommerce_single_product_summary", "woocommerce_template_single_excerpt", 10); function HB_woocommerce_template_dimensions()( //Add function to call panel with dimensions and weight global $woocommerce, $post, $product; $product->list_attributes(); ) add_action("woocommerce_single_product_summary", "HB_woocommerce_template_dimensions", 15); //Put a panel after the short description
Removing breadcrumbs on the WooCommerce store pages and on the product card page.
If you don't like the standard WooCommerce breadcrumbs, or instead you have a custom plugin that outputs Breadcrumbs, then add the following code to functions.php:
Remove_action("woocommerce_before_main_content", "woocommerce_breadcrumb", 20, 0);
Remove the "Additional description" tab of products in the WooCommerce store:
If you do not need an additional description, then it is easy to remove it. Let's add the following code to the theme functions:
Remove_action("woocommerce_product_tabs", "woocommerce_product_attributes_tab", 20); remove_action("woocommerce_product_tab_panels", "woocommerce_product_attributes_panel", 20);
Redirection (redirect) of the client after authorization in the store to the page you need.
So that after entering Personal Area the client went to the page you want to set (replace the page address in the /checkout code with the desired one), add the following code to the theme function:
Add_filter("woocommerce_login_widget_redirect", "custom_login_redirect"); function custom_login_redirect($redirect_to) ( $redirect_to = "/checkout"; )
Swapping pagination and sorting.
Let's change places page navigation(list of pages at the bottom) and a sorting block (at the top - in descending / ascending price, etc.). The code is like this:
Remove_action("woocommerce_pagination", "woocommerce_pagination", 10); remove_action("woocommerce_pagination", "woocommerce_catalog_ordering", 20); function pre_woocommerce_pagination()( //Add text before the list echo "Sort: "; ) add_action("woocommerce_pagination", "pre_woocommerce_pagination", 5); add_action("woocommerce_pagination", "woocommerce_catalog_ordering", 10); add_action("woocommerce_pagination", "woocommerce_pagination", 20);
Adding navigation and sorting to the top of the page.
We add the code as always to functions.php:
Add_action("woocommerce_before_shop_loop", "pre_woocommerce_pagination", 1); add_action("woocommerce_before_shop_loop", "woocommerce_catalog_ordering", 2); add_action("woocommerce_before_shop_loop", "woocommerce_pagination", 3);
Making the fields in the WooCommerce order form optional.
add_filter("woocommerce_checkout_fields" , "no_required_checkout_fields"); function no_required_checkout_fields($fields) ( $fields["billing"]["billing_last_name"]["required"] = false; $fields["billing"]["billing_address_1"]["required"] = false; $fields[ "billing"]["billing_city"]["required"] = false; $fields["billing"]["billing_postcode"]["required"] = false; return $fields; )We put the buttons "Continue shopping" and "Checkout" at the bottom of the WooCommerce cart page.
Function cart_more_buttons() ( echo " ← Continue Shopping Checkout →"; ) add_action ("woocommerce_after_cart_totals", "cart_more_buttons", 5);
Add a "Continue Shopping" button to the checkout page.
Function checkout_more_buttons() ( echo " ← Continue Shopping"; ) add_action ("woocommerce_review_order_before_submit", "checkout_more_buttons", 5);
We have reviewed the main fine tuning store on WooCommerce using a valid way to edit theme functions (functions.php file).