It happens that when creating Excel tables, you need to protect some cells with entered formulas or constants from unauthorized changes. I hope the reader knows how to do this! So, after a certain time, the need arises to change formulas or other protected data.
And suddenly it turns out that the password is irretrievably forgotten, and you don’t really want to create tables again and remember formulas. Moreover, this becomes clear precisely when everything is needed urgently, right now, or even better – yesterday... And then this article will come to the rescue!
Excel Format
The method is only suitable for documents (files) saved in Excel 2007-2013 format, i.e. with the extension ".xlsx". You can open Excel 97-2003 files with the extension “.xls” in the new Microsoft office packages and save them in the desired format.
Attempting to access a protected cell
The following figure shows the message that is displayed when you try to access a protected cell:
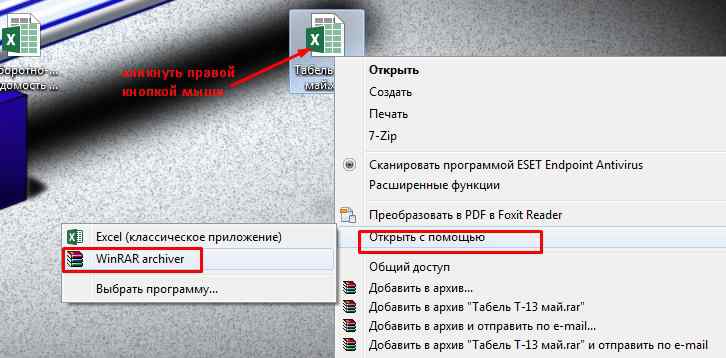
The arrow at number 1 shows a button, when pressed, you can enter a password. But I forgot my password, what should I do? There is an option for getting rid of the password. Closing open file. Click on the file right click mouse and open it using the WinRar archiver:
The result will be:
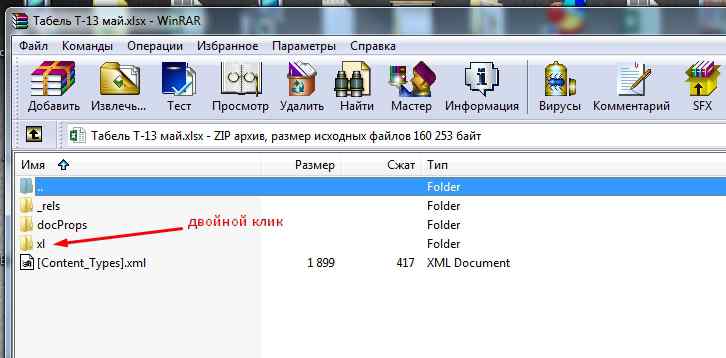
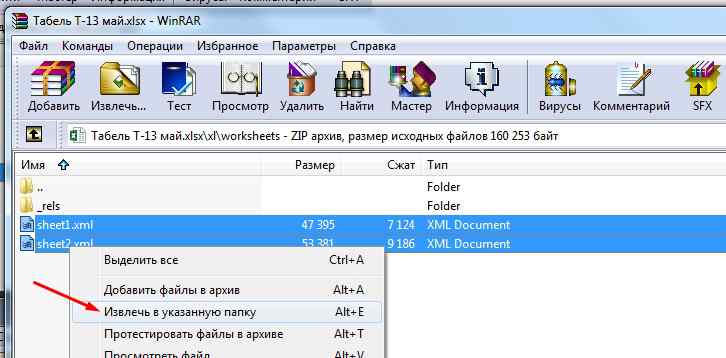
Opening the folder we see:
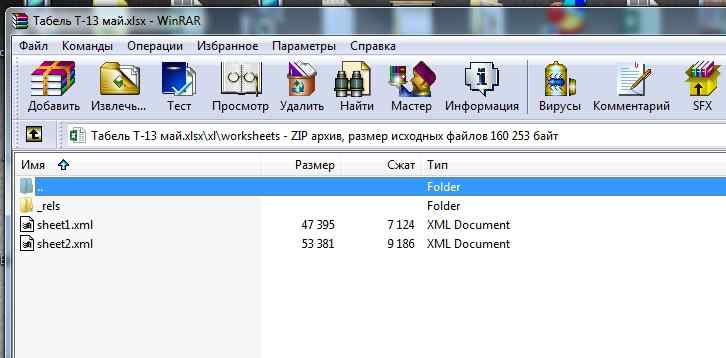
Archive in excel
There are two page files here: sheet1.xml and sheet2.xml. The number of files depends on the number of sheets in the Excel document. You need to unzip password-protected pages. To do this, select the necessary files by pressing the “Ctrl” key and clicking on the desired file. Next, either by simply dragging it onto the “desktop”, or by right-clicking the mouse -> context menu, extract to the specified folder -> select “desktop”. After completing these steps, do not close the archive!
In the end it should look like this:

From notepad to excel
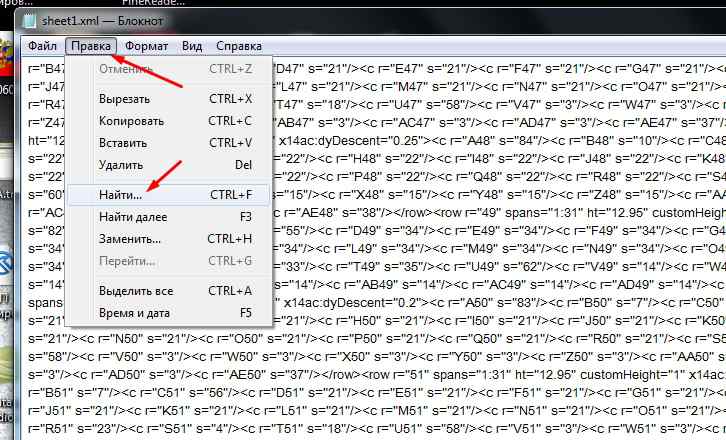
Open a saved file - right-click on the file, context menu-> open with -> select “Notepad”.

When the file opens, perform the following steps:
sheetProtection

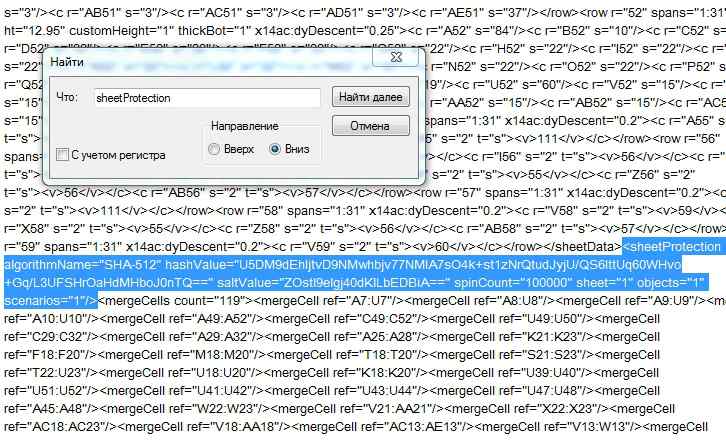
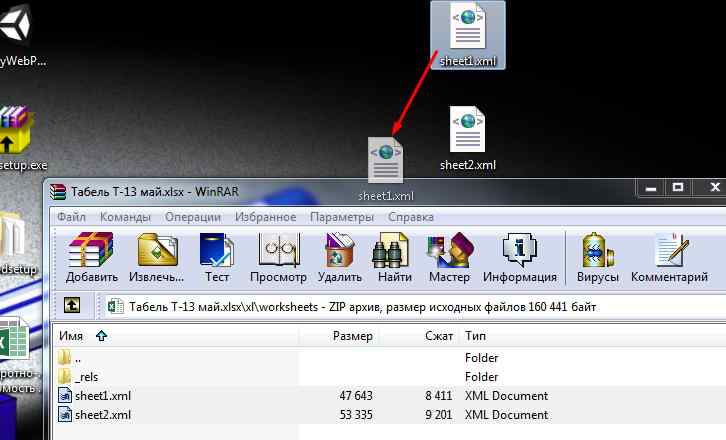
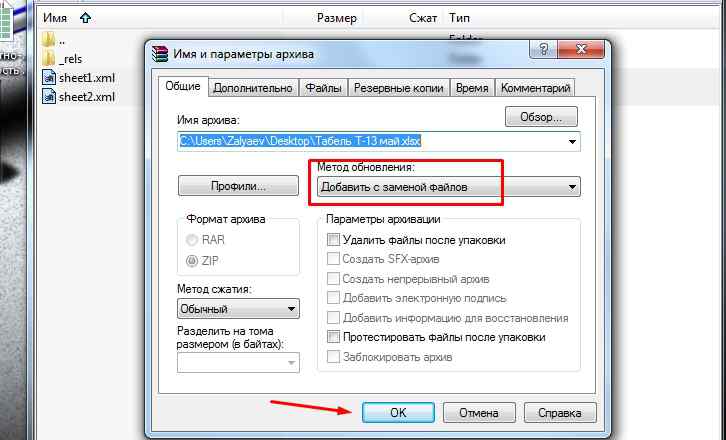
Next, delete the selected text by pressing the “Delete” key and save the file by pressing the “Ctrl+S” key combination. Or other known methods. Next, you need to return to the open archive by clicking its icon on the taskbar, and simply drag and drop the previously saved file in the archive window. The hope is that everyone knows how it's done. A dialog box will appear (as in the figure), where you need to click on the “OK” button.
This inscription indicates that the sheet is not protected and the values in its cells can be changed. And in the formula bar you can see the entered formulas that can be changed.
Remember password in excel
This is the “remember password” option. Of course, this is not a 100% method - but this way you can remove sheet protection from many files. And, most importantly, this method is only suitable for files with the extension “*.xlsx”. Therefore, files with the extension “*.xls” need to be opened in Excel 2007-2013 and saved in the required format.

In order to protect data both from unauthorized persons and from their own accidental actions, users can install protection on Excel documents. Alas, not everyone knows how to remove such protection in order to gain access to information, including the ability to edit it. And what should we do if the file was received from another user who forgot to give us the password, or we accidentally forgot (lost) it? Let's take a closer look.
Note that block Excel document There are two ways: protect a sheet or a book. Accordingly, this will determine what actions need to be taken to unlock it.
Removing protection from the sheet
A security password can be set not only for the entire document, but also for a specific sheet. IN in this case, the user will be able to see the contents of the sheet, but will not be able to edit the information.

To remove sheet protection, perform the following steps.

Changing the file code to remove sheet protection
This method is needed in cases where the password was lost or was not transferred along with the file from another user. It only works for those documents that are protected at the level of individual sheets, and not the entire book, because we need to get to the menu "File", which is not possible when password protecting the entire document.
To remove protection, you must perform the following sequence of actions:
- Go straight to step 4 if the file extension is XLSX (Excel workbook). If the document format is XLS (Excel 97-2003 workbook), you need to first resave it with the required extension. To do this, go to the menu "File".

- Select from the list on the left "Save as", then on the right side of the window click the button "Review".

- In the window that appears, select any convenient location to save the file, set the format “Excel workbook” and click OK.

- Open in Conductor a folder with a document in XLSX format (newly saved or originally available). To enable file extensions, go to the tab "View", where we enable the desired option in the tool group “Show or hide”.
 Note: The actions in this step and below in the operating system are described using Windows 10 as an example.
 - Right-click on the document and in the list that opens, click on the command "Rename"(or you can just press the key F2, after selecting the file).

- Instead of expansion "xlsx" we write "zip" and confirm the change.

- The system will now identify the file as an archive, the contents of which can be opened by double-clicking the left mouse button.

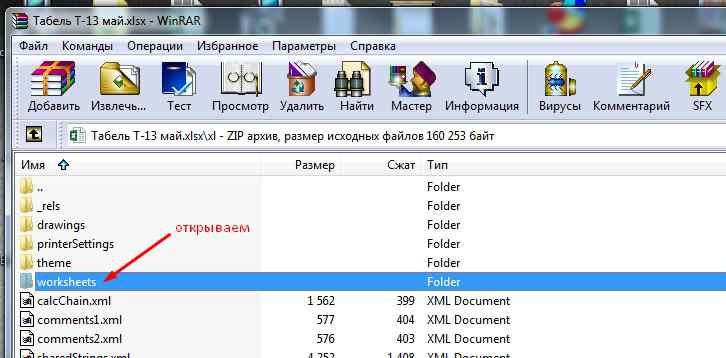
- In the folder that opens, go to the directory “xl”, then - “worksheets”. Here we see files in the format XML, which contain information about the sheets. You can open them using the usual Notepad.
 Note: in Windows 10, you can set the default program by file type in the system settings (launched by pressing the keys Win+I), In chapter “Applications”, then - “Default apps” – "Choice standard applications for file types".
- After successfully opening the file, we need to find the phrase in its contents "sheetProtection". To do this, we will use the search, which can be launched either through the menu “Edit”(paragraph "Find"), and by pressing the key combination Ctrl+F.

- Enter the desired phrase and press the button “Find next”.

- Once you have found the desired match, you can close the search window.

- We erase the phrase and everything that relates to it (between the opening and closing tags).

- On the menu "File" select a team "Save as"(or press the keyboard shortcut Ctrl+Shift+S).

- It is not possible to save the document immediately in the archive. Therefore, we do this in any other place convenient for us on the computer, without changing the name and specifying the extension "xml"(file type must be selected - "All files").

- Copy the newly created file to the folder “worksheets” our archive (with replacement of the original one).
 Note: record "sheetProtection" present in all password-protected sheet files. Therefore, we perform the steps described above to find and delete it with all other files XML in folder “worksheets”.
 - Again we go to the folder containing our archive and change the extension back from "zip" on "xlsx" by renaming.

- Now you can open the file and safely edit it. You will not need to enter a password to remove protection.

Third-party programs for removing passwords
To remove a password, you can use programs third party developers. At the same time, it is worth remembering the possible risks associated with downloading, installing and using non-standard tools operating system And Excel programs.
If you nevertheless decide to take advantage of this opportunity, you can pay attention to quite popular program Accent OFFICE Password Recovery .
Link to official page with the program: https://passwordrecoverytools.com/office-password.asp.
Please note that to gain access to all functions of the program you need to purchase a license. A demo version is available to try out the application; however, it does not allow you to delete passwords.

Conclusion
Protecting a book or individual sheet is extremely useful features Excel programs when you need to protect information from unauthorized persons or, for example, protect yourself from accidental changes to important read-only data. But sometimes the opposite need arises - to remove previously installed protection. This can be done in different ways, depending on how it was installed. And even if you have forgotten the password, the lock can be removed, however, only if the code was set for individual sheets and not the entire book.
Program Microsoft Office Excel is designed to work with information in tables. It is presented in the form of a grid, which is formed by columns and rows. In some cases, the author of a “book” - an Excel document - needs to protect data from changes. You can protect an arbitrary number of cells from entering incorrect data or editing. This is necessary in order to:
- limit the rights of users or groups by setting a password for a specific list (or the entire book);
- protect the elements from changing the cell on their own and losing information.
The article discusses the options available in Excel.
This is how you can prevent interference in an Excel workbook from accidental or intentional interference by one or another user. This will avoid data loss when saving and closing a document, as well as attempts to restore values, which takes time and is not always possible.
Unfortunately, Excel does not have a button that will instantly restrict access to a particular area. Nevertheless, everything can be done using the program’s capabilities without resorting to others. In order to install such protection against entering incorrect data or changing it, use one of the following methods:
- restriction on entering incorrect information;
- protecting a selected quantity or a specific group of values from editing;
- setting different rights for different users or groups;
- restricting rights to one or more pages of an Excel workbook.
You can also password-protect security features, making changes unavailable to people who don't know the access code. For example, this allows you to split a book into areas with one person working in each area. By combining different functions, you can achieve the type of editing rights restriction you desire. The change restriction can also be canceled (if a password has been set, you will need to enter it).

The setting can be made for various types protected data.
This method is the easiest to use. With it, you can control what you (or another user) puts into the cell. You can filter out data that does not meet certain criteria, which can also be specified. This way, you can prevent entering a negative price, a fractional number of people, or the wrong date for a certain event. In order to install protection, you need:
- Select the elements to which the function will apply.
- Go to the “Data” tab in Excel, then in the “Working with Data” area, click “Data Validation”.
- A window will open - in “Parameters”, specify the type of data you want to protect cells from entering.
- You can also set up notifications that Excel will display before editing and if you enter incorrect data. This is done in the “Input Message” and “Error Message” tabs, respectively.
- Then you need to save the settings by clicking “OK” and they will take effect.

Adding automatic notifications for working with cells.
Restriction from editing
Using this function, you can clearly indicate specific cells or groups that need to be protected from modification. This can be done for:
- All elements of the work area - press Ctrl + “A”;
- Specific - select them manually, using Ctrl to add a cell to the list and Shift to include several horizontally, vertically or crosswise;
- Certain groups of elements, for example, only cells with formulas, notes or any others.
Limit the entire work area:
- Select all elements - press Ctrl + “A” or click on the area where the numbering of rows and columns on the table frame intersects (an empty cell without a number or letter).
- Select “Format Cells”, in the window go to “Protection” and activate the items “Protected cell” (set by default, optionally or instead), “Hide formulas”.
- After this, you need to activate the saved page function.

By selecting the entire table or part of it, we restrict access.
Restriction of rights to manually selected cells:
- Select elements that do not need to be protected by clicking on them, holding Shift (to include in the group list) and Ctrl (to include a specific, including non-adjacent cell).
- Right-click on the highlighted area to open the context menu.
- Select “Format Cells”, in the window go to “Protection” and uncheck “Protected cell” - all other selected elements will be limited in editing when sheet protection is activated.
- Click "OK" to apply the settings.
- After this, you need to activate the option.
Restricting access to certain groups of cells is necessary if you need to restrict editing of one or more groups with specific content properties:
- Specify items belonging to one or more groups that need to be protected. To do this, follow the path “Home” - “Editing” - “Find and Select” - “Selecting a group of cells”.
- Specify the required options and click OK for the changes to take effect.
- After this, you need to activate the protection function.

An example of selecting content with specific properties.
How to set worksheet protection in Excel
It is not enough to simply uncheck or check the boxes in the paragraphs on restricting the rights to change data. The cells will become protected (or vice versa, if you unchecked them) after the function is activated for the entire page. Excel's default settings are Protected Cell enabled and Hide Formulas disabled, but you can check this or make adjustments if necessary.
- Go to the “Review” tab, select “Protect sheet” - this way you will limit the rights to all cells that are checked (the rest can still be changed).
- You can also deposit additional settings before applying the option to specify what exactly will be done with the marked elements.
- Confirm activation of access restriction.
If you want to leave the option to format all elements of an Excel page, check only the first three items.

Excel allows you to add a password when protecting a worksheet.
Limiting different ranges for different users
If several people are working on a document, and each of them should have access to only a certain area, it is necessary:
- Go to the “Review” tab, click “Allow changing ranges”.
- In a new window, create an area - enter a list of values and a password to access them.
- Create the required number of custom areas and allow access to any number of users.
- Install the function for the changes to take effect.
When using such a system of functions, each user will be forced to enter a password before editing a certain section of the table. If he doesn't know secret code, you won't be able to make changes.

We restrict or provide access to cell ranges.
Restrict one or more sheets from changing and formatting
In most cases, it is not enough to limit the rights to cells and their groups by functionality. It is advisable to prohibit editing an entire Excel page or several. To do this you need:
- Go to “Review”, select “Protect Sheet” in the “Changes” area.
- Enter a password if required.
- Save changes.
Using this function, you can avoid not only changing certain values, but also editing the title, “header” (fixed rows and columns), formatting and resizing in the Excel window.
How to set a password to protect against editing
Restrictions set in an Excel document can be overridden by any user with rights (by default). In order to prevent other users from disabling the function of protecting against editing or entering incorrect data, you can set a password. For this:
- Specify the cells or sheets to which you want to restrict access.
- Go to Review and click Allow Ranges to Change.
- In a new window, create a range or specify an existing one.
- Enter a password and save the settings.
After activating the function, the document cannot be changed by a person who does not know the file access code. Be careful, as it is impossible to recover your Excel password - it will be lost along with all your data.
How to remove protection
This algorithm is suitable for returning rights to the entire sheet, and to some of its elements, if they are the only ones blocked. For this:
- Specify the list of cells to which you want to restore access (press Ctrl + “A” to select all).
- Open the “Format Cells” window by right-clicking on the elements area.
- Go to “Protection” and configure the “Hide formulas” and “Protected cell” items.
- Save your changes.
After use specified functions The Excel document will again become available to all users. In order to cancel protection for only part of the book, first do this for the entire book, and then select the elements whose rights should be restricted again.
Bottom line
Knowing what storage capabilities Excel offers, you can fine-tune access restrictions. This way you can protect yourself from accidentally entering unwanted data, as well as editing the book by a third-party user. You can password-protect the cells, as well as remove the protection against unwanted access or amendments in whole or in part. These are the simplest ways to restrict rights that can be configured in Excel itself.
You worked long and hard on the file, created complex formulas and entered a lot of data. Of course, it is better to protect such a file with a password! And now six months pass, you need to make changes to the file, but the password has been safely forgotten? How can I now remove the protection of an Excel sheet or, as they say, reset the password?
How to quickly unprotect an Excel sheet if you forgot your password? Essentially cracking the book.
There are several methods, but except for one they are all quite cumbersome. Create () double-click on “This book” as in the picture
Copy the macro into the window on the right
Sub Password_Cracker() Dim t! Dim i As Integer, j As Integer, k As Integer Dim l As Integer, m As Integer, n As Long Dim i1 As Integer, i2 As Integer, i3 As Integer Dim i4 As Integer, i5 As Integer, i6 As Integer Dim kennwort As String t = Timer On Error GoTo err_ For i = 65 To 66: For j = 65 To 66: For k = 65 To 66 For l = 65 To 66: For m = 65 To 66: For i1 = 65 To 66 For i2 = 65 To 66: For i3 = 65 To 66: For i4 = 65 To 66 For i5 = 65 To 66: For i6 = 65 To 66 kennwort = Chr(i) & Chr(j) & Chr(k) & Chr (l) & Chr(m) & Chr(i1) & Chr(i2) & Chr(i3) & Chr(i4) & Chr(i5) & Chr(i6) For n = 32 To 126 ActiveSheet.Unprotect kennwort & Chr (n) MsgBox "Done in " & Format(Timer - t, "0.0 sec") Exit Sub nxt_: Next: Next: Next: Next: Next: Next Next: Next: Next: Next: Next: Next Exit Sub err_: Resume nxt_ End Sub
When we share our Excel data with other people, we may need to protect the data in the sheets from being changed or edited.
In this article we will look at how to protect an Excel sheet from changes and editing, as well as how to remove the protection.
Data Protection Basics in Excel
Sheet protection in Excel does not allow you to reliably restrict access to the data in your files or sheets. This is due to the fact that Excel uses a simple password encoding algorithm that is easy to crack. Older versions of Excel (earlier versions lower than Excel 2010) use such a simple coding algorithm that anyone who understands VBA can hack it. Versions of Excel 2013 and 2016 use a more advanced encryption algorithm, but there are also simple approaches to cracking it.
Protecting Excel sheets or files is most needed to limit unwanted changes and editing of data or formulas. I do not recommend storing and forwarding confidential information V Excel tables.
In order to minimize the risk of unwanted changes to your files or sheets, adhere to the following rules:
- Use latest versions Excel – 2013 or 2016;
- Use complex passwords to protect sheets;
- Protect the file structure from changes to avoid editing, deleting or moving data;
- Use different passwords to open the Excel file and allow editing;
How to protect an Excel sheet
To protect a sheet in Excel, we will take the following steps:
- Right-click on the tab with the Excel sheet at the bottom of the page and select “Protect sheet...” . Or go to the tab “Review” on the toolbar and click the button “Protect Sheet” :
- In a pop-up window “Sheet protection”
:
- In field “Password to disable sheet protection”
enter the password that is required to remove the protection. Write down your password in a safe place.;

- If you do not want to protect your sheet with a password, but just want to warn users that editing data on the sheet is not welcome, then leave the password field empty;
- In chapter “Allow all users of this sheet” let's set the settings for those actions that will be allowed to all users who do not have a password. By default, items are ticked “Highlighting locked cells” And “Selecting unlocked cells” . If you leave only these items, then users without a password will only be able to view and highlight locked and unlocked cells.
- If you want to allow users not those who know the password, actions such as: formatting cells, rows and columns, the ability to insert/delete columns and rows, add hyperlinks, sort data, use autofilters, build pivot tables and graphs
, then tick these boxes:

- After we click the “OK” button, the system will ask us to enter the password assigned to the sheet again.
- In field “Password to disable sheet protection”
enter the password that is required to remove the protection. Write down your password in a safe place.;
How to remove protection from an Excel sheet knowing the password
If you know the password to the sheet, then removing the protection will not be difficult.
For this:
- Right-click on the Excel sheet tab and select “Remove sheet protection...” =>
- You can also remove protection from the sheet through the tab “Review” on the toolbar by clicking on the item “Unprotect sheet” => enter your password in the pop-up window and click “OK”.

How to unprotect a sheet in Excel if you forgot your password
As I wrote above, removing protection from a sheet if you don’t know the password is not the most difficult task. To remove password protection from an Excel sheet, use the methods described below.
Unprotect an Excel sheet without password using VBA code (for Excel 2010 and below)
If you are using Excel 2010 or lower, you can unprotect a worksheet without a password using a macro. If you are using Excel 2013 or 2016 version, then save the protected file in xls format (Excel 97-2003 workbook). Then do the following:
- Open the file and go to the password protected worksheet. It is important that the sheet is active; to do this, I recommend clicking on any cell on the protected sheet;
- Press the key combination Alt+F11, thereby calling up the menu Microsoft Visual Basic ;
- In the window that opens, find the section “Project – VBAProject” => right-click on the section item ( VBAProject (filename.xls ));
- Select the item from the drop-down menu "Insert" => "Module" ;
- In the window that opens, enter the code:
Sub PasswordBreaker() "Breaks worksheet password protection. Dim i As Integer, j As Integer, k As Integer Dim l As Integer, m As Integer, n As Integer Dim i1 As Integer, i2 As Integer, i3 As Integer Dim i4 As Integer , i5 As Integer, i6 As Integer On Error Resume Next For i = 65 To 66: For j = 65 To 66: For k = 65 To 66 For l = 65 To 66: For m = 65 To 66: For i1 = 65 To 66 For i2 = 65 To 66: For i3 = 65 To 66: For i4 = 65 To 66 For i5 = 65 To 66: For i6 = 65 To 66: For n = 32 To 126 ActiveSheet.Unprotect Chr(i) & Chr(j) & Chr(k) & _ Chr(l) & Chr(m) & Chr(i1) & Chr(i2) & Chr(i3) & _ Chr(i4) & Chr(i5) & Chr(i6 ) & Chr(n) If ActiveSheet.ProtectContents = False Then MsgBox "Password is " & Chr(i) & Chr(j) & _ Chr(k) & Chr(l) & Chr(m) & Chr(i1) & Chr(i2) & _ Chr(i3) & Chr(i4) & Chr(i5) & Chr(i6) & Chr(n) Exit Sub End If Next: Next: Next: Next: Next: Next Next: Next: Next : Next: Next: Next End Sub
- Press F5 or click "Run" to run the code. Excel will “freeze” for 3-5 minutes and then display a window with a password.
- This is not an actual password, but one that was generated by the system. Click “OK” - your sheet is unlocked!
If your file contains several protected sheets, use this macro for each sheet separately.
Unprotect an Excel sheet by copying data to another sheet
Another way to unprotect an Excel worksheet is to copy the contents of the protected worksheet to a new Excel worksheet. To do this, do the following:
- Open the Excel file with the protected worksheet;
- Go to the protected sheet and select the cell with the left mouse button A1 ;
- Press the keyboard shortcut Shift + Ctrl + End to highlight all content on a sheet;
- Create a new sheet in your worksheet Excel workbook (Ctrl + N );
- Left-click on a cell A1 on a new sheet;
- Press the keyboard shortcut Ctrl+V and paste the copied data.
This method will work provided that the selection of locked and non-locked cells is allowed by the author of the file.