Very often, individual users' computers stop working properly. And then people start wondering how to boot the system. It is this question that we will seek the answer to in this article. In fact, there are several ways to download. We will look at three of them. This includes booting from disk, booting from a flash drive, and booting in safe mode.
Booting from CD-DVD
A situation often arises in which it is necessary to boot from disk, for example, during Windows installations, or download other applications right at startup. To boot this way, you need to go into the BIOS and delve into its settings. You may have an Award or Ami BIOS. So, boot into Award BIOS.
- Launch the BIOS settings by pressing the Delete key while your computer is starting up.
- Use the arrow keys on your keyboard to select the “Advanced BIOS features” tab and press Enter.
- in the same way, select the “First Boot device” tab, and then, in the window that appears, using the same arrows, set the pointer to the CDROM label.
- exit the BIOS, saving the settings (F10 key).
After the red window appears, press Enter. The computer will restart from the disk. Now let's look at an example loading into Ami BIOS.
- launch the BIOS.
- Use the arrows on your keyboard to select the “Boot Device Priority” tab and press Enter
- select 1st Boot Device. In the window that appears, select the CD-DVD drive and confirm your choice by pressing Enter.
- exit the BIOS, saving the settings (F10 key).
So, we figured out how to boot the system from disk, now let's move on to other boot methods.
Boot in Safe Mode
First, let’s figure out what “Safe Mode” means and why it is needed. Firstly, this is one of the loading methods if the usual one does not work. Secondly, if we delve deeper into the concept, we must say that Safe Mode is a diagnostic mode. It is also called the failure protection mode, as it makes it possible to find problems that are caused by improper operation of the computer’s hardware and software. In this mode, Windows applies the default settings. If you have installed new programs and the computer does not boot, try starting in Safe Mode. The cause of the breakdown may be installed drivers, then they need to be removed. How to boot the operating system in safe mode? Here are the instructions:
- First, restart your computer;
- During restart, press F8. If the Boot Device window appears, you need to select HDD, on which the system is installed and press Enter, and then F8;
- a menu will appear in front of you additional options boot, use the arrows on the keyboard to select “Safe Mode”;
- select an account;
- in the “Desktop” window with a message stating that the OS is running in Safe Mode, click “Yes”.
- After downloading the Desktop, you will be able to work on your computer.
Booting from a flash drive
Sometimes there are situations in which it is important to know how to boot the system from a flash drive. For example, the CD drive does not read discs well, and you need resuscitation or reinstallation operating system. The OS can be loaded from a flash drive, but only if it is functional and compiled correctly. So, insert the flash drive into the computer and only then turn it on.
- After turning on the computer, look at the screen, in the lower left part it says which key you need to press to get to the “boot device”, usually it is Esc or F12.
- Next you will see a menu for selecting those devices from which your computer can be launched. Select your flash drive from the list and press F12 (hold it until your system unit will not emit a special signal - a squeak).
- The Boot Menu will open in front of you. Here, use the arrows on your keyboard to select “Hard Disk” and press the Enter key.
- In the “Hard Disk” menu, select your flash drive. After pressing Enter, the computer starts loading.
But remember that all subsequent times the operating system will load with hard drive, and not from the drive.
We use the easiest way to download - using the “Boot Menu”. To call the “Boot Menu” on different motherboards On computers and laptops, the "F8", "F9", "F10", "F11", "F12" or "Esc" keys can be used. Often this key is indicated in the prompts that appear when you turn on the computer.
Immediately after turning on the computer, press and hold the “Boot Menu” key until the boot device selection menu appears.

Use the down and up arrows to navigate to the DVD drive or flash drive and press Enter.
Transcend JetFlash 790 8Gb
If the call key is not indicated in the prompts at the initial stage of booting the computer, then you can find out this information from the instructions, on the website of the motherboard or laptop manufacturer, by searching on the Internet, or at random.
The first thing you should see after the BIOS messages is a line like “Press any key to boot from CD or DVD...” or “Press any key to boot from USB...” (“Press any button to boot from USB...”) if you are booting from a flash drive.

When you see this message, you should press any key on your keyboard within a few seconds, I usually press Spacebar. If you miss this moment, the Windows installation will not begin and you will have to restart the computer again from the old operating system using the “Ctrl-Alt-Del” key combination or the “Reset” button on the system unit.
Please note that during the installation process Windows computer reboots several times and each time such a message may appear, but pressing “any key” on the keyboard is no longer NECESSARY, otherwise you just repeatedly reinstall Windows from the beginning and you will never finish it!
Sometimes a message like the one in the screenshot below may also appear.

In this case, you just need to press the “Enter” key on your keyboard. And by switching with the “Tab” key to the “Windows Memory Diagnostic” item, you can check random access memory computer for serviceability.

Wait for the blue “Install Windows” window to appear.
Installing Windows 7 begins with choosing languages.
3.1. Language selection
At this stage you are asked to select languages.

“Installed language” is the language in which all messages will be displayed in the operating system. If the version of Windows is multilingual, then you will have a choice. Majority Windows editions have only one operating system language and it is desirable that you understand it well.
“Time and Currency Format” – defines the names of months, days of the week, main currency, digital separators accepted in your country (period or comma), etc. What does it mean? Well, for example, if you select “Ukrainian”, then in programs for typing and tables, days of the week, months and monetary units will be automatically entered in Ukrainian, regardless of the language of the entire document. Therefore, choosing a national format only makes sense if the majority of your documents will be in the national language. However, this can be easily changed in Windows at any time.
"Keyboard Layout" is just the default input language that will be used when Windows startup and all programs. It makes sense to install the one on which you communicate and write. If you will use the computer primarily for programming, it may be more convenient to select the “US” (English) layout. After installing Windows, you can add and set any language as default.
For Russian-speaking residents of the CIS, I recommend leaving “Russian” everywhere, since when installing some programs that have a multilingual interface, they may not be in Russian, but in the language that you specified in one of the fields when installing the system.
To continue the installation, click the “Next” button.
3.2. Starting the installation
In the next window, click the “Install” button under the “Windows 7” logo.

3.3. License agreement
Check the box “I accept the license terms” and click “Next”.

4. Windows 7 installation type
We offer two types of installation.

“Update” – allows you to update the previous Windows version(Vista) on new Windows 7 with saving files, programs and settings. Windows XP cannot be updated this way. In any case, I do not recommend using this installation method, since it inherits the problems of the previous operating system and it is likely that the computer will slow down and malfunction.
« Full installation» – installation of a new copies of Windows to new or existing hard section disk. When installed on new computer partitions are created on the hard drive, and when installed on old computer partitions are either deleted and recreated, or a partition is selected that has enough space for installation. With this type of installation, you can also install Windows 7 as a second operating system, for example, alongside your existing Windows XP. In this case, when you turn on the computer, you will be asked which operating system you want to load.
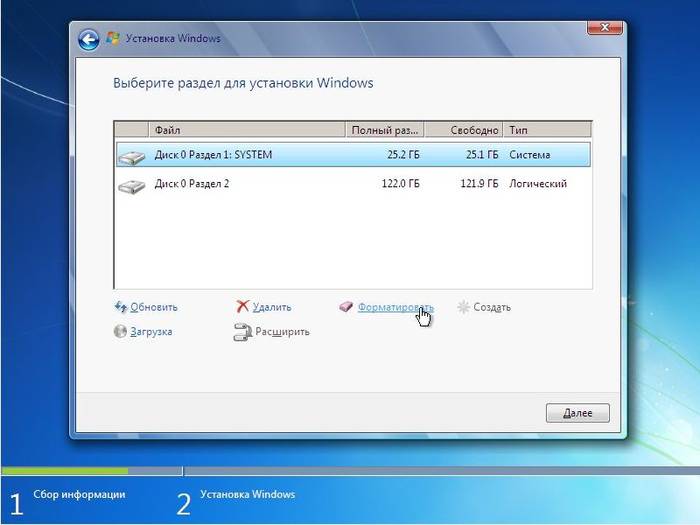
We select “Full installation” and a window for selecting a disk for installing Windows 7 will open in front of us.
5. Disk configuration
Disk configuration is the process of creating, deleting, formatting hard disk partitions for installing Windows on it.
5.1. Disk configuration on an old computer
If you are reinstalling Windows on an old computer, then it already has one (“C”) or several partitions (“C”, “D”…). I hope you haven't forgotten from drive "C" to external drive, because in the process of reinstallation Windows disk"C" will be cleared.
Hard drive Transcend StoreJet 25M TS500GSJ25M 500 GB
If your disk has only one partition, then it is better to delete it and create two new ones - one of small size for the operating system and programs, the second for all the remaining space for your files. This disk configuration will be more convenient and reliable in terms of backing up and restoring the operating system and your files.
If your disk has several partitions, then the first one, on which Windows is installed, can be deleted and a new one created in its place, and the second one with your files can be left as is.
5.2. Disk configuration on a new computer
When installed on a new computer, your disk is completely empty and has no partitions. The best option will create two partitions - one of small size for the operating system and programs, the second for all the remaining space for your files. This disk configuration will be more convenient and reliable in terms of backup and recovery of the operating system and your files.
5.3. Dual drive configuration
If you have two hard drives, or one SSD and one regular disk, then it is advisable to create one partition on each of them and install Windows 7 on the one that is faster (SSD) or smaller in volume, and the second one is completely dedicated to storing your files.
If both disks are large, then you can create two partitions on the first one - one small for the system, one for storing your files. On the second disk, you can create a partition for the entire volume and use it to install programs and games, or you can also create two partitions - the first for programs and games, the second for files. This configuration will provide maximum speed loading programs and games, since Windows and the page file will be on one disk, and programs and games on another.
6. Disk setup for Windows 7
The screenshot below shows a computer with a 500 GB disk.

Don't be surprised that the real size is 465.7 GB. Manufacturers round up sizes hard drives to a larger round number. A table with actual hard drive sizes can be downloaded at the end of the article in the “” section.
SSD drive It’s better not to divide it into several partitions, but to give it entirely to the “C” drive for installing Windows, programs and games. Then you will get unrivaled computer speed!
Hard drive A-Data Ultimate SU650 120GBClick on “Disk Setup” and additional buttons will appear.

The optimal size of the system partition is 10-20% of the total hard drive volume. For Windows 7, I recommend a partition size of at least 40 and no more than 200 GB.
I usually take 10% of the declared disk capacity, that is, 50 GB from a 500 GB disk and 100 GB from a 1000 GB disk. Since this is enough to install basic programs, it is better to install games on the second partition along with other files, since they take up a large amount of space and make it difficult to backup and system recovery, which we'll talk about later.
But if you like to experiment and plan to install a lot of serious programs and games, then it’s better to do system partition more, about 20% of the disk capacity or 100-200 GB in physical terms. Since some of the data still ends up on the system partition and in the future there may be a lack of space on it.
Let's make everything sure, create a system partition of 100 GB in size. To do this, click the “Create” button and enter the size in megabytes.

Please note that 1 GB = 1024 MB. In addition, Windows 7 takes 100 MB of this volume to create a hidden boot partition.
I like everything to be beautiful and the system to display a 100 GB disk, not 97.6 GB, so I calculate the volume in megabytes as follows:
100 GB x 1024 + 100 MB = 102,500 MB
This number must be entered in the “Size” field and click the “Apply” button.

Here is the result of the performed operation.

As you can see, two sections have been created. “Partition 1”, only 100 MB in size, is used for the operating system bootloader and we will not see it in Windows. “Partition 2” has a size of exactly 100 GB and we will install Windows 7 on it.
There is still “Unallocated space…” with a volume of 365.6 GB, on which we will create another partition for storing user files.


By default, all remaining space is allocated for it. It can be divided into several more sections if you know what you need it for. But we will leave everything as it is by simply clicking the “Apply” button.

As a result, we get “Section 3”, which took up all the remaining space. Now you need to click the “Format” button and confirm this action.

You can create this partition after installing Windows, but you will have to perform more steps and possibly change the drive letters. We will also consider this option after installing Windows.
7. Nuances of marking and large-volume disks
A 100 MB hidden boot partition is created when a new partition is created. If you install Windows 7 on an existing partition, the bootloader files will be located on it and a separate partition will not be created.
This configuration will occur if the Windows 7 installer partitions the disk in the old MBR system. If Windows Installer partitions the disk in new system GPT, then several service partitions can be created.
MBR is an older partition type that supports disks up to 2 TB. GPT is a new type of partition that supports disks larger than 2 TB and requires support from the motherboard.
There are usually fewer problems with disks marked in MBR, but this is not essential. If you install Windows 7 on a disk with a capacity of 3 TB or more, then you need it to have GPT partitioning, otherwise not all of its capacity (about 2.3 TB) will be used.
The problem is that the Windows 7 installer does not always partition large drives in GPT partitioning, even with support from the motherboard. In this case, check that BIOS settings of your motherboard or laptop in the “Boot” section, UEFI boot devices are prioritized.

In modern graphical interface the motherboard's "Setup" program it may look like this.

Write this folder onto a USB flash drive and insert it before turning on the computer to install Windows. In this case, the Windows 7 distribution kit can be located either on installation DVD, and on this flash drive.
When you reach the window hard choice disk in which it is not displayed, click on the “Download” button and specify the location of the driver files (folder on the flash drive).

If the driver is suitable, the installer should detect your hard drive and it will appear in the window for selecting a disk for installation. After this, you can create partitions on the disk and install Windows on them.
9. Copying and unpacking files
Now select “Partition 2” of 100 GB in size, on which we install Windows 7 and click “Next”.

Copying and unpacking of files begins, which will take some time.

Sometimes this process may stop at 0% or any other place for a while, and then quickly end. Please be patient and do not touch your computer. You may need to wait 15-30 minutes. If after 30 minutes of waiting nothing happens, then most likely the computer has frozen or the installation disk is hard to read. You'll have to start all over again and if it freezes again, perhaps replace the installation disk. The problem may also be caused by a malfunction of the hard drive, RAM, or motherboard.
After copying and unpacking the files, the computer will restart several times and the installation process will continue, requiring user interaction.
Let me remind you that when the message “Press any key to boot from CD or DVD...” appears, there is NO NEED to press anything.
10. Configuring Windows 7 settings
Settings Windows settings 7 starts with entering your username.
10.1. Entering your username and computer
In the next window, you need to enter the name of the main user, who will be the computer administrator, and the name of the computer on the network.

I recommend entering the name in English letters without spaces, since the user profile folder will have the same name, into which program and game settings can be saved. And some, even modern, programs and games cannot save files to folders with Russian names.
Names may have capital letters and numbers, and switching the input language is done using the “Alt-Shift” key combination.
As for the computer name, my recommendations are the same, but you can use a hyphen (minus sign) in the name. For example, for the main home computer, you can name it PC-1, PK-1 or Home-1, for a second computer - PC-2, PK-2 or Home-2, for a laptop - HP, ACER, Samsung, etc. If you have several laptops at home, you can add a username to the computer name, for example, Notebook-Vera or Misha-PC. This will make it easier for you to navigate later, but in principle this does not matter of great importance and the computer name can always be changed. Please also note that the username and computer name must not be the same.
10.2. Entering your password
The next window prompts you to enter the password for the user whose name was entered in the previous window, as well as a hint for this password in case you forget it.

I recommend not entering a password at this step, since during the process of setting up the computer it will reboot more than once and you will simply get tired of entering it. Make it better after full customization computer and create a system backup. In principle, if no one will use the computer except you, you have nothing to hide and you do not plan to exchange files via local network, then you don’t have to use a password at all. In other cases, using a password is highly desirable and we will talk about this in one of the articles about Windows setup. For now, just click Next.
10.3. Entering the key and activating Windows 7
In the next window you are asked to enter your license Windows key 7.

If you have officially purchased the operating system and are sure that this key has not been used on another computer, then enter the 25-digit code indicated on the disk or certificate sticker. In this case, you can leave the “Automatically activate Windows when you connect to the Internet” checkbox and click “Next”. Activation will occur 3 days after the first login.
If you don't have it yet license key or you are installing Windows 7 for evaluation purposes, then do not enter anything. In this case, you need to uncheck the automatic activation checkbox and click the “Next” button. After installation, you will have a 30-day trial period. In the future, you can extend it 3 times, thereby increasing the time of familiarization with the operating system to 120 days.
10.4. Setting up Windows 7 updates
In the next window you need to select one of three installation modes Windows updates.

“Use recommended settings” – all important and recommended updates will be installed automatically. Important ones include security updates and bug fixes. Recommended ones include updating drivers, software components and much more. Most experts advise using this mode.
“Install only the most important updates” – only security updates and bug fixes will be installed automatically.
“Delay decision” – do not include automatic update, and configure it later in the operating system.
On a personal note, I want to say that if the protection of your data is important to you and you don’t know how to protect yourself from security threats on the Internet, then important updates need to be installed. On the other hand, multiple updates eventually lead to a slowdown of the computer, and along with the recommended updates, a large number of unnecessary components. If you use your computer primarily for gaming, you have good security, backup copy system and all personal files, then in principle you can do without updates and the computer will work as quickly as possible. But I still recommend installing at least the most important updates.
10.5. Setting the date and time
The next step asks you to select your time zone, date and time.

There is nothing complicated about this and although it can be configured after installing the system, it is better to do it right away. First you need to set the time zone, and only after that the time. If your locality is not in the list of time zones, then choose any other one that is in the same time zone with you, for example, for Kyiv the time zone is UTC +02:00 as in Athens.
If you live in Russia, then uncheck the “Automatic change to daylight saving time and back” checkbox, since time change is canceled in Russia. In other cases, follow the accepted regulations in your country. For example, in Ukraine, the time change is still in effect and the checkbox must be left. The computer clock will be automatically adjusted to right time and day. Click "Next".
10.6. Computer location
If your computer is connected to a network and during Windows installation you were able to install required driver For network card, the “Select the current location of your computer” window will appear.

“Home network” - select this item if your computer or laptop is currently at your home, connected to the Internet via a router, and you want to exchange files with other home computers.
“Work network” - select this item if your computer or laptop is currently located at your work, where there is computer network to share files with other work computers.
“Public network” – select this item if your computer or laptop is connected to the Internet directly by cable. In this case, additional protection against attacks from the Internet will be used.
10.7. Home group

This functionality was introduced in Windows 7 to simplify file sharing between home computers, but in principle it is not necessary. You need to check the boxes for the folders with which types of data you want to provide access to. You can also enable general access to a printer connected to this computer. You can check all the boxes, it won't harm you.
If a computer with Windows 7 or higher was detected on the network, you will be prompted to enter the homegroup password, which can be viewed on that computer. After entering your password, click Next. If you don’t have a lot of time, you can skip entering the password and click the “Skip” button, and enter the password later.
If a homegroup was not detected, it will be created on this computer and you will be given random password. You can record it, or you can watch it later in Windows at any time. But it’s better to write it down or take a photo and click the “Next” button.
11. Login
After this, the user should automatically log in and display main screen Windows, called "Desktop". This completes the installation of Windows 7.
12. Links
Hard drive A-Data Ultimate SU650 240GB
Hard drive Transcend StoreJet 25M3 1 TB
Sandisk Cruzer
Do you want to know how to install Windows 7 on a laptop for free? Are you faced with the need to reinstall the operating system, but don’t know how to do it? Our step-by-step installation instructions will help you find answers to these and many other questions.
We will talk about three options for downloading Windows 7: from a USB flash drive, a CD, and directly from a computer. In addition, you will learn how to configure the BIOS with any of these options. Our instructions for dummies will help you reinstall Windows yourself and solve other related problems.
Undoubtedly Windows installation much simpler than, for example, installing android, however, we will have to figure something out.
Important: Please read before installation
When installing Windows 7, you first need to determine the characteristics of your computer. If its RAM is less than 2 GB, then a 32-bit operating system (OS) with an 86-bit platform is suitable for you. Most modern laptops have more than 2 GB of RAM installed, in which case you can safely install a 64-bit OS.
Information about the amount of memory can be obtained by opening the properties of the computer. Right click Click on the “My Computer” icon on the desktop, select properties from the menu, and see what the installed memory (RAM) is.
Preparing to install the OS
Do not forget that the partition of the disk on which the installation is performed will be formatted and the information will be deleted. All the data you need should be saved in the partition of the computer that will not be formatted, or on external media.
To install, you will need a bootable CD or USB flash drive containing Windows 7. Another option is virtual image systems, the features of which are described below.
Burning a disc with the distribution kit
To create boot disk from scratch, we need:
- a clean blank, which must be checked for damage and contamination, since any defects can lead to failure during recording;
- downloaded from the Internet ISO image OS;
- recording program.
There are a huge variety of programs: Nero Burning Rom, UltraIso, CDBurnerXP, InfraRecorder. In this case, we will use the modest Small CD-Writer utility, which must first be downloaded and installed.
After installation, perform the following steps:

Thus, if the startup process on the computer is not disabled, and everything is recorded correctly, then a menu should appear from which you can start installing Windows.
Sometimes PC users wonder how to install Windows 7 on a laptop without a disk or flash drive? This installation method is possible, but only if the computer has a valid operating system:

BIOS options for booting from DVD
If you need to boot from CDs, you need to perform the same manipulations as when booting from USB, with only one difference - when specifying the boot location, you need to select CD ROM instead of Hard Disk.
By the way, on some computers you can specify the boot device without going into the BIOS settings. If during a reboot you see Select Booting Device at the bottom of the black screen, then you have this option!

When you press the appropriate key, a simple menu appears.
To select a hard drive or flash drive we need:

After installation, you need to return to the BIOS and set First Boot device - your hard drive.
Installing Windows 7 on a new laptop
If you purchased a new computer on which the OS is not installed, you will need to install it through the BIOS. In addition, it may be necessary to install Windows via bios after replacing the hard drive or in another case when other methods are not available.
You will need removable media– disk or bootable flash drive.
To get started you need:

In our case, this option is not suitable, since we are installing Windows on an empty laptop without an OS.
Therefore, we have two other options: if we need to boot the system from a CD, we select CD ROM, and if from a flash drive, then USB-HDD.


After the procedures have been completed, the computer will begin to reboot, and during boot time you will see the message “Press any key to boot from cd or dvd” on the black screen. We press any button, after which it starts loading windows from the selected device.
Starting the installation
We made the BIOS settings, connected the USB to the laptop, or put a CD in the drive. A reboot occurs, then the text appears on the screen: “Press any key to boot from CD/DVD.” Click on any button, thereby starting the OS installation.
Installation language
We will be asked to select the installation language, then the input language, as well as the Windows interface language.
Then click Install Now and read the license agreement, which must be confirmed by checking the box next to the inscription: “I accept the license agreement.”

type of instalation
One of two methods can be used here:
- full installation, which involves formatting the hard drive. It is also called a “clean install”;
- updating an earlier version of the OS that is currently installed on your laptop.
If you do not have any important data left on the disk you are formatting, it is preferable to choose the first option.
Video: Installing Windows 7. Step by step guide
Which partition to install in?
A pre-partitioned hard drive has multiple logical partitions. The OS partition must be formatted in order to perform a clean installation.
If you want Windows 7 to be a second system on your laptop, along with the already installed OS, for example, Windows 8, then you should install it in another logical partition of the hard drive. Make sure that there is enough free space in the marked section for these purposes.
If you install Windows 7 on an unformatted partition with an identical OS version, then all the old data will be placed in a separate Windows.old folder, and you will be able to view the files old system, or you can delete it.
Formatting a partition
Select the section we need. Please note that we have the opportunity to delete, format or create a new partition on the hard drive. Windows Setup only allows quick formatting, which is used to complete removal data.
Copying files and rebooting
The program will copy the files, rebooting several times in the process. The OS will then configure and check the hardware, and then ask you to enter the computer name, as well as your name, to create an account.
Activating Windows
The system will ask you to provide your product key. You can also skip this step. Without activation, you will be able to use Windows yet 30 days. Once the product key has been entered, you must confirm the activation.
Unlicensed versions of the OS can be activated using special programs.
Installing drivers
After the OS is installed, you need to take care of the drivers, without which the computer will not be able to function properly. Currently there are various Windows builds with built-in drivers, but there is nothing better than using the “native” ones, which are usually located on the disk included with the laptop or posted on the manufacturer’s website.

Programs and utilities for working in the system
There are many various programs and utilities that you cannot do without when working on your computer. First of all, you need an antivirus, which it is advisable to install before going online. Then you will definitely need an archiver, an Internet browser, and various codecs. And if you work with documents, you also need office programs, such as Microsoft Office.
OS optimization
Optimization is needed to improve computer performance.
You can note the main points that can improve its performance:
- shutdown visual effects. Sometimes external effects interfere with good performance, this is especially noticeable if the computer’s hardware does not use enough powerful processor or small amount of RAM;
- disabling autorun of unnecessary programs. Unnecessary programs in startup load the processor and prevent it from performing necessary actions;
- disabling unnecessary services. We absolutely do not need some services used by our computer;
- removing gadgets. Gadgets make working on a laptop easier, but at the same time they waste system resources. You should not install them unless absolutely necessary;
- removing unused programs;
- removing unnecessary shortcuts from the desktop.
Video: Optimizing the operating system
Windows 7 OS itself can tell you the necessary actions for optimization:
- click Start;
- go to the control panel, select “Counters and performance tools”;
- and now next to the “?” Find "Tips to improve computer performance" and read and follow the instructions.
Installation errors
Sometimes there are problems installing Windows. For example, the OS cannot be installed. Or during use the laptop gives an error.
Users often encounter difficulties such as:
- blue screen - most often this error occurs due to various RAM problems. First of all, you should check if dust has clogged the slots;
- The laptop turns off - this problem can occur for many different reasons, but one of the main ones may be overheating of the laptop. Perhaps it's time to clean it. It is also likely that the difficulties are related to improper operation of the power supply;
- Can't see the hard drive.
To solve this problem, you can try the following method:

Installation cost
Difficulties that may arise during the Windows 7 installation process may be stopping you from thinking about reinstalling it. The price of the issue is the stable operation of your laptop.
Most likely, you have thought about whether you should contact specialists, or save money and do everything yourself.
Leading computer service centers offer their repair and installation services. The price may vary depending on the complexity of the work. The minimum cost starts from 300 rubles. The maximum is usually not indicated.
Prices for services
Type of work
Cost, rub
Visit of the master
For free
Installation (reinstallation) of Windows 7
from 300
Installation (reinstallation) Windows Vista
from 300
Installation (reinstallation) of Windows 8
from 550
Installation (reinstallation) of Windows XP
from 550
Installing Windows Server
from 900
Using this step by step instructions for dummies, you can independently go through all the steps necessary to reinstall the Windows 7 operating system, as well as to configure and optimize it.
>As you know, there are two ways to start installing an operating system. Start from under the running system (from the desktop) and boot the computer from the installation media. The second method is preferable, as it gives full access to hard drive management (formatting, deleting and creating partitions). Accordingly, the latter will be discussed in this article...
There are different ways to boot your computer from installation media. Let's consider each option in detail.
Selecting a device in the boot menu
When you turn on your computer, a startup window appears with the manufacturer's logo. At this time, you need to press a key, which will open boot menu. Please note that each motherboard manufacturer sets its own key for this task!
For example, F8(on Asus) F10(on Intel), F11(on MSI, Sony Vaio), F12(on Acer, Dell, Gigabyte, Lenovo). Open the boot menu and select the required device to boot. I think everything is clear here: CD/DVD Device- boot from DVD drive,
If for some reason the first option does not work or is not supported, then we will use the second.
Setting boot priority in BIOS
To open the BIOS, you must press the key when you turn on the computer. Delete, on some laptops F2(depending on the manufacturer). Then, using the arrows, go to the tab Boot.
We find the section “ Boot Device Priority", which you need to enter by pressing the key Enter.

Here you will see the loading order. By default, the hard drive boots first, then the DVD drive and everything else.

We need settings in reverse: first the disk drive, then the hard drive (HDD). Click on the first item and select your DVD drive.

The hard drive will automatically move to the next position. It should be like the image below:

Press the key Esc(Escape). Then, go to the “ Exit"and save changes made (« Exit & Save Changes«).
Open the section “ Hard Disk Drives«.

Here is a list of connected hard drives and flash drives. Move the installation flash drive to the first position (you need to know its name).

Then, we return to the previous window using the key Esc(Escape) and go to the “ Exit". Save the new settings - “ Exit & Save Changes«.
Later, do not forget to return the default settings to the BIOS!
- an integral part of computer resuscitation and diagnostic work. This knowledge will be useful when you need to reinstall the system, try to revive it using livecd, or make a full backup with using Acronis. In this article I will try to explain all the methods as clearly as possible. boot from disk.Important: before proceeding with the instructions described in the article, insert your boot disk and reboot; most often, boot priority is given to sdromes by default.
All new versions of bios allow you to quickly select the computer's boot source when you turn on your computer, without having to edit the bios settings.

Here is a list of buttons that open the boot menu ( Boot Menu)
This part is suitable for computers with older bios versions that do not have a boot menu. In this part we will look at the bios items responsible for loading and edit them.
In this part I will describe the two most common types of bios.
They differ in color scheme and the number of editable functions.

The availability of functions and how to edit them may vary depending on the bios manufacturer.