Are you encountering a problem installing Windows 10 Creators Update (version 1703)? Don't worry, you're not alone. In this detailed manual We'll take a look at common Windows 10 update errors and provide instructions on how to resolve them.
Note: This guide only addresses common known errors that occur during the Windows 10 update process, but may not be related to the operating system itself. The guide also contains recommendations and solutions specific to the Windows 10 Creators Update.
How to fix Media Creation Tool when installing Creators Update
Description
When using the Media Creation Tool to install version 1703, you may encounter an issue with DynamicUpdate. Restarting the update process will reset the boot, but the device may freeze again.
Solution
- Open Windows Explorer ( Windows key+ E) and go to the following address: C:$Windows.~WS\Sources\Windows\sources
- Double-click Setupprep.exe to restart the update process.
How to fix disk problems during the update process
Errors
- 0x80070070 – 0x50011
- 0x80070070 – 0x50012
- 0x80070070 – 0x60000
- 0x80070008
Description
These errors usually appear when there is not enough space on your device to complete the installation of a new update.
Solution
Use the system tool “Disk Cleanup” to free up space on your hard drive.
- Click on the Start menu.
- Type cleanmgr and select the classic Disk Cleanup app
- Select drive C (or another drive on which the system is installed).
- Click OK.
- Click on the “Clean up system files” button.
- Click OK and make sure that drive C (or another drive on which the system is installed) is selected.
- Select the files you want to delete, including Recycle Bin, Temporary Internet Files, Temporary Files, Windows Error Reporting Files, Previous Windows installations" Attention: just do not delete the “Windows Setup Temporary Files” - these files are necessary to install the new update on your computer.

- Click OK.
- Click the “Delete Files” button to complete the cleanup task.
- Try installing Windows 10 Creators Update again.
Advice: If you can't free up enough space to install the Windows 10 Creators Update, connect a USB flash drive with at least 8 gigabytes of storage capacity to your computer. Windows 10 will automatically recognize the drive and use it as temporary storage to install the update.
How to Fix Corrupt Files on a Bootable USB Device
Description
If you created bootable Windows 10 Creators Update installation media, problems may occur during the update process that prevent the operation from completing successfully. This common problem, which is usually caused by corrupted files.
Solution
Re-download setup files from the Microsoft support site and create bootable installation media again. This usually fixes the problem.
When using the Media Creation Tool, use the system utility Disk Cleanup to remove the “Windows Setup Temporary Files” before creating the media again. Otherwise, you will encounter an identical error.
How to fix stuck update download process in Media Creation Tool
Description
When using the Media Creation Tool to update to Windows 10, the tool may freeze while downloading updates before starting the update process.
Solution
You can solve the problem by simply restarting the update process, but after downloading the files, you need to disconnect your computer from the Internet. Wi-Fi networks or Ethernet.
After updating to Windows 10 Creators Update, connect your computer to the Internet and check for available updates by going to Settings > Update & Security > Windows Update and click the “Check for updates” button.
How to fix the problem of files not found or corrupted
Error
Description
If you received a message with this error code when installing the Windows 10 Creators Update, it means that some files that are required to install version 1703 were damaged or were not found
Solution
If the installation files do not download correctly, use the system Disk Cleanup tool to remove the “Windows Temporary Installation Files”, and then follow these steps:
- Select “Windows Update”.
- Click the “Check for Updates” button and try to download the update again.
How to fix minimum system requirements error
Errors
- 0xC1900200 – 0x20008
- 0xC1900202 – 0x20008
Description
Although everything Windows devices 10 should be compatible with the Creators Update, starting with Windows 10 Anniversary Update ( Anniversary Update) Microsoft has changed the minimum system requirements. If you're using a 32-bit version of Windows 10, your device must have at least 2 gigabytes of RAM to install the Creators Update.
Minimum system Windows requirements 10 Creators Update:
- Processor: s clock frequency 1Hz and higher.
- RAM: 2 gigabytes for the 32-bit version or for the 64-bit version.
- Disk space: 16 GB for 32-bit version or 20 GB for 64-bit version.
- Video card compatible with DirectX 9 or later with support for WDDM 1.0 driver.
- Monitor with a resolution of 800 x 600 pixels.
Solution
The above restrictions may affect some low-end laptops and tablets. It is recommended to install more into the device random access memory or, if possible, purchase a new device.
How to fix Windows 10 errors when trying to install an update
Description
If you've been using the same version of Windows 10 for a long time, you may have experienced performance issues and other issues over time that may prevent the Creators Update from installing on your device.
How to fix compatibility issues during installation
Error
Description
This problem indicates that the driver or application is not compatible with the new version of the operating system. Usually you may encounter this problem when using outdated driver for specific hardware or when using an unsupported version of a program or antivirus.
Solution
If your device works correctly without Creators Update, then diagnosing the conflicting application or driver may be difficult.
The fastest way to get around this problem is to use the Media Creation Tool. As you complete the preliminary installation steps, the utility will show potential problems with drivers and applications, and also check for the presence of the necessary disk space to complete the installation.
If the report shows a driver incompatibility issue, visit the support site for the latest updates.
If the problems are caused by an outdated driver, you can temporarily uninstall it and install the Creators Update. Once the installation of the new version of Windows 10 is complete, you can reinstall your device again.
Warning: The following steps should be used with caution.
To remove the driver from Windows 10, follow these steps:
- Open the Start menu.
- Type “Device Manager” and select the link that appears.
- Uncover the device that is causing the problem.
- Click right click mouse over the device and select the “Remove device” option.
After the uninstall operation is completed, try installing Windows 10 Creators Update on your computer.
If you encounter a problem with software, check and install available updates on the official website of the developer. You can also uninstall the conflicting application and continue with the installation.
How to fix installation error after accidental reboot
Error
Description
During the update process, this error may occur due to an accidental system reboot.
Solution
There is no need to worry about this error. Just reinstall the update and make sure that the installation process is no longer interrupted.
How to fix program compatibility issues during update installation
Error
0xC1900208 – 0x4000C
Description
This error indicates that an incompatible program is installed on your computer and the update cannot complete successfully.
Solution
Remove the incompatible application. Often this error call antivirus or security software. Check your antivirus's compatibility with Windows 10 Creators Update.
How to fix problems when trying to complete the installation
Solution
- Open the Settings app.
- Go to the “Update and Security” section.
- Select the “Windows Update” option.
- Click the “Advanced Options” link.
- Click the “View update history” link.
- Click on the update that failed to install and note the error code.
Search for the error code on our website or in the search bar to resolve the problem.
Typically, these problems occur when using an old laptop. Sometimes turning off, unplugging the laptop, or temporarily disconnecting the battery can resolve the problem.
How to fix Windows 10 activation problems
Error
Windows 10 system is not activated
Description
After installing Windows 10, sometimes it does not activate automatically.
Solution
If the activation problem occurred after upgrading to Windows 10 Creators Update, then read the Windows 10 activation guide.
How to fix an unexpected error when downloading installation files
Error
Description
This error occurs when an unexpected problem occurs while downloading the files required for installation.
Solution
Try updating your system using the Media Creation Tool.
How to fix DTS/Dolby Digital Live audio issues in Windows 10 Creators Update
Error
Digital sound doesn't work
Description
After installing Windows 10 Creators Update (version 1703), some users on Microsoft forums report driver problems Realtek High Definition Audio with Dolby Digital Live and DTS Surround. The problem persists even after reinstalling the driver or performing a clean install of Creators Update.
Solution
On this moment An official fix from Microsoft has not yet been released, so it is recommended not to update to Windows 10 Creators Update for now. May be updated soon Realtek driver High Definition Audio.
For uninstall Windows 10 Creators Update and return to Windows 10 Anniversary Update, do the following:
- Open the Settings app.
- Click “No, thanks.”
- Click “Next”.
- Click “Next” again.
How to Fix Intel Clover Trail Processor Issues in Windows 10 Creators Update
Description
On devices with Intel Clover Trail processors, Windows 10 Creators Update will not install, or after installation, icons and text will not be displayed, or blocks with solid fill will be shown.
Status
Microsoft has confirmed that the Windows 10 Creators Update does not support Intel Clover Trail processors. Redmond is working with partners to develop driver updates for the following Intel processors Clover Trail:
- Atom Z2760
- Atom Z2520
- Atom Z2560
- Atom Z2580
Solution
If your devices use unsupported processors, Microsoft recommends that you temporarily avoid upgrading to the Windows 10 Creators Update. If you have already installed the update, you can go back to the previous version of Windows 10 by following these steps.
- Open the Settings app.
- Select the “Update and Security” section.
- Select the “Recovery” menu option.
- Click the “Get Started” button under “Go back to a previous version of Windows”
- Select the reason for the rollback and click “Next”.
- Click “No, thanks.”
- Click “Next”.
- Click “Next” again.
- Click “Return to earlier build” to start the recovery process.
How to fix problems with the Night Light feature
Description
On some computers, the Night Light toggle may be grayed out in Settings > System > Display or in the panel quick action in the Action Center.
Solution
This problem may occur when using an outdated video card driver. Install the latest graphics drivers, reboot your system, and try activating Night Light again.
Description
Many users report that the Night Light feature does not turn off automatically, even after restarting or shutting down the computer.
Solution
At the moment, the only solution to the problem is to manually disable the Night Light feature. This can be done using a separate button in the Quick Actions panel in the Action Center. Microsoft has not yet prepared a fix for this error.
How to change the font size in the Windows 10 interface
Description
Many users have encountered problems when trying to change the font size in Windows 10 Creators Update.
Solution
In Windows 10 version 1703, standard functions for changing font sizes that were present in previous versions have been removed. Windows versions 10. Now to easily change the font without interfering with system registry you will have to use a third-party portable utility - System Font Size Changer. Before using it for the first time, the application prompts you to create a backup copy of your default settings. In addition, it supports exporting user configuration to a registry file. The program is only available on English language.

Error
- 0xC1900101 - 0x20017 (The installation failed in the SAFE_OS phase with an error during BOOT operation).
- SYSTEM PTE MISUSE
Description
On devices with AMD processors Carrizo A10-8700P during installation of Windows 10 Creators Update may fail with an error message and automatically rollback to the previous build.
Solution
Owners of devices based on AMD Carrizo A10-8700P are advised not to upgrade to Windows 10 Creators Update using the Windows 10 Upgrade Assistant or the Media Creation Tool at this time.
Text does not appear in Windows Explorer, Task Manager and other system utilities

Description
Due to older versions of Comodo's antivirus and firewall, text may not display in Windows Explorer, Task Manager, and other system utilities when upgrading to Windows 10 Creators Update (version 1703)
Solution
If you have already installed the Creators Update on a system with old version Comodo antivirus, you must completely remove the antivirus product. If you are using Comodo Internet Security (CIS) / Comodo Firewall / Comodo Antivirus, you will need to update to version 10.0.1.6209 or higher, while Comodo Cloud Antivirus users should install version 1.10.413855.478 or higher.
Found a typo? Highlight and press Ctrl + Enter
Microsoft engineers have implemented a boot store, also known as Boot Configuration Data (BCD), and a boot menu in Windows. The first contains the bootloader identifiers of all operating systems available on the PC, and the second reads them and displays them as a list of operating systems available for launch. This makes life much easier for the user whose computer has several systems. He doesn't have to do anything fancy to switch between them. Just restart your computer and select the one you need from the list provided. Like other parts of the Windows OS, the boot menu is customizable. This guide lists available methods editing this section.
Note: Almost all actions described in this manual must be performed from under account with administrator rights. Otherwise, you must know the password for it.
Editing the Windows 10 boot menu in the bootloader window
Menu Windows boot 10 has a small settings section. It provides a minimal set of options - changing the timer value automatic start the main system, changing the default OS, as well as an additional section with system startup modes and a computer shutdown function.
Editing the Windows 10 boot menu in System Settings
In the additional system parameters, which can be accessed through the OS properties, there is a section. It contains a small list of functions for editing the boot menu, which is suitable for undemanding users. So with its help you can choose which operating system will load by default, set the list display time installed systems or turn off the timeout altogether, and also activate the display of recovery options.

To get to this section, you need to do the following:

Editing the Windows 10 boot menu in System Configuration
If you need a little more customization options, you can try the utility system configuration. In addition to the mentioned settings, it offers the function of deleting boot records of operating systems, an option to display information about the OS, the ability to run Windows without a graphical shell, and select boot options safe mode and a few more minor functions.
You can edit the boot menu using System Configuration as follows:

How to Edit Windows 10 Boot Menu Using EasyBCD
EasyBCD - free utility, which provides a wide range of options for editing the boot menu. In comparison, all standard system tools (except the Command Line) look very primitive.
This compact program allows you to:
- Remove OS from the list of available ones for launching.
- Add new Windows entries(including outdated ones), Linux / BSD, Mac.
- Add entries for installing systems using ISO images or individual hard drive partitions.
- Rename operating system entries.
- Set the system to default.
- Change the position of entries in the list.
- Set boot menu language.
- Select the bootloader interface shell (Metro or earlier from Windows Vista / 7).
- Set the timeout duration.
- Back up and restore boot storage (BCD) settings.
- View BCD contents and boot menu.
The program's interface is completely localized into Russian, and it itself is quite easy to use and does not require any supernatural abilities from the user.


How to rename the system entry in the boot menu

How to move system entry to boot menu

How to choose the default boot system

How to change the boot menu display time

How to change the boot menu language

How to Edit Windows 10 Boot Menu Using Command Prompt
If you don't trust third party programs and try to use exclusively system tools, then you should try ways to edit the Windows 10 boot menu using the command line.
Create or restore a Windows Boot Store backup
Before you proceed, create a backup of your download store so that you can restore it if necessary. You can create a BCD backup as follows:

How to add a system entry to the boot menu

How to remove system entry from boot menu

How to change the order in which systems are displayed in the boot menu
To edit the position of entries in the loader, use the command bcdedit /displayorder (ID2) (ID1) (ID3). Instead of everyone ID please indicate real codes entries in the order in which you want to see them when the computer starts. 
And so, you spend a pleasant evening at the computer - play, chat, surf the Internet, and Windows promptly carries out your commands. Everything is fine! Idyll! However, you should not think that this will always be the case. Know: the insidious Windows is preparing a dirty trick for you. She is just waiting for the moment when some urgent matters overtake you in order to... show you nothing. More precisely, it won’t boot.
Crash Windows downloads- an ordinary phenomenon, but according to the law of meanness, it usually happens when a computer is really needed. So that the situation does not take you by surprise, it is important to prepare for it in advance. Let's talk about what to do if Windows 10 won't boot, why this happens, and what every user should have to solve this problem as quickly as possible.
Why won't it load?
The reasons for the “dozens” being unbootable can be software or hardware. Software related to the removal (damage) of boot and system files and/or those responsible for running registry keys. They are usually to blame for:- Installing another operating system on another partition of the drive (the new OS replaces the old bootloader with its own).
- Experiments with disk partitions - compression, merging, partitioning, formatting, etc. Common mistake, which is precisely a consequence of this, is “ ” (the system boot loader is compressed).

- Unskilled manual editing of the system registry.
- Using various “tweak cleaners” to speed up and decorate the system, which “accidentally” change the registry keys responsible for startup, patch files, etc.
- Windows updates installed incorrectly or the PC shuts down during the installation of updates.
- Viruses and antiviruses. Don't be surprised, the latter can cause no less harm than the former if used thoughtlessly. It's like swallowing pills indiscriminately, hoping that the right one will be among them.
- Faulty hardware drivers. Booting in such cases is usually interrupted by a blue screen of death, sometimes indicating the name of the driver that caused the problem.
- "Clumsy" applications in autostart. The failure occurs in the late stages of loading - shortly before the desktop appears.
Hardware reasons for Windows 10 not starting:
- Changing the boot media polling order in the BIOS (the computer searches for the Windows boot loader not on system disk, and, for example, on flash drives).
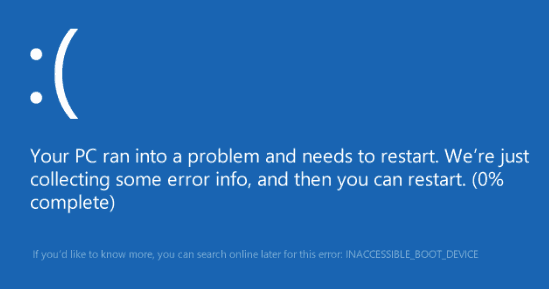
- Connecting the drive to a different port on the motherboard than it previously worked on - if the failure occurs after removing and re-installing installing hard disk into the computer. It appears as an INACCESSIBLE_BOOT_DEVICE error on the blue screen of death.
- Faulty or poor connection of the system drive. Often appears with the message “ ” (bootloader unavailable) on a black screen. Sometimes - stops, restarts, BSoDs at any stage of loading.

- RAM malfunction. As with disk problems, it manifests itself with reboots and blue screens at any stage of startup.
- Failure of video subsystem elements. Windows may boot, but you won't see it because the screen will remain black. Sometimes you can tell that the system has booted only by a characteristic sound.
- Other hardware problems, e.g. motherboard, periphery, etc.
It's better to prepare for the worst in advance
Since 80-90% of cases of Windows 10 not starting are due to software failures, today’s article is devoted to methods of dealing with them.So, to restore normal Windows startup, the computer needs to be booted into the recovery environment. If you have previously used Windows 7, then you know that this very environment is installed on the disk along with the main system. And to enter it, you need to open the menu of additional boot methods (by pressing F8 after turning on the computer) and go to the “ Troubleshooting».
The “top ten” also has a recovery environment, but since its loading time has significantly decreased compared to Windows 7, the interval when you can call boot menu, also became much shorter. There is only one chance left at this time to press the desired key (more precisely, the combination of F8 and Shift): if the system is installed on HDD MBR standard and the fast startup option is disabled in the power settings of the PC or laptop. If the system is on an SSD or GPT hard drive, you will need bootable media.
For emergency recovery of Windows 10, it is optimal to keep its official distribution on a DVD or flash drive, and of the same bit size as installed on the PC. As an alternative, you can use the downloadable utility package MS DaRT 10 (Microsoft Diagnostic and Recovery Toolset for Windows 10 ).
MS DaRT distributions (formerly called "ERD Commander") are officially distributed only through paid subscription, but they are easy to find online. For example, on torrent trackers. Windows images 10 are available for download from .
As an example, I will use the home edition of Ten, recorded on a bootable USB flash drive, since it has everything you need.
Booting into the Windows 10 recovery environment
If the download fails, the “ten”, as a rule, tries to self-repair. When she succeeds, the user does not receive any notifications; it just takes longer to start the computer than usual. If unsuccessful, a message may appear on the screen, as in the screenshot below, but more often it will be simply a “Malevich square” with or without a cursor or blue screen death with a sad emoticon.
The failure option shown in the screenshot can be considered relatively favorable. By clicking, " Extra options» you will be taken to the recovery environment installed on your hard drive, and you will not have to boot into it from external media. But we will consider a more severe case, when the system does not show any signs of life.
Connect the media to your computer, reboot, and make it the first boot device.
The window that you will see first after booting from a flash drive (DVD) will prompt you to select the system language. If Russian is selected, click " Further».

You will then be prompted to proceed to installation or Windows recovery. Click " System Restore».

On the screen " Action selection» click « Troubleshooting" Here you are.

Tens launch recovery options
In the recovery options section (screen " Extra options") there are 5 subsections:- System Restore. When you select this option, a standard Windows utility is launched. rstrui.exe, the purpose of which is to roll back the system to one of the saved checkpoints.
- Restoring the system image. Launches the Windows Deployment Wizard from backup copy, created by the OS's own tools.
- Boot recovery. Corrects errors in boot files and partitions.
- Command line. Allows you to run various system utilities.
- Return to the previous build. Rolls back to earlier installed version OS if it has been updated to Windows 10.
Rollback to a checkpoint
Returning to a newly created checkpoint is the best first aid remedy for all types of system failures, including when you do not know their cause.
Clicking on the first item most likely launches the recovery utility you are already familiar with. All you have to do is select the date and time you want to rollback to and follow the on-screen instructions.

To use this option, you must have at least one saved checkpoint and a properly working system restore function. If the latter was disabled before the failure, skip this step and try other methods.
Startup Recovery
This option effectively helps in case of damage or deletion of boot files, for example, when installing an additional OS on another disk partition after Windows 10. And also in case of accidental formatting or other manipulations with the “System Reserved” partition.
Command line
The command line itself does not restore anything, but it makes it possible to launch other tools. So, with its help we can open Windows Explorer to see the installation location (partition letters in the recovery environment and during normal system booting usually do not match), run the system file error fixer, registry editor and bootloader recovery utilities.
If rollback to a checkpoint and auto-recovery at startup (the first and second options) did not give the desired result, raising the load “tens” often helps console utility BCDBoot. She recreates hidden section“Reserved by the system” and copies to it boot files from the Windows directory.
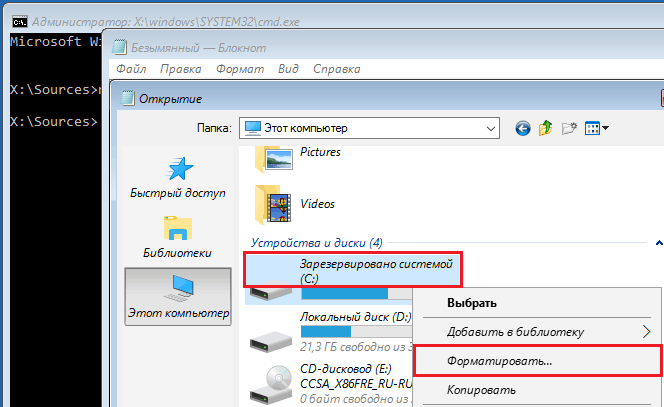
For BCDBoot to work correctly, you must specify the location Windows folders on your hard drive. To find out, you can use the utility Diskpart, but I think it’s more convenient to do this through Explorer.
So, to get into the explorer, let's open command line and run notepad in it ( notepad).

While in notepad, go to the menu “ File", select " Open" and go to the folder " This computer" Next, let's go through the disk partitions and determine which of them contains the system directory. In my example this is drive D.

Next we return to the command line and execute the instruction:
BCDboot D:\Windows

Please note that your path to the system folder may be different.
In 80% of cases, this is enough for the “ten” to start normally. But in about 20% of cases the command does not work correctly - it does not restore all boot files. To help the utility a little, before executing the instructions on the command line, you need to format the reserved boot partition (in my example, drive C) in FAT32. This can also be done with using diskpart, but I think it’s more convenient through a conductor.
The next two console commands recreate boot records entire drive (MBR) and system partition(VBR). They are used to solve problems with running Windows on MBR disks.
Execute commands one after another in this order:
bootrec/fixmbr
bootrec/fixboot
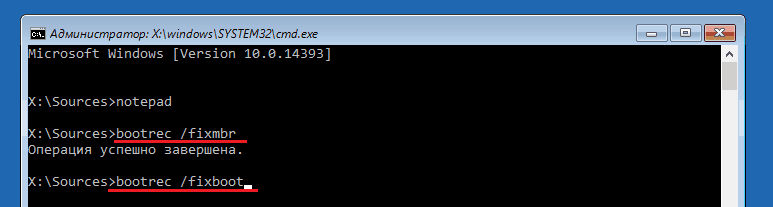
If you accidentally run them on GPT disk, nothing bad will happen.
In some cases, startup problems arise due to damage not to boot files, but to the main system files, for example, after a virus attack. As you may know, there is a special utility in Windows to fix them Sfc.exe. So, thanks to the command line, you can also run it in the recovery environment.
The command to find and fix errors in protected system files in the recovery environment looks like this:
sfc /scannow /offbootdir=D:\ /offwindir=D:\

Parameter offbootdir determines the location of the main boot partition (in my example, as you remember, this is drive D), and offwindir– path to the system folder.
Using the command line, you can also fix registry errors on an unbootable system. But, unlike previous instructions, this requires certain experience and qualifications, because the user needs to know exactly what to correct and what erroneous entries should look like normally.
I will not dwell on registry errors that lead to Windows 10 boot failure, since this is the topic of a separate large article. I will only describe the method for launching the editor RegEdit.exe in the recovery environment and open the registry files in it so that you have the opportunity to fix the errors that you are aware of.
So, to launch the editor, write the word on the command line regedit and press Enter.

You will see that in the utility window that opens there is already some kind of registry, but not the one you need. Before us is our own registry of the recovery environment, and we are interested in the main system.
To load files into RegEdit Windows registry 10 select the section in the left half of the editor window HKEY_LOCAL_MACHINE or HKEY_USERS, open the menu “ File" and click on the item " Load bush».
In the Explorer window that opens after this, go to the folder D:\Windows\System32\Config(your drive letter may be different) and select the desired file.
Files without an extension in the \System32\Config folder are the components (hives) of the Windows 10 registry. The main ones are circled.
Give the hive any meaningful name (it will be temporary until you unload it) and click OK.

Next, we will open the section into which we loaded the bush, and here it is - in front of us, available for editing. In my example this is the registry file software, which I temporarily renamed to soft_win_10.

After making the edits, go back to the editor menu “ File" and click " Unload bush».
Return to previous build

When reverting to a previously installed build, the user's personal files will remain intact, but everything done since the update will be undone.
Restoring a system image
Restoring an image from a backup helps to restore the system to functionality in case of any problems, but the problem is that almost no one creates these images.If you are an exception to the rule and the happy owner of a relatively recent backup copy, select the item marked in the screenshot from the list of parameters,

Tell the recovery program where to store the image and follow its instructions.

All data from the inoperative OS will be replaced with working copies from the archive. If it contains user files, this will also affect them.
Happy recovery!
Also on the site:
Windows 10 won't boot: why this happens and how to restore startup updated: April 23, 2017 by: Johnny Mnemonic
Problems can arise at any time technical system for various reasons, that is why user requests are coming in that Windows 10 is not updated. The nature of the difficulties can be expressed by the complete absence of updates or stopping their download at a certain stage of the download. Before solving a problem, it is necessary to understand why it arose and what is its cause. Then a more effective solution can be found if the root cause is identified.
The problem usually manifests itself in the absence of an invitation to download the update or code 80240020 appears - an error when updating Windows 10. The latest versions of the Microsoft program were developed in such a way that the update occurred with minimal user interaction and did not affect the operation of the entire server system. However, the Windows 10 update error exists, and individual cases confirm this.
Causes of failures
Updating the software can be from older versions of W7 or W8 and installing new types of W10 itself. Users have problems in both cases. Freezing can occur for at least four reasons:
- The update does not arrive The “Multiple Location Updates” function may be turned on; it needs to be turned off, because Microsoft solution This situation is unacceptable and there will be no Windows 10 update. Disable Path: Update and Security - Extra options- switch off. You can now enable searching for updates if required.
- No automatic update 10586 and 1511. Latest version loaded into manual mode in one of two ways: using the Media Creation Tool utility, you can download it without paying from the Microsoft website, launch it and turn on the “Update now” button. Another method involves creating bootable flash drive(disk) via ISO file Windows 10. After this new version can be applied to old program by clicking “setup.exe”.
- Windows 7 does not update to 10. That is, in installed program must have Service Pack 1 - without it the update will not arrive. W7 or W8 must be legal and valid.
- The Windows 10 update cannot proceed due to changes in Microsoft's terms. We are talking about version 10586, as it should be launched. Initially, we followed the recommendation to update manually through an ISO image, but today the rules have changed, and those who did not have time to install W10 must install the RTM version. After performing this step, Windows Update will install all new versions.
You can do without the Update Center by performing the operation manually through the update catalog on the Microsoft page.
Another way is to use someone else's utility, such as Windows Update Minitool.
Fix error 80240020
First, you should make sure that there is enough space on the server disk with the W7 program to add a new version: there should be at least 16 GB of free space, and in some cases - 50. If there is space, but W10 does not download and the error appears again, then in W7 you need to enter the command Wuauclt.exe /updatenow in the Run cell and turn on the Enter key. If original program is W8.1, then you can initiate the command line through Start.
When these steps did not help and update error 80240020 is displayed again, you should try downloading a new version using a utility from Microsoft. After launching the assistant, W10 will start loading and will be created installation disk without performing any additional actions.
You can create this disk yourself, for which you need to insert the flash drive into the slot and turn on the required file by double pressing the key.
In the window that opens, click “Next”, then select the version of the operating system to install and the method for saving the installation data, it can be a flash drive or an ISO file, which can later be transferred to disk. Now “Next” again. Wait until the files are downloaded and the installation media is created, and then press the “Finish” button.
Troubleshooting Windows utility
If when downloading W10 updates installation program hangs, you can try the proprietary Troubleshooting Center utility, it is located in the server section “Control Panel” (troubleshooting). In the “System and Security” header, you need to select the Update Center assistant, which will launch the utility and begin searching for reasons why updates are not downloaded. When you click Next, some fixes will happen automatically, others will require user initiation by confirming the "Apply this fix" command.

At the end of the check (you won’t have to wait long), there will be a report on the completed and unfulfilled corrections.
After closing the utility window, reboot the server and check again whether the W10 settings are updated.
And also on the Control Panel for problems in the “All categories” cell, you can obtain the “BITS Background Intelligent Service” utility. Failures in the operation of this service affect the downloading of updates; the process takes much longer, so it makes sense to run this program to be sure of the result.
Clear W10 update cache
If the user repeatedly downloaded updates, then all installation files were automatically cached so that they could be used repeatedly without additional downloading. At the same time, the size of the cache folder grows, and this leads to the fact that the operating system runs slowly and there is no free space left on the server’s hard drive.
To avoid problems, it is suggested to clear the entire cache from W10 Windows updates Update. System utility Disk Cleanup doesn't work 100%, it can't remove Windows cache Update completely. But in manual mode you can do a complete cleanup:
- Stop Windows Update. To do this, enter the search command “Service” and run the Services application as an administrator. Find the service to stop and disable it with the right mouse button by clicking “Stop”.
- The command C:\Windows\SoftwareDistribution\ will help you find the folder where the updated W10 files are stored. It will work after pressing the Enter key. Now you need to go to the Download folder and delete all files. To complete the operation, press the Continue button.
- Now you should go back to the beginning and download the Services application, which is used to update W10, by pressing the Start key. Make sure that service program Windows services Update has loaded.
After these manipulations, you need to close the command line and download the updates again. After clearing the cache, they load much faster.
In every system, errors can occur that disrupt the normal flow of internal processes. Most problems are minor, but they can have serious consequences, such as data loss. Therefore, it is very important to be able to prevent the occurrence of any kind of errors on the computer.
Troubleshooting tool and what problems it can solve
In Windows 10 version 1703, the capabilities of System Settings have been significantly increased. In particular, a “Troubleshooting” element was added, which partially duplicates the functionality of the “Control Panel” applet of the same name and can correct some computer errors.
The main areas of the master’s work are as follows:
- sound;
- connection to local network and the Internet;
- Printer;
- "Windows Update";
- Bluetooth;
- video;
- power problems (the OS does not turn off or the battery does not charge);
- "Windows Store";
- some critical blue screen errors;
- Application compatibility problems.
Troubleshooting Windows 10 Settings
With each subsequent build, developers increasingly change the system interface, giving the “Settings” new capabilities, and thereby gradually abandon the standard “Control Panel”.
To use the Troubleshoot tool:
- Press the Win + I key combination and select Update & Security.
In PC Settings, select Update & Security
- In the menu that opens, in the left column, open the “Troubleshooting” tab.
 Go to the "Troubleshooting" tab
 - Click on the group of interest and click on the “Run the troubleshooter” button that appears.
 After selecting an item from the list, click the "Run troubleshooter" button
 - A wizard will open. automatic search problems. Click on the “Next” button several times to start it.
 Click Next to start the troubleshooting wizard
 - Upon completion of the error correction module, you will receive a report: what errors were found and corrected.
 At the end of the work, the wizard will issue a report on the problems found
Depending on the OS build and update version, the Troubleshooting functionality in the settings may differ.
Video: How to use Troubleshooter in Windows 10
"Troubleshooting" in the "Control Panel" of Windows 10
The modules in the “Control Panel” work exactly the same as in the “Settings”, but have much more options for checking the system for the presence and correction of problems.
- To get into the repair programs environment, press the Win + R key combination, type control and click OK.
 Press the Win + R key combination, type control and click OK
 - The Control Panel window will open. Change the View option to Large Icons and open the Troubleshooting section.
 From the items, select "Troubleshoot"
 - The general service window will open. In the left column, click on “View all categories.”
 The "View all categories" button will list all troubleshooting services
 - A list of all troubleshooting modules will open. Click on the element of interest to launch the wizard. The “Next” button will begin work on finding and eliminating errors.
 Click on a service to start it
Third-party applications for diagnosing and fixing errors
It's no secret that Microsoft is a leader in software development. However, quantity does not mean quality, so most standard utilities have more advanced and convenient analogues. Bug fixes are no exception to the rule. The software market offers many programs to solve various problems with Windows OS.
Microsoft Fix It
Typically, the Fix It tool is not used in Windows 10, since it is already built into the “Settings” of the system. It is this program that is used as the basis for “Troubleshooting” in the “Update and Security” section. Its interface is represented by various categories and Run buttons, which launch the process of finding and fixing errors.
 Microsoft program Fix It works in Windows OS troubleshooting environment
 FixWin 10
One of the leading programs on the market for eliminating “ten” errors is FixWin 10. Unfortunately, its interface is only in English, but it is very easy to understand. Already on home page You can see four main directions in which the program works:
- checking for system file errors;
- re-registration of Store applications if they are installed and problems appear in their operation;
- creating a restore point;
- checking and restoring OS system elements.
The Search For More Fixes button launches all four categories.
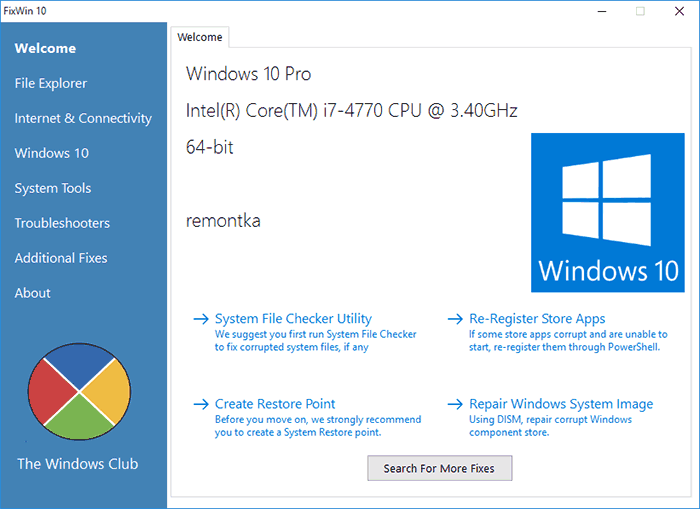 The FixWin 10 program works in four main areas of troubleshooting in Windows OS
The FixWin 10 program is comprehensive and suitable for diagnostics in all areas of the Windows OS.
Video: how to diagnose and fix Windows 10 errors using the FixWin 10 utility
AVZ
The AVZ program does a good job of finding and treating viruses and Trojans on your computer. Its technologies were borrowed by Kaspersky Lab in the product Kaspersky Internet Security. The program also specializes in finding and eliminating various types of spyware. This product is ideal for preventative diagnosis and treatment of a system due to malware infection.
 Antivirus utility AVZ does an excellent job of finding spyware and other viruses
 Video: how to use the AVZ program
Anvisoft PC PLUS
Anvisoft PC PLUS is more of a system optimizer than a troubleshooter. However, with the help of this tool it is possible to increase system performance in work and games, disable unnecessary services and minimize the impact of the operating system required, as well as fix some minor errors in the network, shortcuts, registry and much more.
 Anvisoft PC PLUS program optimizes your computer and fixes some problems
 Net Adapter Repair
The main task of the Net Adapter Repair program is to comprehensively search and solve local network, Wi-Fi and Internet connection problems. Working with the utility is very simple: after launching, check the boxes for the categories that you need to check and click the Run All Selected button. Then the program will do everything itself, correcting non-critical errors.
 The Net Adapter Repair utility is designed to find and fix network errors
 Common Error Codes
During Windows operation Various types of errors may occur, many of which can be easily corrected if you know how. To choose the appropriate method, just pay attention to the code that appears along with the problem message.
Table: common error codes, their causes and solutions
| Error code | Reason for the error | How to solve the error |
| 0x080070091 | Occurs when trying to delete a folder. Indicates problems file system or disruption of system files. | Scan your computer for viruses, then run a system scan with FixWin 10 or Microsoft Fix It. |
| 0x800F0922 | Indicates that the update files could not be downloaded from the Windows servers. | Scan your computer for viruses, then run Net Adapter Repair and the troubleshooting service in the “Windows Update” column. |
| 0x0000005 | Application launch error. Application files may be blocked or missing. | Scan your computer for viruses, then run a comprehensive FixWin 10 scan, try running the application as an administrator. |
| 0xC1900208 - 0x4000C | There is an application installed on your computer that blocks system updates. | Scan for viruses and malware. Remove all uncertified applications. |
| The sound stopped working | The audio drivers may have been damaged. | Run the FixWin 10 utility. If this does not help, go to the standard “Troubleshooting” tool in the “Sound Playback” item. |
| 0x80072efd | Error when running the application from the Store. The application files may be damaged by a virus or your account may need to be re-registered. | Check your computer for virus damage, then conduct a comprehensive scan with FixWin 10. |