Email is one of the oldest services provided on the global network. With it, users can exchange messages and transfer a variety of files. Today, despite the development of more convenient and simple messengers, email is still very popular. Without it, it is impossible to register on many sites, in addition, it is one of the main tools for the exchange of business documents.
"Rambler-Mail" appeared more than 15 years ago and has gained enough a large number of users. Even when the interest in search from Rambler has dwindled to a minimum, the email service is used by millions of people every day. This is due to the ease of memorizing addresses, old contacts and the widespread popularity of Rambler as a media portal. The Rambler-Mail settings are quite simple and accessible to everyone. For the convenience of working with e-mails, most users prefer to abandon the use of the web interface. Instead, separate client programs or applications for mobile operating systems are used. In this article, we will consider the most common options for setting up Rambler-Mail.
Settings for Microsoft Outlook
Outlook from Microsoft is one of the most widely used e-mail programs. It is used by both businessmen - because of a fairly wide and convenient set of functions, and the Rambler-Mail settings in it practically repeat other services, meanwhile there are still some features.
When you start Outlook for the first time, the program will automatically prompt you to create a new email account. If this did not happen, then you must independently launch the "Automatic Configuration Wizard" using the "Add Account" item, which is located in the "File" menu. In the course of the wizard, you must specify your name, the address and password selected during registration. Setting up "Rambler" mail in Outlook will then be performed automatically. It's simple.

or iPad
Apple devices are very popular, and Email on them is an integral function. This allows you to receive and send emails almost anywhere. Before configuring the Rambler-Mail settings, you need to make sure that mobile device has an internet connection. After that, you need to launch the Mail application. If you are setting up "Rambler-Mail" on the iPhone or iPad for the first time, and there are no other email accounts on the device, then you can immediately select the "Other" item in the window that appears. In other cases, you will first have to go to the program settings and create a new email account.
After starting the setup process, a form will appear on the screen, in which you need to enter your name and the selected address and click the "Next" button. At the second step, you need to fill in the servers for incoming messages (pop.rambler.ru) and outgoing mail (smtp.rambler.ru), and also double-enter your email address in the username and password field.
Android Settings
 Android is another very popular mobile operating system, which is installed on a huge number of smartphones and tablets. It is also quite possible to configure mail on them. "Rambler" on "Android" begins with the launch of the Email application. After that, you need to enter the settings and select "Add account", and then fill in the configuration parameters. They are similar to those for iOS. The only difference is that you need to specify the SSL / TLS security type and server port (995 for incoming and 465 for outgoing mail).
Other email clients
Rambler-Mail supports work with all clients for any platforms that can work with POP3, IMAP and SMTP protocols. To send messages, you must specify smtp.rambler.ru and port 465 (SSL) as the server. In addition, it is imperative to set the authentication setting in the program when sending messages. Depending on the selected protocol, messages are received from the pop.rambler.ru server via port 995 (SSL) or imap.rambler.ru (port 993). Before using a third-party client to send messages, you must activate the appropriate option in the Rambler-Mail settings.
Please note that these settings are suitable for all domains that can be used in Rambler-Mail. Therefore, when specifying a username, it must be entered in full, including Domain name, for example, [email protected]
Possible mistakes
Most errors when setting up "Rambler-Mail" are related to the incorrect input of the username or password. First of all, you need to make sure that they are correct.
![]()
If an error occurs when you try to send a message, then you should check the activation of the feature through the settings menu of the Rambler-Mail web interface. You also need to make sure that in mail client Authentication is enabled when sending messages. In some cases, the provider may block the operation of the standard 25th port in order to combat SPAM. In this case, it is recommended to use a secure connection to transfer mail or change the port to 587 in the client settings.
The iPhone in the 21st century is in rather high demand in all countries. High technologies and ample opportunities have made the line of this product not only popular, but also convenient in terms of communication and work with the global network. Distinctive features of such devices have always been the quality and wide opportunities for relatively quick access to certain services. However, owners of devices up to the fifth version often wonder how to set up mail on the iPhone?
As a rule, the same procedure is used for each mailer. The only difference is the data that is entered in the settings. Let's take a closer look at how to set up mail on iPhone.
Let's say your mailbox located on the @ mail.ru service. To properly set up mail on the iPhone, you will need to go to your application called "Mail", where the basic operations will be carried out. Now step by step:
1. Initially, you need to select the category "Others" and edit it.
2. In the column "Name" you must enter your data.
3. The "Address" field serves as a place where you will need to enter an email (for example, [email protected]).
4. The "Description" field is filled in at your request, but you can leave it blank at all.
5. Now we turn our attention to the "Server of incoming mail" and "Server of outgoing mail" (these fields will be variables that must be registered in accordance with one or another mail service).
5.1. Correctly fill in the "Incoming mail server":
In the field "Hostname" you need to register the value "pop.mail.ru" (without quotes);
In the field "Login" we indicate the name of your mailing address, that is, if our address is [email protected], then in the field we write "iphone" (without quotes);
In the field "Password" we write the original password of your mailbox.
5.2. Correctly fill in and install the "Outgoing mail server":
We register "Hostname" (for the mail service @ mail.ru - "smtp.mail.ru:25" (without quotes);
Press "Next" and see how the line "Confirm IMAP account information" lights up (do nothing, just wait);
When a window appears on your display stating that there is no possibility of connecting via SSL, and a proposal appears to create an account without this protocol, you will need to click "Yes";
The final step will be to click on the "POP" button, after which we save all the actions done.
How to set up mail if these procedures did not help? In fact, if you did not make any mistakes during all the above steps, then the problem may lie in the server port address. To change it, we need to go to the "Mail, Addresses, Calendars" section and select your account. We select the section "Outgoing mail server / Primary server" and already here we change the port itself (it is desirable to specify the values "25" or "465").
How for Yandex?
To do this, you only need to replace some of the values in procedures 5.1 and 5.2, which are described above:
1. If you are interested in connecting via pop3, then fill in the field of incoming messages as follows - pop.yandex.ru.
2. If you are interested in connecting via imap, then fill in the field for incoming messages as follows - imap.yandex.ru.
3. In this case, both in the first and in the second case, it is necessary to register smtp.yandex.ru in outgoing messages.
How to set up mail on iPhone for Rambler?
For Rambler, the pop3 and imap connections are identical in their settings, so the setup itself will not take much time. To properly connect your mail service here, you should register:
1. In incoming messages we indicate - mail.rambler.ru.
2. In outgoing messages we indicate - mail.rambler.ru.
Note for iPhone 5 users: On the 5th series iPhone, you will not need the full procedures described above, you will only need to fill in your personal information to directly access your mailbox.
Apple products are a kind of quality mark, a symbol of modern technology and further progress. However, these same modern technologies sometimes develop so rapidly that ordinary users not always keep up with them. As a result, it may not be an easy task for someone to set up Rambler mail on the iPhone. In order not to face similar problems, let's see how to do it correctly.
Create a profile
To access Rambler mailbox on iPhone 5 or other versions of Apple's smartphone, the first step is to create a new account. If you know how to set up mail on iPhone, then you can handle this task without any problems.
Open "Settings". Go to the "Mail, Addresses, Calendars" section.  In the Accounts field, click the Add button.
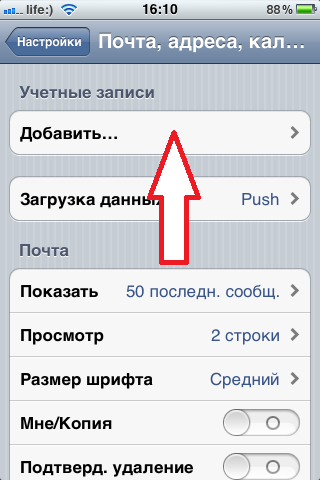
A list will appear on the screen. postal services which the iPhone works with by default. Rambler, unfortunately, you will not be able to find among these mail services.
Therefore, scroll down the screen and press the "Other" button. 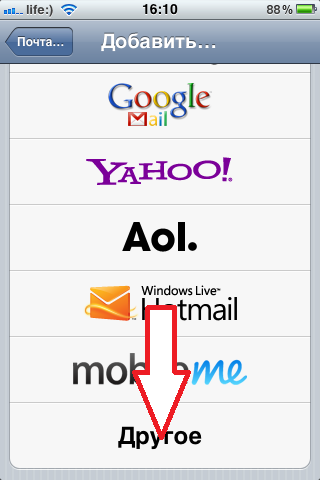
The Other menu appears. In the Mail box, click the New Account button. 
A window titled "New" will appear. Here you need to enter:

After filling in all the indicated lines, click the "Next" button.
Mail service parameters
Next, you need to specify the data for the mailbox to work. Rambler mail works through the IMAP server, so in the next window you need to select the appropriate tab. The fields "Name", "Address" and "Description" should be filled in by default.  Scroll down the screen. Here you need to specify the hostname, registered mailbox and mail password.
 ![]()
The next field is "Outgoing mail server". Be sure to specify only the hostname - mail.rambler.ru. The rest of the parameters do not need to be entered.  Click "Next" to start checking the specified data.
If you entered everything correctly, a check mark will appear next to each line, which signals that the mail is configured correctly.
The final window looks like this:  Click the "Save" button to start using the created account... If necessary, you can delete the mailbox on Rambler, as well as remove the created account from your mobile device.