Good afternoon, dear readers and guests of the blog, today we will continue to study Windows-based web services, namely, let's see how setting up SSL on IIS for one or several sites, both with one Ip address, and with several. To accomplish this task, you must have an iis web server installed, on Windows Server from 2008 R2 and higher, at the moment the most recent is Windows Server 2016.
Configuring an https site on IIS
And so about creating an iis website on windows server 2012, I already told you, it is assumed that you have it. Further, when you registered all the DNS records, you generated a request to issue a certificate and only then received your certificate from the certification authority, but it still had to be sharpened under iis, since it needs the pfx format.
A little more theory and limitations
If you have one site on https on your iis server, then there will be no problems with the certificate, but if two sites are planned, then there are already options:
- Buy a wildcard certificate to be able to hang SSL on any IIS site
- Buy an additional ip for each site
- Use the script and apply the binding of the desired SSL to the desired site, on one IP address
- Use SNI (Server Name Indication) technology
Setting up SSL in PFX
First of all, to create sites on the https protocol, you need to import the required certificate, this is done very simply. You open IIS Manager and go to Server Certificates


Through the overview, indicate your pfx archive.

Specify the password, in the line "Select a certificate store" indicate either "Personal" is suitable for normal placement, but the item "Web services hosting" is needed for SNI technology.

In essence, this is a complex SSL installation in iis, whatever you like.

Now we will bind the SSL certificate to the desired site. First, I'll check my site on the http protocol, as you can see, everything works fine.

Now we click on the desired site with the right click and select the "Change bindings" item, this is where we will configure the https in iis.

As you can see, your default site will work over the http protocol, click the add button.

We indicate for the site:
- The https type and port number, by default, is port 443, make sure it is open in your firewall.
- In the hostname, write the full name of the site.
- SSL certificate> select the one you want and save the settings.

We check your site using the HTTPS protocol, if everything is fine, then you will see a closed lock, which means that the ssl certificate is installed in IIS correctly.

Setting up multiple HTTPS sites on different ip
Let's assume you have two sites:
- api.pyatilistnik2010.ru
- new.pyatilistnik2010.ru
You need each of them to have their own ip tied to the DNS name and also a separate certificate, everything is simple here. You also raise individual sites, with the only difference that in the ip address field, specify the desired node name in the field, the address of your resource, and the required certificate itself.

We save and check if everything should work, on any of the versions of the IIS server from 7.5 to 9.

Setting up multiple HTTPS sites on one ip
Now let's imagine a situation that you have one external IP address, how to be, we are trying to hang everything on it. As a result, one of your sites will receive a 404 error, who do not know what it is, then you should go here.

The whole problem is that in IIS, according to this scenario, in the web interface, only a certificate for a domain, wildcard * .site format, can work. The asterisk implies that you can use SSL on any third-level domain. But don't you dare give up, there are two options:
- The use of SNI (Server Name Indication) technology in IIS is suitable for everything older than version 7.5, so that Windows Server 2008 R2 and lower are in the air.
- Use a script from Microsoft.
Here's an example of such a certificate.

If you have a wildcard, then everything is simple, either through the IIS manager you change everything, or through the configuration file.
C: \ Windows \ System32 \ inetsrv \ config \ applicationHost.config

Open it, IIS settings are stored here. And you can set binding for different domain names:
Now the method, if you don't have a wildcard and only one external ip on the server, is suitable for IIS 7.5 and higher. The first thing we need to do is find out the ID of your site, this is done simply, either through the IIS manager console

Or everything in the same applicationHost.config file

% SYSTEMDRIVE% \ Inetpub \ AdminScripts

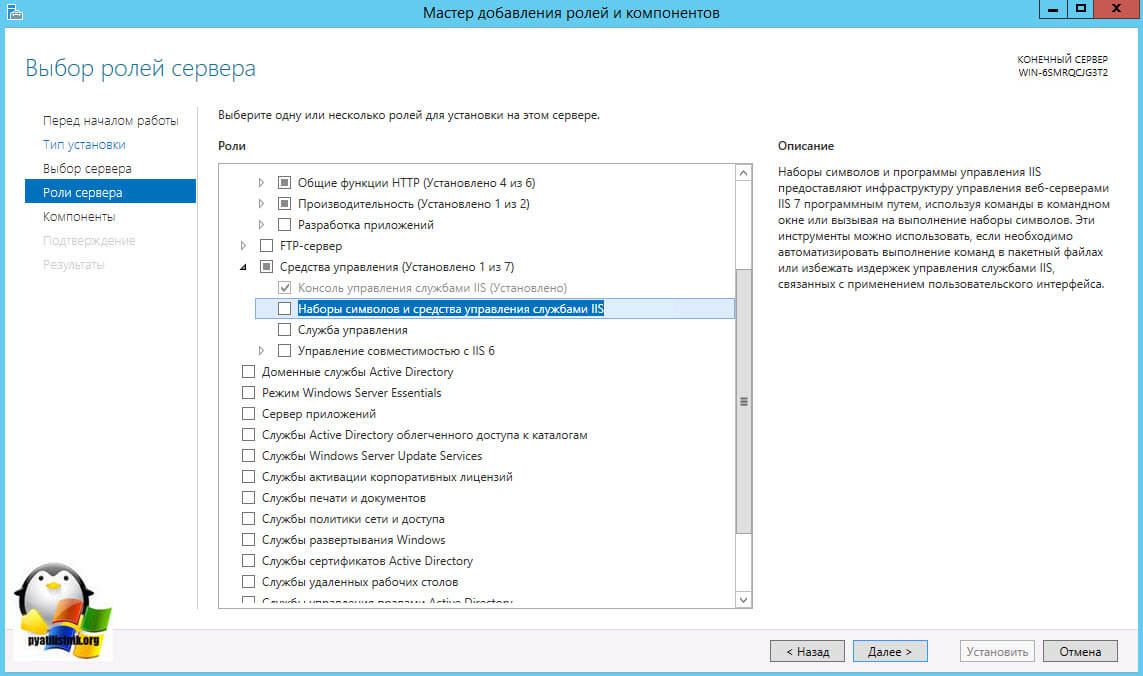
If you, for example, on IIS 8 and older do not have this file in this folder, then you need to deliver IIS Management Scripts and tools (IIS scripts and management tools
).
We continue to talk about the procedure for installing a web server running IIS 7.0 on Windows Server 2008, which was discussed in the previous post.
Now let's move on to verifying the results of the IIS 7.0 installation. The easiest way to check if the web server is working, especially from the local console, is to access from any web browser at http: // localhost /. Next, check from local and remote machines by IP address.
Installing IIS 7.0 creates a default web site that is configured to respond to any URL request made to port 80 of any network interface on the server on which IIS 7.0 is installed. Those. a browser request of type http: // localhost / should be handled as a request to the default website. By default, the content of the site consists of 2 files - iisstart.htm and welcome.png (which is displayed in iisstart.htm), which will be opened by the client. Therefore, the result of calling localhost will look like this:
Now, if everything is good (if "bad" - we will look at troubleshooting and errors later, in a separate section), make sure that all modules that should be installed by default are connected and working, and the basic configuration meets our requirements.
1. The main management tool for IIS 7.0 is the Internet Information Services (IIS) Manager console, which is installed by default along with the Web Server role in Windows Server 2008 (IIS Management Console, under Management Tools section of plug-in installation). After the appropriate installation, the IIS 7.0 Management Console can be found as a child entry under the Web Server (IIS) section under the Server Manager Roles section, or as an item in the Administrative Tools section of the Start menu, or by executing the inetmgr command (on the command line or via the Run item of the same Start menu).


2. At startup, the Internet Information Services (IIS) Manager console opens with a "home page" on which, in the form of panels, there is information about which web servers and web sites the console user has connected to before (if the console is only installed together with the Web Server ( IIS), then the console contains an entry only about the local web server), there are also links for choosing a connection to other servers, web sites, web applications and folders, as well as links to external resources dedicated to IIS.

3. In addition, the home page contains a news bar that is loaded as an RSS news feed from www.iis.net if the administrator clicks on the Enable IIS News link. By the way, the news is very useful, it is recommended to include and use this information in your daily work.


4. When connecting to any IIS 7.0 web server, the Internet Information Services (IIS) Manager console presents its configuration as a logical structure - the level of the web server itself, whose settings are global and apply by default to all web sites, application pools and, in fact, the web sites with their own settings. This configuration hierarchy, in the form of an expanding tree starting with the node named (or IP) of the web server, appears in the left pane of the Internet Information Services (IIS) Manager console.

5. If you select a node in the configuration tree, then in the central pane of the Internet Information Services (IIS) Manager console, all parameters (as well as modules or lists) corresponding to the configuration of the selected node will be displayed as separate icons, and in the right pane, a set contextual tasks and operations that the administrator (or user) can perform on this node.
6. We select the top node, the node of the web server, which contains icons that are responsible for the parameters of the operation of the modules of the entire web server, these parameters are inherited by default for all web sites. Make sure all required modules are installed and displayed. A screenshot of the default configuration setting is shown below.

7. In the right pane, when you select a website host, all operations that can be performed directly with the web server (IIS in general) in this context are displayed - restart, stop, start, go to application pools and sites.

8. Make sure Application Pools are configured. Application pools will be discussed later. Pools are a child of the configuration tree for a website host. In the default installation, only one pool is created - the DefaultAppPool, in which one application is registered - the default configured website, which we have already tested. See screenshot.

9. Below the node of application pools in the configuration tree there is a node of websites (Sites), when selected, a list of websites running on this web server is displayed. By default, one website is created called Default Web Site with an internal number (ID) equal to 1, "bound" to port 80 of all IP addresses of all network interfaces to any URL in the request, and using the directory with the path as the home directory of its content % SystemDrive% \ inetpub \ wwwroot (which is C: \ inetpub \ wwwroot when Windows Server 2008 is installed).

10. When you select the Default Web Site in the left pane of the console, just like when you select a Web server host, the central pane displays icons for accessing the configuration parameters of various modules, this time for a specific web site. We make sure that, as is the case with the entire web server, all the necessary modules are presented in the central panel.

11. In the right panel of the console, similarly to the panel for the entire web server, contextual commands are displayed, however, this time their list is seriously expanded - start / stop / restart of the website process, view its basic and advanced settings (not module parameters), binding settings (address, port, domain name - by combination of which this website will respond to requests), etc.

In principle, these steps are sufficient for a basic check of the health and integrity of the installation. But if you want to get acquainted with the "full" set of settings and the "default" configuration, you can follow the next steps.
12. Select the web server node in the configuration tree in the left pane of the Internet Information Services (IIS) Manager console. In the central pane, click on the Modules icon. The central pane will open the following complete list of installed by default modules, which is a list of dll files.

13. To make sure that the web server will work only with static files (by default) or only with the extensions you need - select the web server node again and click on the Handler Mappings icon in the central panel. A list of "bindings" of extensions of files called on the website by the user and modules bound to these extensions that process this call will open. Please note that by default all files are tied to the static files processing module (i.e., a request for any script or executable file from the home directory of the website will not lead to its execution on the server, but only to transfer this file to the user), and See also the default document and directory view modules. We'll get to know these modules later.

14. And finally, in order to make sure that the website is safe, check its authentication parameters. To do this, select the Authentication icon in the same central panel. By default, the web server (and web sites) does not support any authentication modules. Those. all connections are anonymous for him. What is the safety? This means that users will only be able to access the content of the site's home directories — files and subdirectories — that have NTFS read permissions for “Everyone”. If the file does not have such permissions, the user will be denied access with the corresponding error 401. If the user tries to authenticate in some way during the HTTP request on the server, then since no authentication modules other than anonymous are installed on the web server - it will get the corresponding 401 error again.

Such default security settings - only anonymous users - allow you to ensure the protection of data on the server, for which the appropriate permissions are required, and also - that the web server authentication mechanism (which in this case simply does not exist) will not be used to brute-force passwords and other hacking attempts "Through accounts.
So, the server is installed and its performance is checked. Now it is enough to put some static content (HTML files, images, documents and files for users to upload) to the home directory of its default site (remember that in most cases this is C: \ inetpub \ wwwroot) - and a website running IIS 7.0 will start working. Well, and of course, for external sites - do not forget to register their A-record in your domain zone on a public DNS server.
In the next part - installing IIS 7.0 in command line mode,
Open Control Panel -> Programs -> Turn Windows features on or off. We find the section "IIS" in the list. We open it and select the necessary components:
Installing the web server components
Basic set:
Security. We select all components except "Authentication with certificate matching ...".
Application development components. Basically, you only need a CGI component to install PHP later.
Common HTTP functions. We mark all the items.
Performance check and diagnostics. Select "HTTP Logging" and "Request Monitor".
Performance enhancement functions. We mark all the items.
Website management tools. We mark only "IIS Management Console". 
When all items are selected, click "OK". When the installation is complete, be sure to reboot!
Now let's move on to creating a website. Open the Control Panel -> System and Security -> Administrative Tools -> Computer Management (as quickly as possible: Start menu -> right click on Computer -> select Management from the menu). In the window that opens, expand the "Services and Applications" group and open the "IIS Manager". In the "Connections" window, select the "Sites" folder, then in the right-hand Actions window, click on the "Add website" link.
Testing the created website
And finally. For the site to be accessible from the outside, it is necessary to open the 80th port for incoming connections. Let's do this using the example of the standard Windows 7 firewall:
Open Control Panel -> System and Security -> Windows Firewall -> Advanced Options. In the list, you must enable the Internet Services (inbound HTTP) rule:
Opening port 80 in Windows Firewall
In this basic installation mode, the web server can only display static pages (normal HTML + JavaScript). Expanding its capabilities - installing support for ASP, ASP.NET or PHP. Next, we'll talk about installing PHP on IIS in FastCGI mode.
Install PHP (FastCGI)
The optimal web server for PHP is Apache, but there are times when you need to install PHP on IIS. A lot of work has been done by the developers lately to increase the performance of PHP on IIS.
Before installing, you need to download the PHP release from the site http://windows.php.net/download/. There are several options out there. We need a VC9 x86 Non Thread Safe release. For FastCGI operation, this is the most reliable option. It is better to download the release with the installer, and not the zip archive (this is for manual installation).
Next, run the installer. After several windows you will be prompted to select a web server and PHP mode.
Today we will learn with you install IIS web server on Windows Server 2016 operating system in several ways, namely using a graphical tool and, of course, using Windows PowerShell.
What is IIS 10?
IIS (Internet Information Services) Is a set of services designed to implement a web server in the Windows operating system with support for HTML sites and ASP.NET or ASP applications. In Windows Server, it is distributed as a separate role with a fairly large number of role services. Earlier in the article "Description and Purpose of Server Roles in Windows Server 2016" we looked at a brief description of all server roles and their services, including the role " Web Server (IIS)"Therefore, repeat now, ie. I will not describe each of the role services.
The current version of the server operating system Windows Server 2016 also contains the newest version of the web server, namely IIS 10.
IIS web server versions
| IIS version | Operating system version |
| 10 | Windows 10; Windows Server 2016 |
| 8.5 | Windows 8.1; Windows Server 2012 R2 |
| 8.0 | Windows 8; Windows Server 2012 |
| 7.5 | Windows 7; Windows Server 2008 R2 |
| 7.0 | Windows Vista; Windows Server 2008 |
| 6.0 | Windows Server 2003 |
| 5.1 | Windows XP Professional |
| 5.0 | Windows 2000 |
Installing the IIS 10 Web Server
So, let's move on to examining the installation process, and for example, let's just install the basic components that are necessary for the functioning of the web server and its administration ( controls), and also place a simple HTML page on it, i.e. essentially an HTML site to test the web server. If you need to host applications, for example on ASP.NET, then you need to also install the corresponding role services from the section " Application Development».
Installing the IIS web server using the wizard
First, let's walk through the process of installing an IIS 10 web server using “ Server manager", And more specifically" Add Roles and Features Wizards».
Step 1
Open the server manager " Start -> Server Manager».
Then we run " Add Roles and Features Wizard", Menu" Management -> Add Roles and Features».


Step 3
Then we select the installation type “ Installing roles or features", Click" Further».

Step 4
Then select the target server and click " Further».

Step 5
At the step of choosing roles, mark the role “ Web Server (IIS)". You will be automatically prompted to install the component " ", We agree and click" Add components».


Step 6
We have already marked all the necessary components, so at this step we also immediately click “ Further».

Step 7
Now we need to configure the installation of the role " IIS web server", First press" Further».

And then we select the necessary role services, by default the minimum number of services will already be selected, but if you need something else, then tick them. For our test problem, i.e. host a simple static HTML site, the default services will be enough, click " Further».

Step 8
We check the selected roles, services and components and click " Install».

The installation will complete as soon as a message appears.

Installing the IIS web server using Windows PowerShell
To install the IIS web server using PowerShell, start Windows PowerShell and enter the following commands ( the commands below will install all the same services that we installed using the wizard just above).
Default document
Install-WindowsFeature -Name "Web-Default-Doc"Catalog overview
Install-WindowsFeature -Name "Web-Dir-Browsing"
Http errors
Install-WindowsFeature -Name "Web-Http-Errors"
Static content
Install-WindowsFeature -Name "Web-Static-Content"
Filtering requests
Install-WindowsFeature -Name "Web-Filtering"
Http logging
Install-WindowsFeature -Name "Web-Http-Logging"
Install-WindowsFeature -Name "Web-Stat-Compression"
Internet Information Services Management Console
Install-WindowsFeature -Name "Web-Mgmt-Console"

Hosting HTML site on IIS web server
The first thing to do is to create the root directory of our test site, for this in the directory C: \ inetpub \ create a folder TestSite and add the index.html file with the following content to it for checking, for example
<Н1>Test site
Then we open “ Internet Information Services (IIS) Manager", This can be done, for example, from the server manager" Tools -> IIS Manager».

Then we right-click on the item " Websites -> Add Website».

A window for adding a website will open, fill in the required fields and click " OK» ( TestSite in my case is the name of the site).

Now we can check the operation of the web server and the newly created site, for this we open any web browser and go to the TestSite site ( just remember, in order for you to open a site by name just like mine, it must be added on the DNS server (A record created) or at least for tests a record must be added to the HOSTS file of the local server).

Removing the IIS web server using the wizard
To remove the IIS web server, open the server manager, then click on the menu " Management -> Remove Roles and Features».

As a result, “ Remove Roles and Features Wizard", Where we do almost the same thing as during installation, only we do not check the boxes, but remove them.

Removing the IIS web server using PowerShell
To remove the IIS web server on PowerShell, start the Windows PowerShell shell and use the cmdlet Uninstall-WindowsFeature... To remove the following IIS Web Server Role Services, you can use the following commands:
Default document
Uninstall-WindowsFeature -Name "Web-Default-Doc"
Catalog overview
Uninstall-WindowsFeature -Name "Web-Dir-Browsing"
Http errors
Uninstall-WindowsFeature -Name "Web-Http-Errors"
Static content
Uninstall-WindowsFeature -Name "Web-Static-Content"
Filtering requests
Uninstall-WindowsFeature -Name "Web-Filtering"
Http logging
Uninstall-WindowsFeature -Name "Web-Http-Logging"
Compressing static content
Uninstall-WindowsFeature -Name "Web-Stat-Compression"Internet Information Services Management Console
Uninstall-WindowsFeature -Name "Web-Mgmt-Console"
Here we are with you and learned how to install and uninstall the IIS web server in the Windows Server 2016 operating system, and that's all for now!
A web server is some kind of program (service) that accepts HTTP requests from clients, usually from web browsers, which processes these requests and gives them a response, usually together with an HTLM page (site), image, file, media stream or other data. Below we will take a closer look at the installation process of such a service, namely the IIS 8 (Internet Information Server) web server included in the delivery.
1. Installing the IIS web server
Launch Server Manager. It can be launched from the shortcut on the taskbar, or by running the command servermanager.exe(To do this, press the key combination Win + R, in the window that appears in the field “ Open"(Open) write the name of the command and press" OK»).

In the server manager, in the menu located in the upper right corner of the window, select " Control"(Manage) -" Add roles and components»(Add Roles and Features)

The Add Roles and Features Wizard starts. Click " Further»(Next) on the start page.

Installation Type, mark “ Installing roles or features"(Role-based or feature-based installation) and click" Further"(Next).

We select the current server from the server pool (Select a server from the server pool) and again click “ Further"(Next).

In the next step, select the role to be installed. In our case, this is the role “ Web Server (IIS)"(Web Server). We mark it in the list.

In this case, the wizard will offer us to add the components required for the Web server, namely “ Internet Information Services Management Console"(IIS Management Console). We agree to install additional components by clicking " Add components"(Add Features) and click" Further"(Next).

Leaving the list of components unchanged, press “ Further"(Next).

After reviewing the information about the role of the web server, click again " Further"(Next).

Then you need to select the role services to be installed for the web server. This set depends on the specific tasks that the IIS server will perform.

Also, this site can be viewed from any other computer on the network by typing in the IP address of the computer where the IIS web server is installed.

The files of this site, like the files of all other sites added later, are located by default in the directory C: \ interpub \ wwwroot.

Well, and accordingly, in order for the sites located on this web server to be accessible from the Internet by an external IP address or domain name (read how to bind a domain name to an IP address), you need to perform a forwarding on the router 80 port to the computer with the IIS web server installed.

2. Restarting the IIS server
Sometimes it is necessary to restart the IIS web server. This can be done both from the IIS Manager by right-clicking on the server in the connections window or from the menu “ Actions»(Action)

and from the command line by running the command
Iisreset / noforce<имя_компьютера>
- parameter / noforce is optional and is used to protect against data loss when Internet Information Services (IIS) cannot be stopped within a one-minute time-out period.
- parameter <имя_компьютера> also optional when working on a local computer. In case of remote administration of the IIS server as a parameter<имя_компьютера>specifies the NetBIOS name of the computer on which IIS is being restarted.

When you restart the IIS web server, the following services are restarted (if they were installed during the installation of the IIS component):
Did this article help you?